
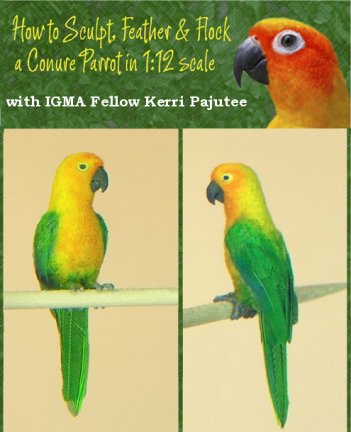
Learn To Sculpt
1:12 Conure Parrot
with IGMA Fellow
Kerri Pajutee
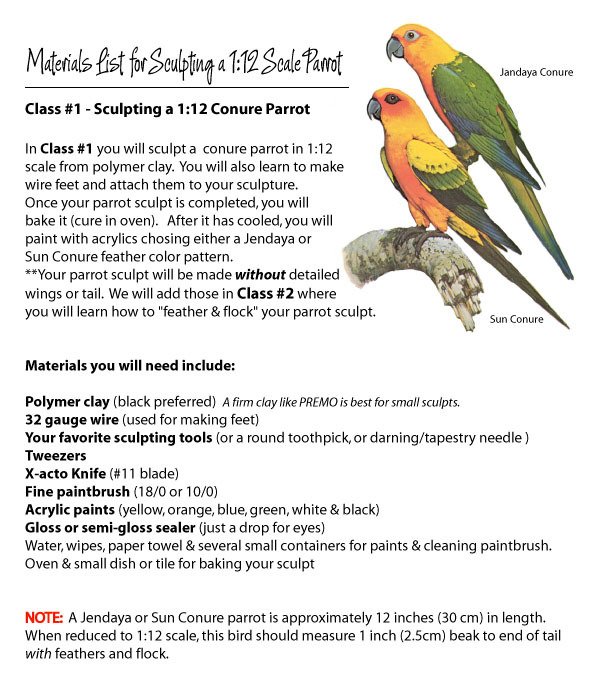
Materials Needed:
- Polymer Clay: Black (preferred)
- Acrylic Paints
- Black
- Blue
- Green
- Orange
- White
- Yellow - Sealer: Gloss or Semi-Gloss for Eyes
- Tools
- Your Favorite Sculpting Tools or a Round Toothpick or Darning/Tapestry Needle
- Tweezers
- X-acto® Knife: #11 Blade - Wire: 31-32 gauge wire (0.226 - 0.200 millimeters) *also called "bead wire".
- Paintbrush: Fine 18/0 or 10/0
- Water: Cup
- Baby Wipes
- Paper Towels
- Zap-A-Gap® (an optional gap filling formula for making wire feet)
- Several Small Containers for Paints & Cleaning Brushes
- Small Dish/Tile For Baking Sculpture On
- Oven
 Close-up images of materials needed
Enlarge picture of material requirements
OVERVIEW
This tutorial will be split into 2 separate classes: In Tutorial #1, you will learn how to sculpt the basic form of a 1:12 scale Conure Parrot from polymer clay using simple sculpting tools, as well as create and attach wire feet. You will bake/cure your polymer clay sculpt in the oven and add color using acrylic paints.
In Tutorial #2, you will learn to cut feathers to size; make your own flocking; and glue the feathers and flock onto your parrot sculpt. There is also a tutorial on how to dye feathers and thread to use for 1:12 or smaller scale feathering and flocking.
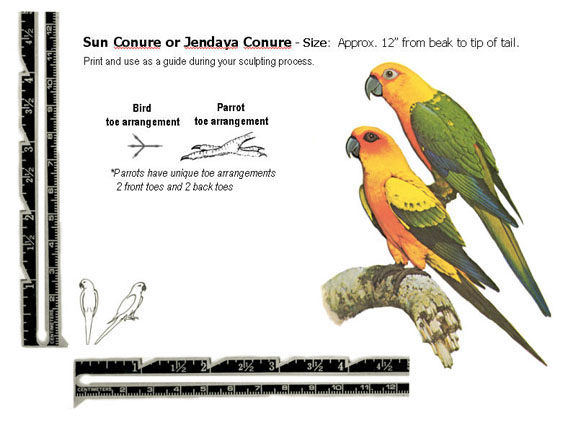
For this project, we will focus on the Sun Conure & Jendaya Conure Parrot.
In nature, these birds grow to 12 inches (30cm) in length (from the beak to end of tail). Re-creating this beautiful parrot in 1:12 miniature scale presents a challenging and rewarding adventure. NOTE Because of its small size (the basic sculpture form is only ¾ inch in length), this tutorial will require an intermediate to advanced skill level in working with polymer clay.
This tutorial will be split into 2 separate classes: In Tutorial #1, you will learn how to sculpt the basic form of a 1:12 scale Conure Parrot from polymer clay using simple sculpting tools, as well as create and attach wire feet. You will bake/cure your polymer clay sculpt in the oven and add color using acrylic paints.
In Tutorial #2, you will learn to cut feathers to size; make your own flocking; and glue the feathers and flock onto your parrot sculpt. There is also a tutorial on how to dye feathers and thread to use for 1:12 or smaller scale feathering and flocking.
For this project, we will focus on the Sun Conure & Jendaya Conure Parrot.
In nature, these birds grow to 12 inches (30cm) in length (from the beak to end of tail). Re-creating this beautiful parrot in 1:12 miniature scale presents a challenging and rewarding adventure. NOTE Because of its small size (the basic sculpture form is only ¾ inch in length), this tutorial will require an intermediate to advanced skill level in working with polymer clay.
 1. Before you begin the actual sculpt, you will need to print the Conure Parrot Template, see image. It will be helpful to refer back to in keeping your sculpt to scale and basic form, as you advance through the steps, and when you chose a color pattern for painting your parrot.
Enlarge picture showing the parrot template
TIP
Before you start to shape your chosen brand of polymer clay, its a good idea to condition it first by kneading. I highly recommend using a "firm" clay such as Premo®, Kato® or "old" Fimo® Classic. Using a soft polymer clay for extreme miniature sculpts can be frustrating, as it tends to be "gum-like", stick to your fingers, and not hold it's shape during the sculpting process. If you find your clay becomes too soft and is not holding it's shape - place it in the freezer for a few minutes to firm it up before proceeding.
Before you start to shape your chosen brand of polymer clay, its a good idea to condition it first by kneading. I highly recommend using a "firm" clay such as Premo®, Kato® or "old" Fimo® Classic. Using a soft polymer clay for extreme miniature sculpts can be frustrating, as it tends to be "gum-like", stick to your fingers, and not hold it's shape during the sculpting process. If you find your clay becomes too soft and is not holding it's shape - place it in the freezer for a few minutes to firm it up before proceeding.
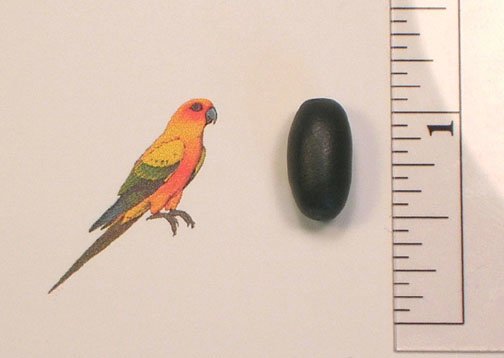
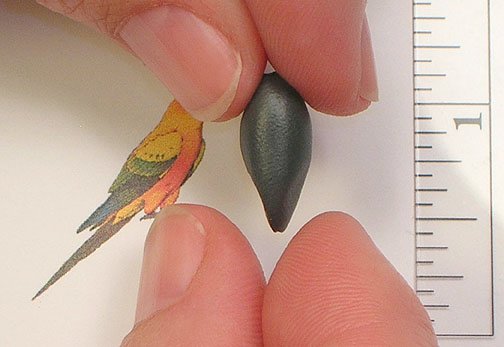
 2. Begin with a piece of clay about ½" x ¼" wide - as shown in the photo. For this sculpt, I chose black clay because the beak of this parrot is black and the sculpt will look more natural once the clay has been baked and cured.
Enlarge picture showing size of ball to make the parrot
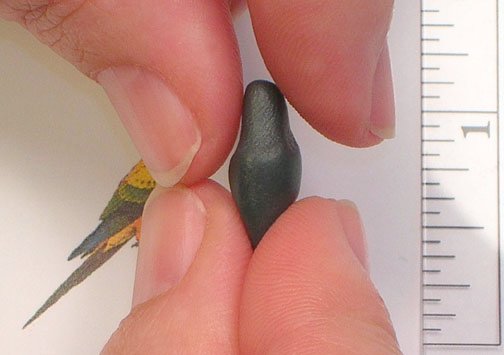
 3. Using your thumb and finger, pinch the bottom half of the clay into a "V" shape. This will help define and form the tail of your parrot.
Enlarge picture showing how to shape the body and tail
 4. Next, gently hold the tail end and use your fingers to begin to shape the neck and head of your parrot. At this early stage, you are simply forming a basic shape.
Enlarge picture showing how to form the basic neck and head
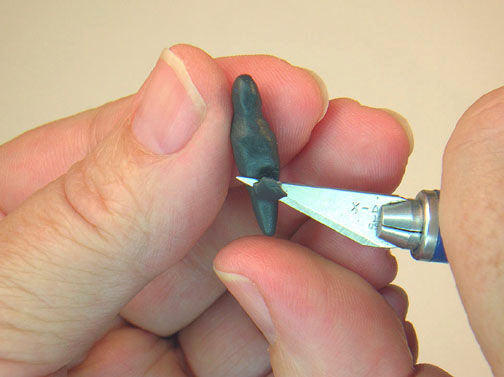
 5. Once you have formed the basic shape with your fingers, you may need to use your X-acto® knife to trim away any excess clay. How much clay you trim away, will depend on what your form looks like at this point. If it looks a little plump, carefully carve very small amounts of clay away until you are pleased with it. Hold your sculpt gently - try not to squeeze and use caution with the X-acto® knife - it's very sharp!
Enlarge picture showing how to trim off excess clay
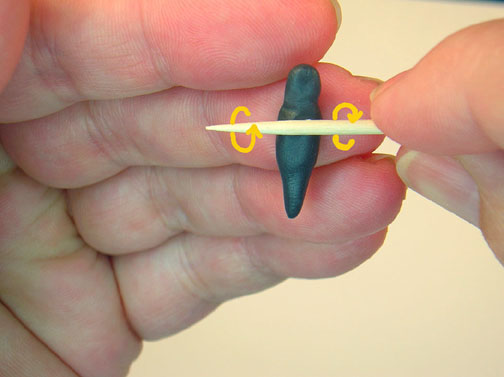
 6. After you have trimmed your desired amount of clay with the X-acto® knife, use a sculpting tool (or toothpick/cocktail stick) to continue to smooth and shape the clay. This sculpt is so delicate, that simply rolling your sculpting tool along the surface will help shape and define your parrot form.
Enlarge picture showing how to shape and smooth
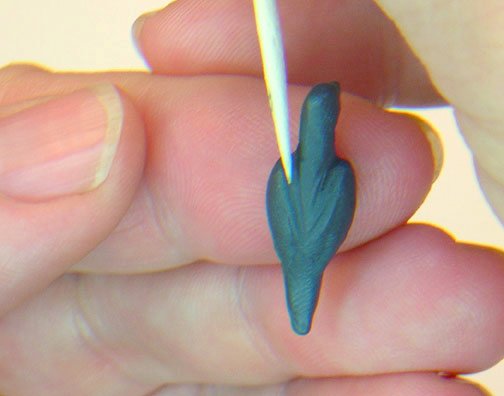
 7. Keep refining your parrot using your sculpting tool. Make sure you shape the parrot as evenly as possible on both sides. So far, this parrot's head is facing in a forward direction. Keep it pointed forward until you have finished with all the detailing. You will "pose" your parrot later.
In this photo, I have started to define the wings. If you find that you need more clay to "build out" the sides of your parrots wings - just add a little bit (a small amount of clay at a time), then smooth your "added clay" into the parrot sculpt until you achieve a similar shape. Take your time.
Enlarge picture showing how to define the wings
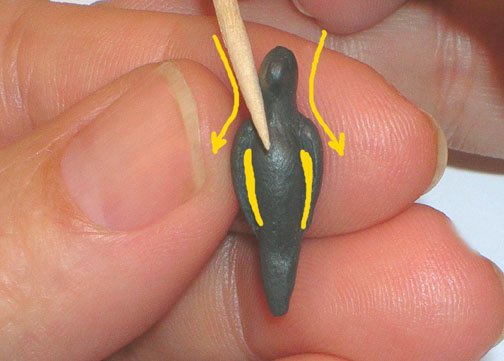
 8. Use your sculpting tool to define the area under the wings. To do this, gently scribe a line (or crease) into the clay using the tip of your sculpting tool. Make a line (or crease) on each side. Continue to work the clay, smoothing the line and defining as you go.
Enlarge picture showing where to place a crease under the wings
TIP
I know it's difficult - but try not to "grip" your sculpt too tightly as you work. You don't want to damage your parrot shape and detail at this stage.
I know it's difficult - but try not to "grip" your sculpt too tightly as you work. You don't want to damage your parrot shape and detail at this stage.
 9. Turn your sculpt to the side and check your wing lines. Do they gradually taper back as in this photo? If not, make the adjustment with the tip of your sculpting tool, then define and smooth the clay.
Enlarge picture checking the wing lines
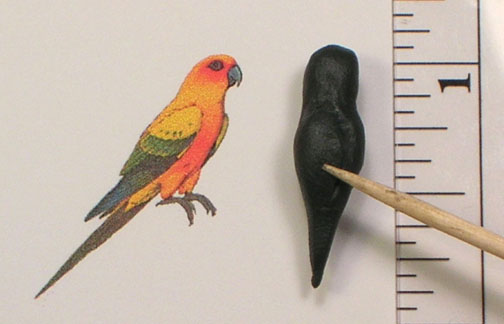
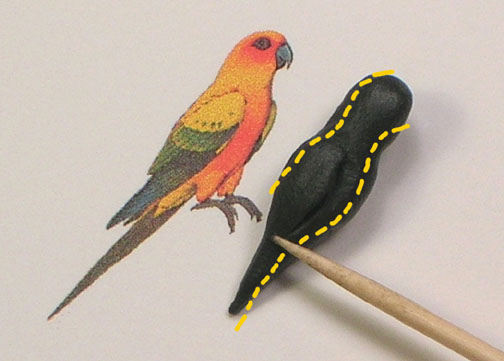
 10. Time to check your parrot sculpt to the example 'Conure Template' (Step 1). How does your parrot form look? From this photo, I can see that "my" parrot form is still a bit "plump", so it will need some additional trimming with the X-acto® knife. I will not extend the length of my parrot wings or tail.
Enlarge picture to see results of the parrot shape
 11. Here I have shown where "my" parrot form was a bit "plump" compared to my scale example. In this photo, I have made yellow dotted lines to show you where I will prudently trim away the excess clay with my X-acto® knife. Once I have trimmed the excess clay away, I will smooth out the X-acto® cut and edge marks with a sculpting tool.
Enlarge picture showing where to trim off the excess clay
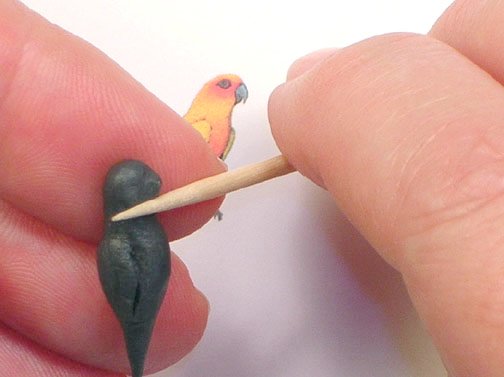
 12. Next, you will begin by defining the shape of the head, cheek, throat and beak area. Start, by gently pressing into your clay sculpt with your sculpting tool. Do not apply too much pressure with your tool here -- such a tiny form calls for a very delicate touch.
Enlarge picture showing how to define the head area
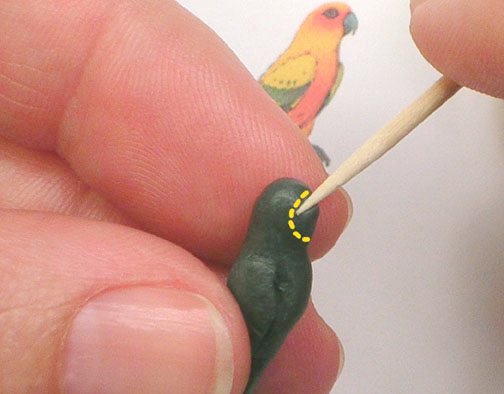
 13. Again, It helps to look at your parrot sculpt head on. Check to make sure that both sides are evenly matched. You will need to define the beak area by using the end of your sculpting tool and very lightly scribing the beak outline into the clay. First one side, then the other.
Enlarge picture showing where to check the evenness of the head sculpt
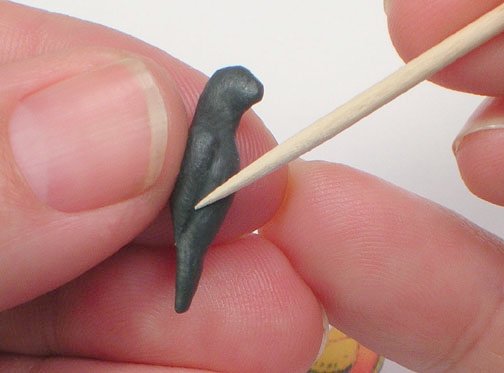
 14. Because this parrot is an extremely small sculpt in polymer clay, it can be challenging to shape at this stage. Keep at it with the tip of your sculpting tool. Press and define until you are happy with it.
Enlarge picture where to check shape
 15. Turn your parrot sculpt left and right as you shape the chin and beak. Keep your line detail even on both sides. Make slight adjustments if needed.
Enlarge picture checking both sides of the head
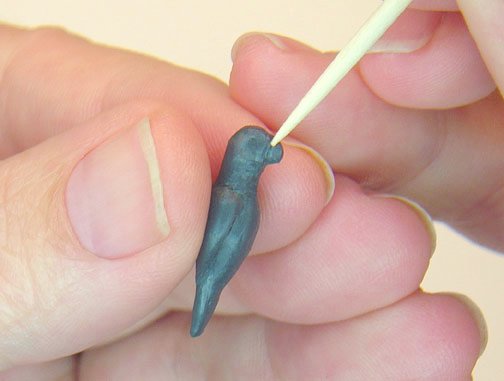
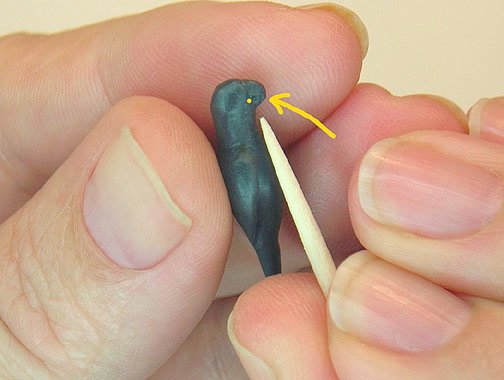
 16. When you get the overall beak shape to where you are happy with it - then you are ready to scribe a line into the clay, detailing the upper and lower mandible (mouth). I have indicated the approximate starting point with a yellow dot in the photo example. Using the tip of your sculpting tool scribe a fine curved line. Do this on both left and right sides of the beak.
Enlarge picture showing where to scribe the mouth
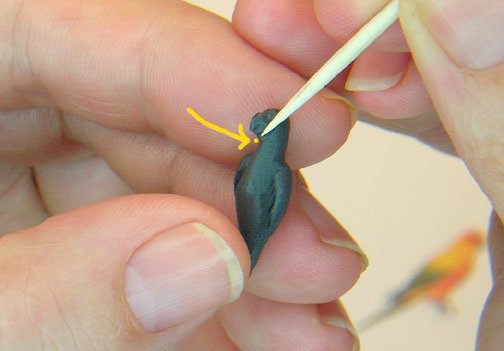
 17. Here you can see the upper and lower mandibles separated by a scribed line.
Enlarge picture showing the scribed line
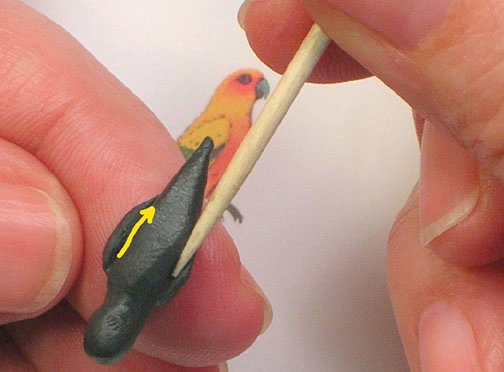
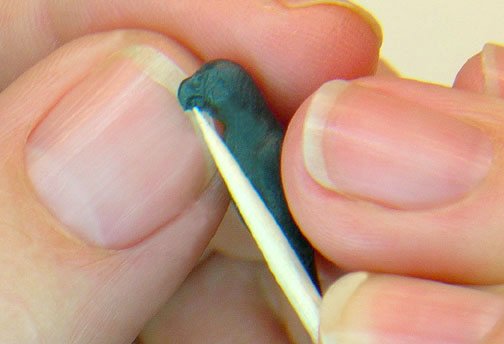
 18. A final word about the parrot beak. The upper mandible has a small, curved, sharp point to it. If you chose to, take your sculpting tool and press in this detail with the tip. If you do not want to risk messing up your beak detail at this point, wait until after you bake your sculpt and cut or carve this detail when the clay is hard.
Enlarge picture showing how to add a curved point to the beak
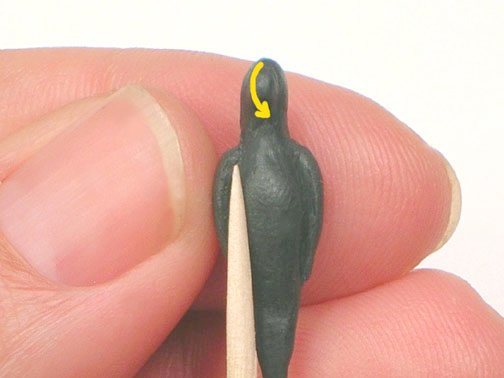
 19. Now you are ready to work on the back of your parrot form. Carefully turn your sculpt over in your hand. With your sculpting tool, lightly press a "V" shape into the back. This helps to define the back of the wing area.
Enlarge picture showing how to work detail on the back of the parrot
 20. After you have a "V" shape pressed into your clay, smooth with your sculpting tool. When you have finished defining the back of your parrot, set your sculpt aside (in a safe & dust-free place).
Enlarge picture showing how to mark a "V" shape on the back form
TIP
Are you ready to make two tiny wire feet? Time to wash the polymer clay off your hands, collect your ruler, wire and scissors and lets begin.
These next steps can be taxing as you learn how to cut, wrap and twist wire into tiny parrot feet. Making these detailed wire feet will really add to your parrot sculpt; as you will be able to position them around a perch or branch. However, if you find assembling these feet too difficult - merely replace them with two strands of twisted wire (without the toes) and advance to baking your parrot sculpt.
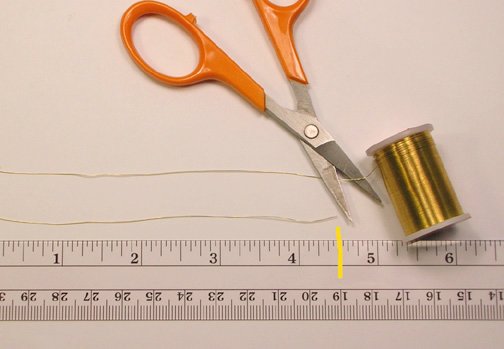
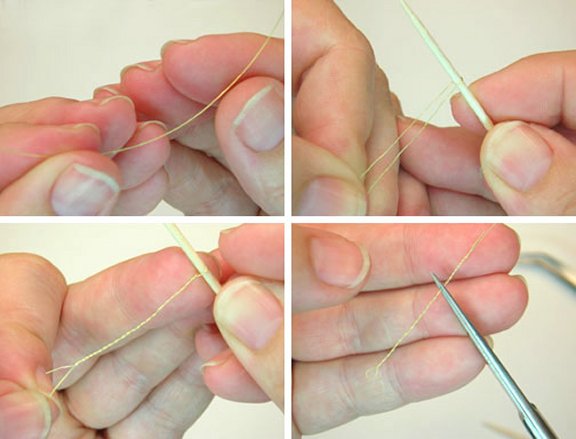
 21. Measure out and cut (2) 4.5" lengths of 31-32 gauge wire (0.226 - 0.200 millimeters) *also called "bead wire".
Enlarge picture showing length of wire
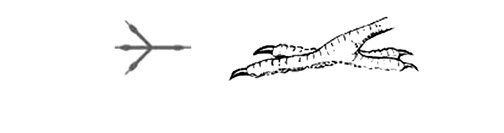
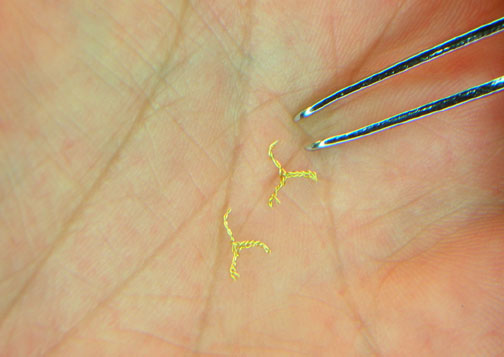
 22. Parrots have a unique toe arrangement. This photo shows a typical bird toe arrangement compared to a parrot toe arrangement (2 toes forward and 2 toes back).
Enlarge picture showing parrot feet
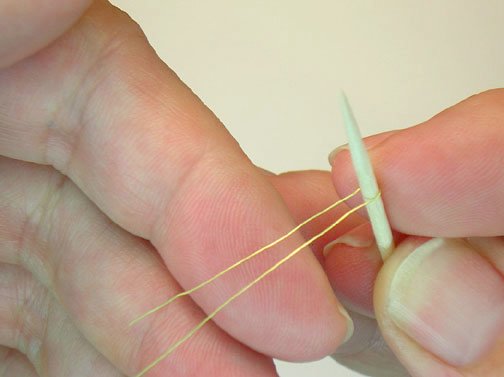
 23. Take your 4.5" wire strand in hand and bend into a 90 degree angle at about 1". This point will be the beginning of the leg and where you will start the first toe loop.
Enlarge picture showing where to bend the wire
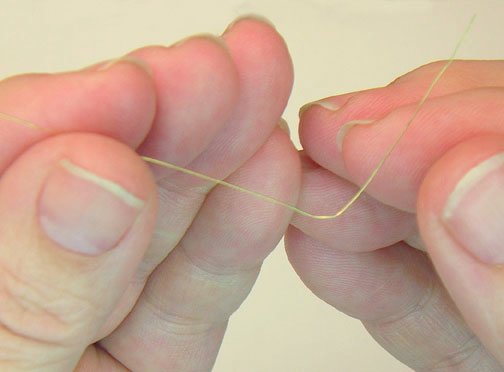
 24. You will need a toothpick or cocktail stick for this next step. Take your wire and begin to wrap it once around the toothpick.
Enlarge picture showing how to wrap the wire
 25. Make a single loop and twist the long end of your wire several times around.
Enlarge picture showing how to make a single loop and twist
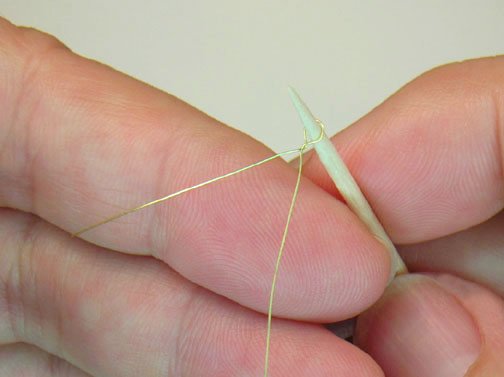
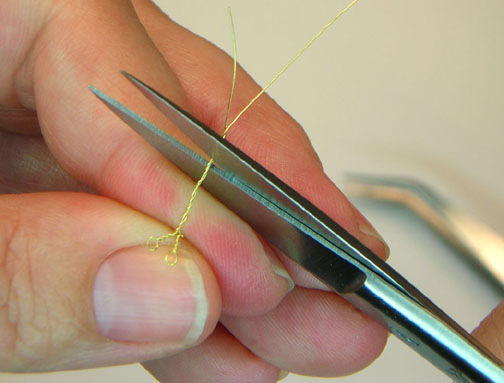
 26. Next, take a pair of tweezers and grip the long ends of the wire. Using the tip of your toothpick inserted into the loophole, twist the wire in the direction of the loop. Twist several times.
The photo shows what twisted toe #1 should look like. You are now ready to begin toe #2.
Enlarge picture showing where to use the tweezers and twist
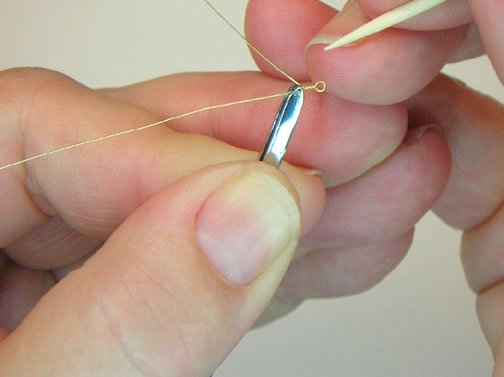
TIP
When working with extremely fine wire, you only need to twist the wire a few times. Do not over twist (or twist too tightly) as your wire will break - and you will have to start over.
When working with extremely fine wire, you only need to twist the wire a few times. Do not over twist (or twist too tightly) as your wire will break - and you will have to start over.
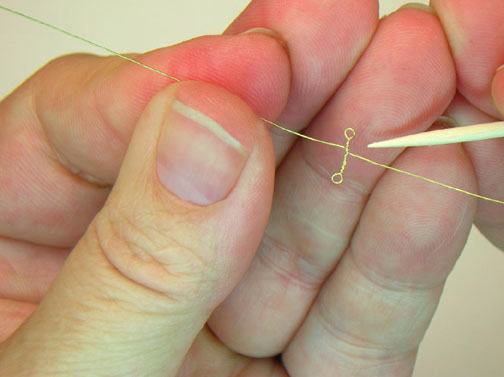
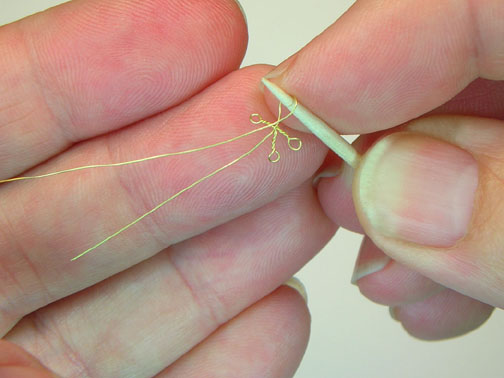
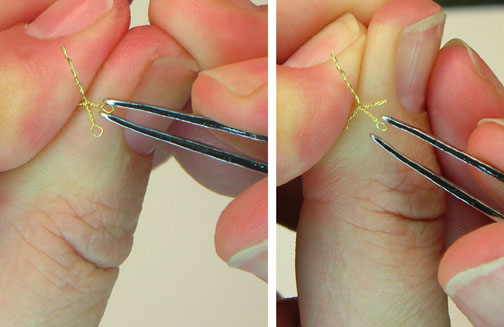
 27. To start toe #2 - take the long end of the wire and make another loop around the toothpick.
Enlarge picture showing how to make the second toe
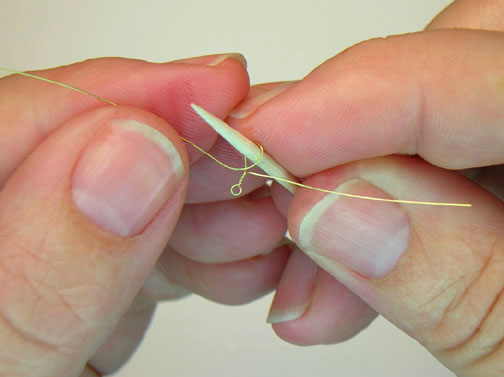
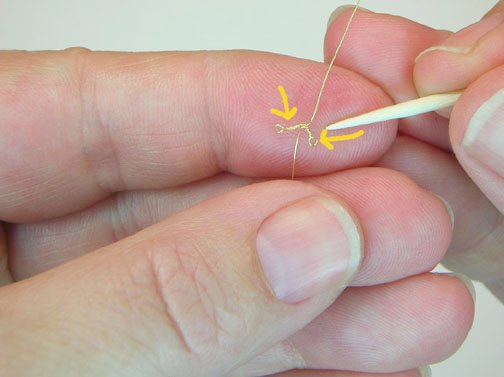
 28. Repeating Step 24. Grip the end with tweezers, while using the tip of your toothpick inserted into the loophole. Twist the wire in the direction of the loop several times.
Your parrot feet wire should look similar to the photo example.
Enlarge picture showing steps using the tweezers
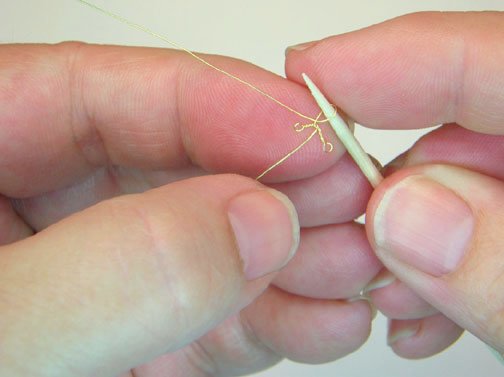
 29. Before beginning toe #3, bend the first two toes downward. Doing this, will give you room to complete the two remaining toes.
Enlarge picture showing how to make the third toe
 30. Begin toe #3 in the same manner as toe #1 and toe #2. Loop your wire around the toothpick and twist.
Enlarge picture showing how to loop the wire
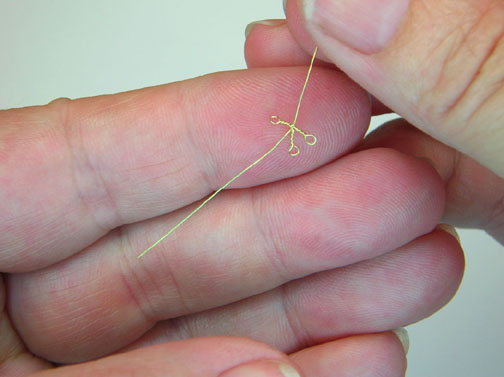
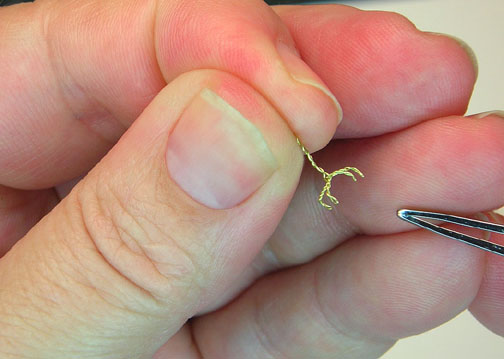
 31. Grip the end of toe #3 with tweezers, while using the tip of your toothpick inserted into the loophole. Twist the wire in the direction of the loop several times. You have completed toe #3 and your wire should look similar to the photo example.
Keep with it! You have completed 3 toes so far and have one more to go!
Enlarge picture showing the three completed toes
 32. Begin toe #4 by looping your wire around the toothpick and twist several times. You got it -- just like the previous steps, finish twisting toe #4 using the tip of your toothpick.
Enlarge picture showing how to make the fourth toe
 33. When you have completed toe #4 - your wire parrot feet should look similar to the photo example.
Enlarge picture showing parrot foot after four toes
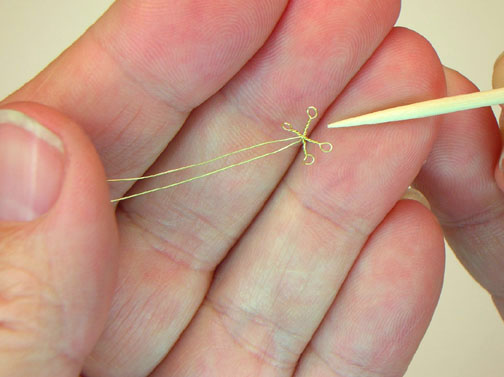
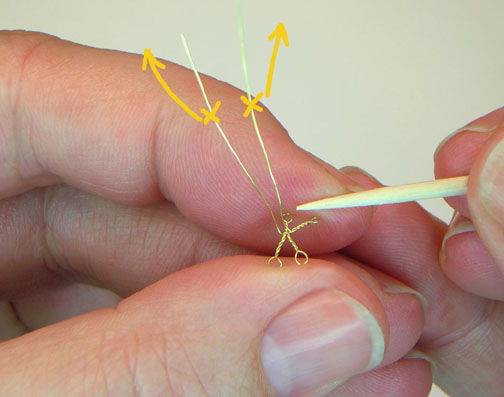
 34. Now, that you have "mastered" the toes, you will need to finish twisting the leg wires together. Begin, by taking the two long ends of wire and bend them upwards. The long ends of wire are marked with a yellow "X" in the example photo.
Enlarge picture showing how to finish the leg wires
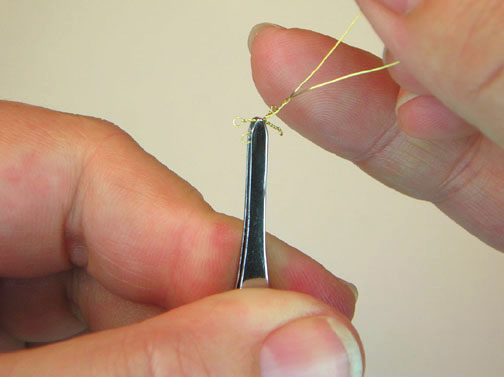
 35. To twist the two "leg" wires together - first grip the toe ends with tweezers. Next, begin to twist the two "leg" wires together. You do not have to twist all of the remaining wire lengths - only twist until your leg reaches the length of 1/2".
Patience is key here. Take your time and do not twist too tightly or your wire may break.
Enlarge picture showing the twisting of the wire legs
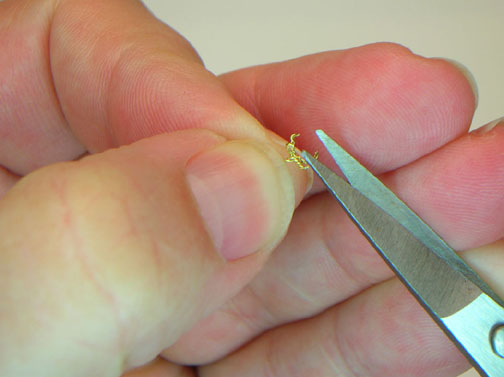
 36. Finally clip the leg wire with scissors. Do not worry if some of your toes appear longer than the others. You will "fine tune" these in the next step.
Enlarge picture showing where to snip the wire
TIP
It may seem that you are "wasting" wire in this process by clipping away the excess. For this project, I thought it would be easier to use a longer wire length. As you get better at making your wire parrot feet - you may chose to cut and use a shorter length so you don't have to trim away as much excess in the end.
In the next couple of steps, you will "fine tune" your wire parrot feet.
 37. To begin fine tuning, take hold of the twisted "leg" end with your fingers. With a pair of tweezers in hand, finish out the toes by pinching the tiny end loops flat. Pinch all four toes.
Enlarge picture showing how to fine tune the feet
 38. Bravo! You now have one completed parrot foot. Dont do a happy dance yet -- you still need to complete one more parrot foot. Take a breath, and go back to Steps 21 thru Step 35, repeating the entire process. Then meet me back here at STEP 37
Enlarge picture showing one completed foot
 39. When you have completed your parrot feet, you may chose to clip the toes a bit shorter, depending on how may times you twist the wire or if one or two of your toes appear a bit longer. Just take a pair of scissors and "snip" back the toes until you are happy with the results. Be careful not to "snip" too much toe or you will have to make another foot.
Enlarge picture showing how to clip the toes
TIP
If you are worried about the wire ends becoming "sharp" or unraveling after you have snipped them no worries. You can use a very small amount of Zap-A-Gap formula applied to the toe end with the tip of a toothpick. Zap-A-Gap is like super glue so when you use it, be careful you do not end up gluing your toothpick or fingers to your parrot foot.
If you are worried about the wire ends becoming "sharp" or unraveling after you have snipped them no worries. You can use a very small amount of Zap-A-Gap formula applied to the toe end with the tip of a toothpick. Zap-A-Gap is like super glue so when you use it, be careful you do not end up gluing your toothpick or fingers to your parrot foot.
 40. This photo shows two completed parrot feet, with leg ends clipped and slightly bent at an angle. You are almost ready to attach the parrot feet to your sculpt and bake. First though, you need to retrieve your parrot sculpt and make a few minor adjustments.
Enlarge picture showing minor adjustments to the feet
 41. Alternative Parrot Feet
O.K., so making those complicated parrot feet is just not your idea of having fun. The good news is you can "cheat" a bit here. These "cheat feet" will not have the detailed toes -- but will do in a pinch. This photo shows you how to make simple twisted wire "legs" which you can substitute for "detailed wire feet". Below are directions for making cheat feet (or twisted wire legs).
1. Take a 2" wire length and bend it in half.
2. Using your toothpick, wrap your wire.
3. Holding the wire ends together with your fingers, begin to twist the toothpick.
4. Clip the leg ends to a desired length.
Enlarge picture showing an alternative method of making feet
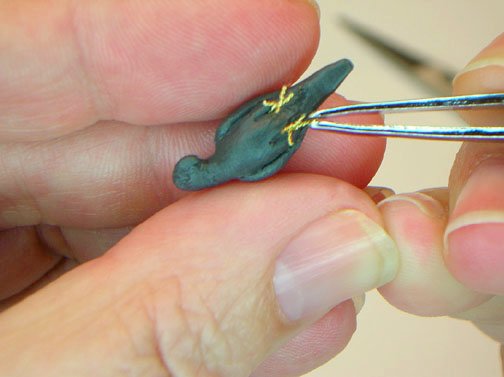
 42. Before adding the wire feet, take your parrot sculpt in hand and very gently press into clay with your sculpting tool. This area is where you will insert the your wire feet.
Enlarge picture showing where to indent to insert each foot
 43. Grip a completed parrot foot with your tweezers and carefully "insert" the leg end into your sculpt using an upward motion. Your parrot foot "leg ends" should not exceed ¼" in length as you may risk running the leg wire through your sculpt and out the other end. If the "leg end" wire looks too long, trim it back a bit, before you insert it. Do not trim the "leg ends" too short. If your "leg end" is too short, it will easily fall out of your sculpt after it has been baked.
Enlarge picture showing how to insert a foot into the body
 44. Grip your second parrot foot with tweezers and repeat Step 43 by carefully inserting the leg end into your sculpt. Make sure your leg wires are evenly placed and spaced.
Enlarge picture showing how to insert the second foot into the body
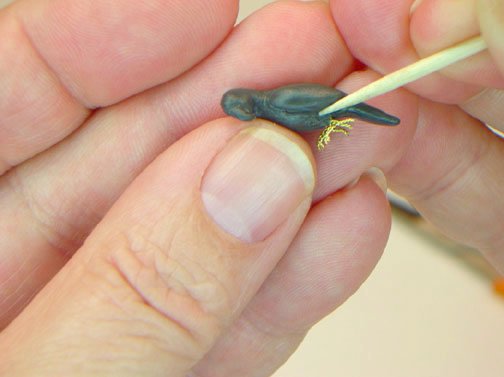
 45. After inserting your parrot feet into your sculpt, take your sculpting tool and smooth the clay around the leg. This will help secure the wire feet to your sculpt. This parrot sculpt is extremely small and the spacing between the feet is tight, so just take your time and enjoy the process.
Enlarge picture showing how to smooth the clay around the leg
 46. Work on both of the legs evenly, smooth the clay using the end of your sculpting tool.
Enlarge picture showing where to smooth the clay
 47. Finally, make sure that your parrot feet are even before you place your sculpt in the oven. Now is the time to make any last adjustments to the unbaked clay form.
Enlarge picture showing spacing of feet
TIP
You are the artist! If you chose to, this is the time to give your miniature parrot some personality. To accomplish this, you can ever-so-gently hold your sculpt with one hand, and using the other hand, tilt your parrot head to the left or right before you bake.
You are the artist! If you chose to, this is the time to give your miniature parrot some personality. To accomplish this, you can ever-so-gently hold your sculpt with one hand, and using the other hand, tilt your parrot head to the left or right before you bake.
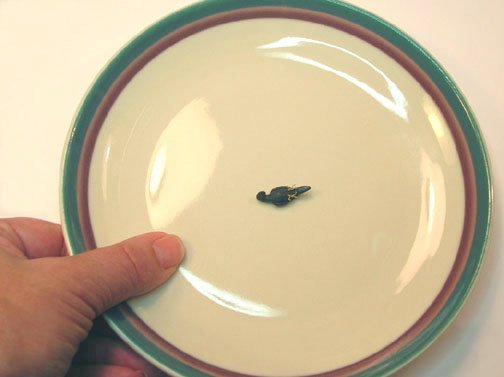
 48. PREHEAT your oven per the manufacturers recommendations for your polymer clay.
Place your sculpt on a tile or oven-safe dish and bake (10-15 minutes or per your polymer clay package instructions). Use an oven thermometer, if possible and keep an eye on the temperature. This is a tiny sculpt so take caution and do not over bake. Oh yes, dont forget to wash your hands after handling the polymer clay.
48. PREHEAT your oven per the manufacturers recommendations for your polymer clay.
Place your sculpt on a tile or oven-safe dish and bake (10-15 minutes or per your polymer clay package instructions). Use an oven thermometer, if possible and keep an eye on the temperature. This is a tiny sculpt so take caution and do not over bake. Oh yes, dont forget to wash your hands after handling the polymer clay.
After your parrot sculpt has baked/cured in the oven and cooled, you are ready to add color with acrylic paints.
Enlarge picture showing preparation before baking
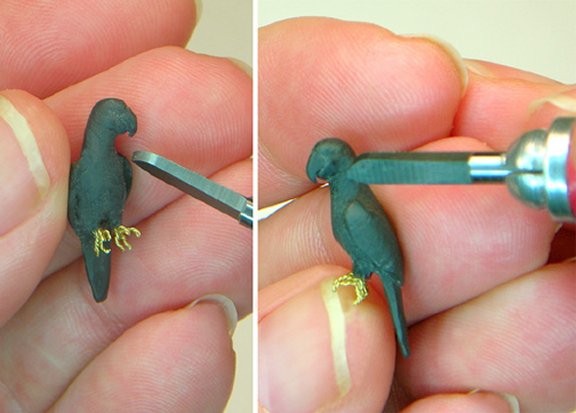
 49. Optional Carving Details
After baking/curing your sculpt in the oven and it has cooled, you may chose to carve a little more detail into your sculpture. You may want to shape the beak a bit more or define lines by carefully carving with an X-acto® knife or other carving tools.
In the example photo, I decided to carve a little more detail into the cured sculpt with a Rio Rondo Carbide scraper tip. I wanted to define the beak point and wing lines. Personally, I find it is easier to grip your sculpture as you "carve" super-fine detail (like the pointed tip of the beak) into the oven-hardened clay sculpt -- rather than try and refine these details when the clay is "un-baked" and soft.
Enlarge picture showing optional carving details
TIP
If after baking your parrot sculpt -- you notice that the wire feet are loose or "wobbly", you can secure them into place by using a small amount of Zap-A-Gap® on the tip of a toothpick. It only takes a very small amount of Zap-A-Gap® between the clay & wire (where the feet are inserted into the clay).
If after baking your parrot sculpt -- you notice that the wire feet are loose or "wobbly", you can secure them into place by using a small amount of Zap-A-Gap® on the tip of a toothpick. It only takes a very small amount of Zap-A-Gap® between the clay & wire (where the feet are inserted into the clay).
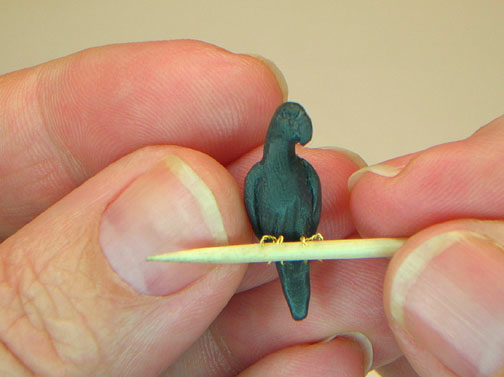
 50. Ready to add color. After you have finished baking, cooling and carving any additional detail into your sculpt -- gather up your paints and brushes. You are ready to add some brilliant color to your parrot.
Enlarge picture preparing to add color
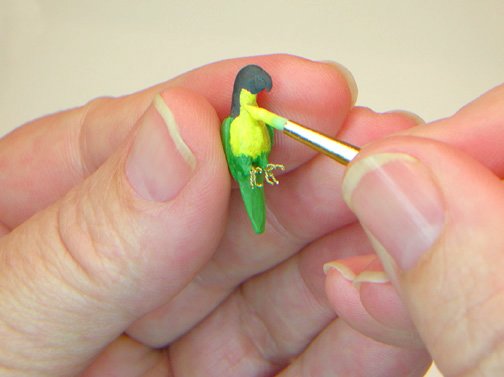
 51. You are ready to add some color and personality to your parrot sculpt? First, you may want to refer to your Conure Template and chose which Conure color pattern (Sun or Jendaya) you wish to paint.
A Sun Conure has more yellow & orange that extends down the back and over the top of the wings. The Jendaya Conure has more green on it's wings and the yellow does not extend down the back. For these photos, I have chosen the Jendaya pattern and will paint with yellow and green acrylics using a fine paintbrush.
Enlarge picture showing where to paint
TIP
If you already have your feathers and thread handy for Class 2, it's a good idea to match your acrylic paint color to the feather and thread colors.
If you already have your feathers and thread handy for Class 2, it's a good idea to match your acrylic paint color to the feather and thread colors.
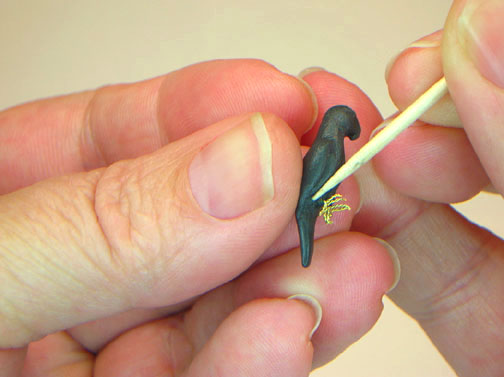
 52. Now, you need to apply paint to the wire feet. I recommend using an enamel paint (gray in color -- or a mixture of black and white) on the wire. If you do not have any enamel paint, but chose to use acrylic paint on the feet, it may "flake off" of the wire when you bend or pose the parrot feet.
Enlarge picture showing how to paint the parrot feet
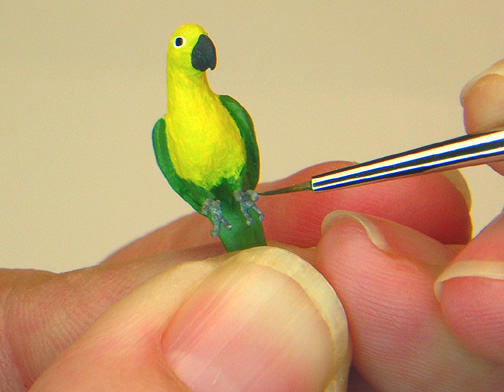
 53. Before painting the eyes, it's a good idea to check the eye placement and color by referring back to your Conure Template. Both the Sun Conure & Jendaya Conure have a white-colored circle of skin around their eye. Paint this white circle first. Once the white has dried, paint the "eyeball" by taking a fine paintbrush and place a dot of black onto the white circle.
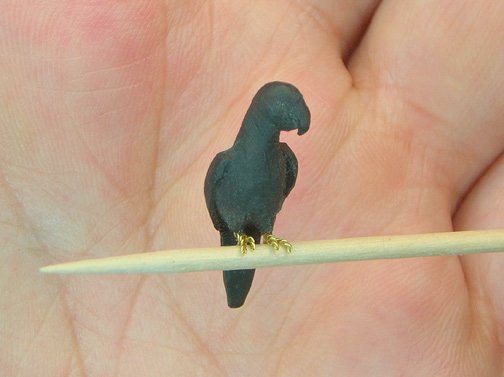
If you have used black clay for your sculpt, you do not need to paint the beak. If you think the black clay looks "too dull", just apply a thin coat of matte sealer.
Enlarge picture showing where to paint the eyes
TIP
If you want a "shiny" eye, simply place a drop of gloss sealer over the black dot. If you do not have any gloss sealer, you can chose to use black enamel paint for the eyes. I find that a "shiny" eye really brings a parrot sculpt to "life".
If you want a "shiny" eye, simply place a drop of gloss sealer over the black dot. If you do not have any gloss sealer, you can chose to use black enamel paint for the eyes. I find that a "shiny" eye really brings a parrot sculpt to "life".
This is the end of Tutorial 1
You have finished your basic parrot sculpt; made the wire feet and attached them to your sculpt; baked/cured your parrot in the oven, and finally painted it with acrylics & enamel. Congratulations! You are ready to move on to the Feather & Flock phase in Class 2. This final phase is where your miniature Conure Parrot will really take shape and come alive!
Reminder
Before beginning Part 2 of this Tutorial, please review your materials list. The most important item is your feather choice. Your feathers should have a very fine, hair-like "rachis" or "spine". Dyed hen saddle feathers are the right size and work very well for this project. The initial materials list calls for 20 small feathers, however, in reality you will only use 10 or less after they have been cut-to-size. If you have never cut feathers to size before, it is best to have a few extra available to practice on.
Try the Tutorial to dye your own feathers and thread to use for 1:12 or smaller scale feathering and flocking. Continue to Part 2, Learn To Flock and Feather a Parrot.
MEET THE ARTIST
 IGMA Fellow Kerri Pajutee is a self-taught artist that finds sculpting animals a pleasurable and challenging hobby that she has experienced over the last 30 years.
Each one of her animal sculpts are original, one-of-a-kind pieces and can be purchased at select miniature shows or by special order commission. In 2001, she achieved Artisan status for animal figures in the International Guild of Miniature Artisans IGMA. In 2004, she was honored with Fellow membership within the Guild.
Kerri says, she balances her life and hobby with wonderful, supportive family and friends. As a result, she creates her miniature animals on a part-time basis. Kerri says that this arrangement keeps her sane and her sculptures fresh and enjoyable.
Kerri is a valued member and Moderator of the Animal board in the CDHM Forum. Visit the Galleries today.
IGMA Fellow Kerri Pajutee is a self-taught artist that finds sculpting animals a pleasurable and challenging hobby that she has experienced over the last 30 years.
Each one of her animal sculpts are original, one-of-a-kind pieces and can be purchased at select miniature shows or by special order commission. In 2001, she achieved Artisan status for animal figures in the International Guild of Miniature Artisans IGMA. In 2004, she was honored with Fellow membership within the Guild.
Kerri says, she balances her life and hobby with wonderful, supportive family and friends. As a result, she creates her miniature animals on a part-time basis. Kerri says that this arrangement keeps her sane and her sculptures fresh and enjoyable.
Kerri is a valued member and Moderator of the Animal board in the CDHM Forum. Visit the Galleries today.
©
2008-2012 Kerri Pajutee
Reproduced with permission from Kerri Pajutee. All photographs and text appearing in this tutorial are the exclusive property of Kerri Pajutee. Permission is explicitly denied for any republication of text or photographs in this article without the prior express written consent of the author.
BACK