


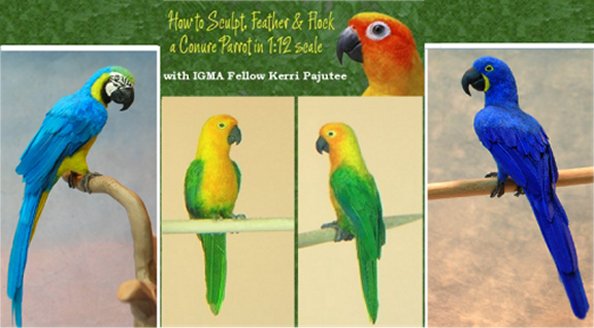
Learn To Flock and Feather
1:12 Conure Parrot
with IGMA Fellow
Kerri Pajutee
Materials Needed:
- Feathers: 10-15 Green
- Cotton, Silk or Poly Thread: DMC Cotton Embroider thread or Sewing Thread
- Scissors
- Ruler
- Paintbrush: Fine 10/0
- Tools
- Toothpick
- Darning Needle or Small Spoon-Tool
- X-acto© Knife: #11 Blade
- Tweezers - Glue: Hob-e-Tac Adhesive© or Tacky Glue
- Water: Cup
- Baby Wipes
- Paper Towels
- Several Small Containers for Holding Feathers and Flock
OVERVIEW
In this tutorial #2 you will learn to cut feathers to size and make your own flocking (from thread). You will learn how to apply feathers to the wings and tail, along with flocking to the rest of your 1:12 parrot sculpt (from Tutorial #1) using glue, a small paint brush and tweezers.
Your feather and thread colors will depend on which Conure parrot you choose to make. Both the Sun Conure and the Jandaya Conure are similar in wing and tail colors (green and blue), however, if you choose a Sun Conure, you will need a bit more yellow and orange.
If you cannot find commercially-dyed feathers for this project, you may chose to dye your own feathers and thread to use for 1:12 or smaller scale feathering and flocking.
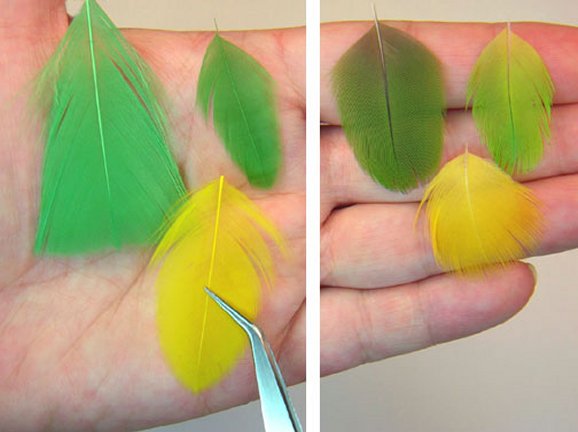
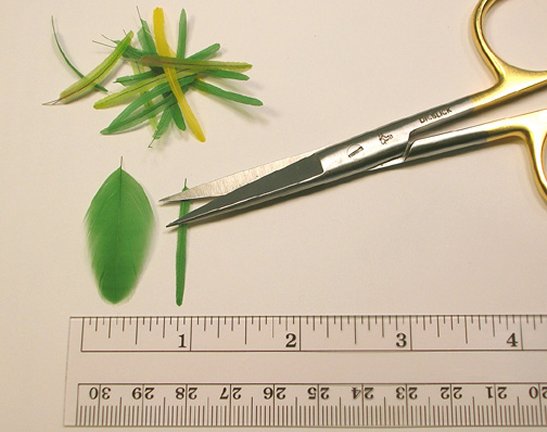
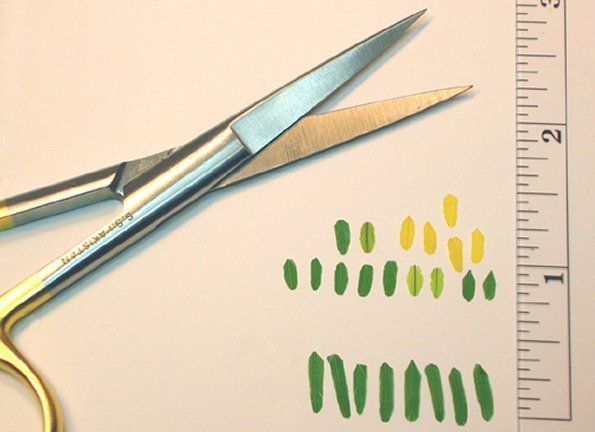
 1. This photo shows a variety of feathers that would work for this project. On the left are dyed turkey flats and hen saddle feathers. The feathers on the right are from a sun conure parrot (I have a friend that owns one of these birds and she collects the feathers for me when her bird sheds/molts).
Enlarge picture showing types of feathers
TIP
For this project, I chose a mixture of dyed hen saddle feathers and a few real conure feathers. The most important thing to remember when choosing your feathers for creating miniature feathered birds is the size of your feather rachis or spine. You want to chose feathers with a hair-fine spine. If the spine is too thick, it will not look natural, and will be too thick and stiff when applying to your parrot.
For this project, I chose a mixture of dyed hen saddle feathers and a few real conure feathers. The most important thing to remember when choosing your feathers for creating miniature feathered birds is the size of your feather rachis or spine. You want to chose feathers with a hair-fine spine. If the spine is too thick, it will not look natural, and will be too thick and stiff when applying to your parrot.
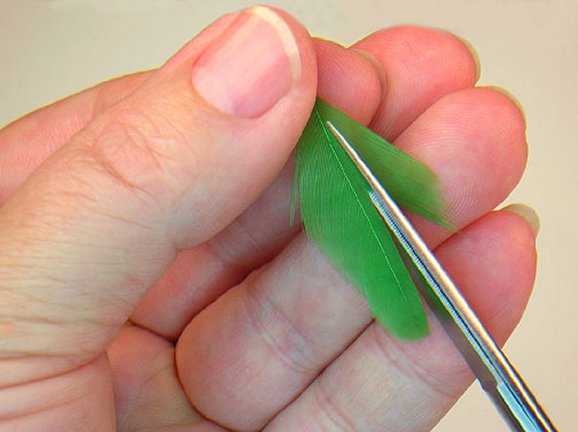
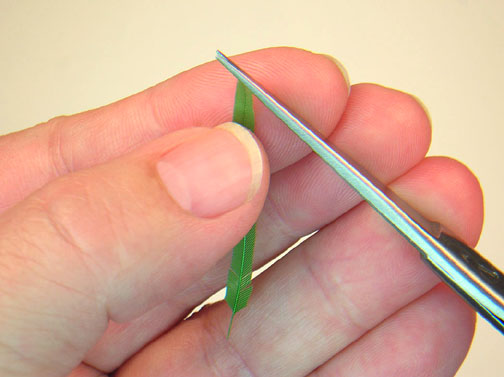
 2. Grip the feather in one hand and begin trimming the right side from the tip upward. Work slowly, and carefully cut in a straight line following the spine. Sharp scissors and steady hand work best. Don't get discouraged if your feather looks a bit "ragged" at first. Cutting a smooth, straight line across the vanes takes practice. The more feathers you cut, the more confident you will become.
Enlarge picture showing how to trim the right side of the feather
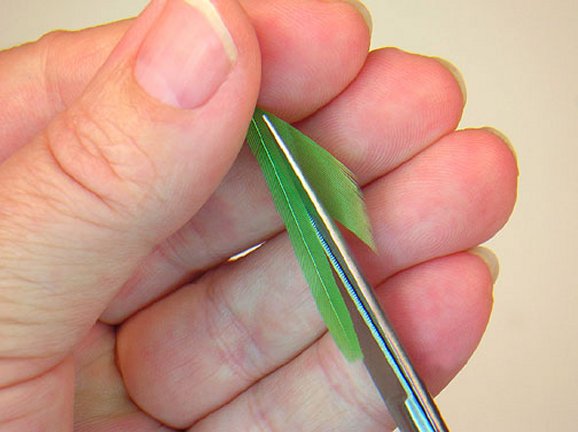
 3. After you have trimmed the right side - turn your feather over in your hand, and begin trimming the left side. Trim from the tip upward. Make sure you trim the feather with both sides an even distance from the center spine. You want to trim your feathers down to approximately 1/16" in width if possible.
Enlarge picture showing how to trim the left side of the feather
 4. You may need to trim the tips of your feathers after you cut them to size. To do this, carefully round the tip using your scissors.
Enlarge picture showing how round the feather tips
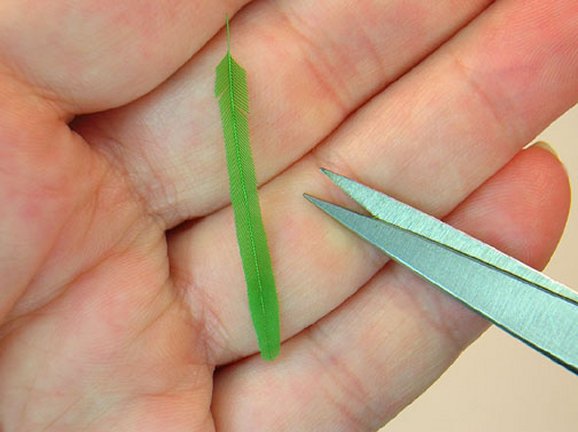
 5. After you finish trimming, your cut feather should look like.
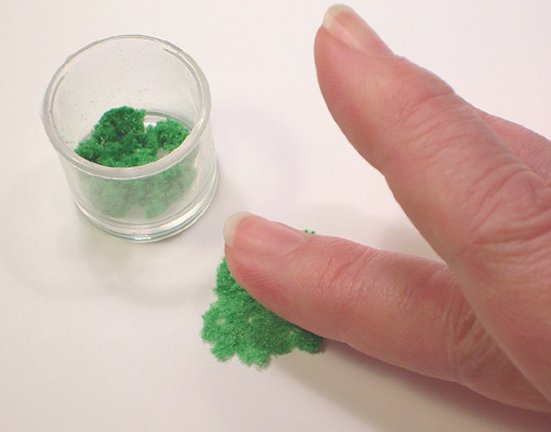
Enlarge picture showing progress of cut feather
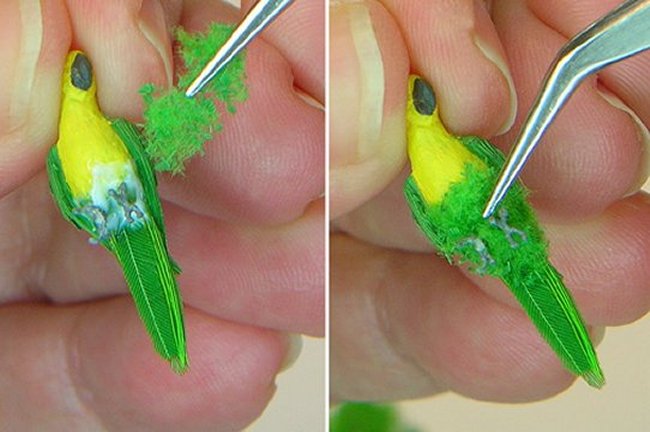
 6. You will need to save some of your feather trimmings. These trimmings come in handy as fill-ins when you glue your feathers onto your parrot sculpt.
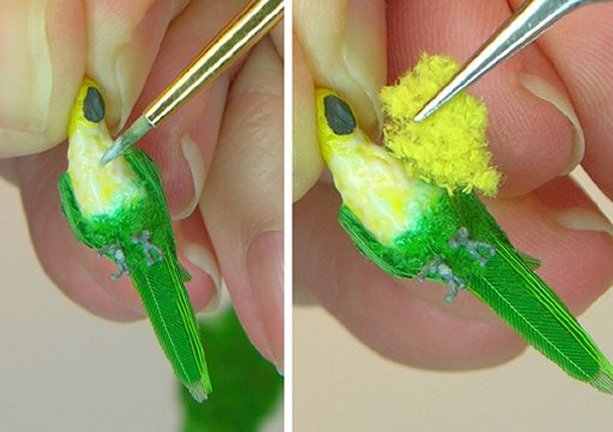
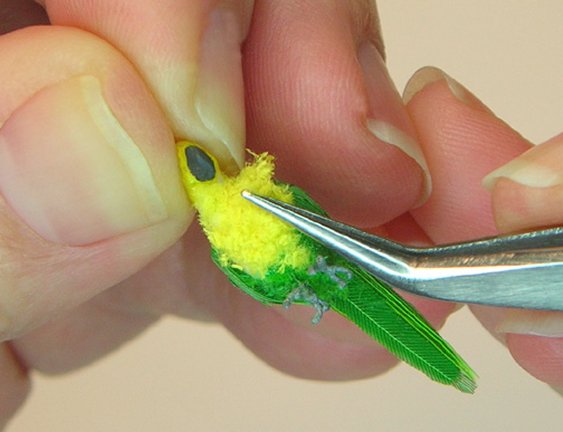
Enlarge picture showing saved feather pieces
 7. To use your trimmings you can carefully take your tweezers and gently pull apart the vanes to the width you choose. These trimmings work nicely when a full feather is just too much.
Enlarge picture showing how to separate the vanes of the feather
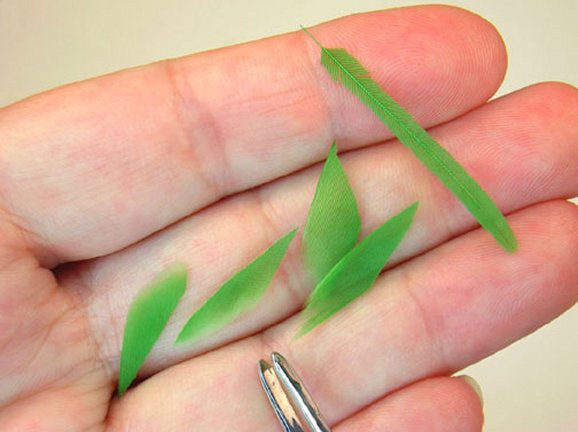
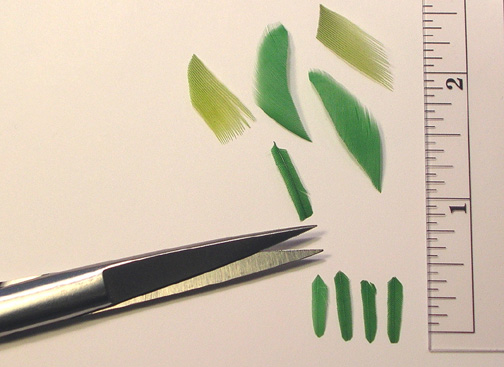
 8. Continue to trim all your feathers and set aside. You will need approximately 10-15 cut feathers. As you can see from the photo, much of the original feather vanes have been cut away. After you have cut all your feathers to "size" you may want to go back to trim and reshape some of the "ragged" edges on a few.
Enlarge picture showing where to trim
TIP
With this project, you will find that you may end up not using all your cut-to-size feathers for your parrot sculpt -- but its nice to be able to pick the "best" ones from the bunch you have trimmed up.
For now, leave your feather lengths as is and set them aside. You will clip actual lengths you need to use, when you begin to attach the feathers to your parrot sculpt with glue.
 9. Set your cut feathers aside to a safe (draft-free area), you are ready to make your own flocking.
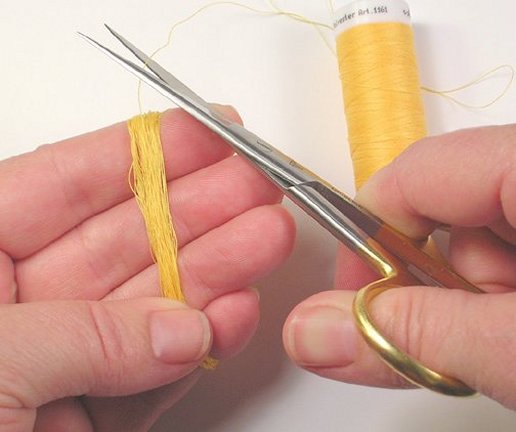
Before you can cut your thread into flocking, you will need to unwind a fair amount of length from the spool (if you are using sewing thread), wrap this around your fingers.
9. Set your cut feathers aside to a safe (draft-free area), you are ready to make your own flocking.
Before you can cut your thread into flocking, you will need to unwind a fair amount of length from the spool (if you are using sewing thread), wrap this around your fingers.
Enlarge picture showing how to start making flock
 10. When you have finished wrapping the thread around your fingers, cut the thread from the spool and set the spool aside.
Enlarge picture showing how to wrap the thread
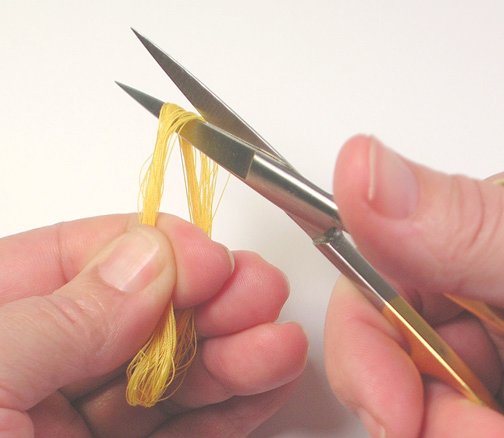
 11. Slip your index finger out from under the wound loop and cut ends in half with scissors.
Enlarge picture showing how where to cut the thread
 12. Pinch the thread ends together and begin to cut the thread as fine as you can into a container. The finer the "cut - the better the flock. Your flock should resemble "fluffy powder".
Enlarge picture showing how to cut the thread
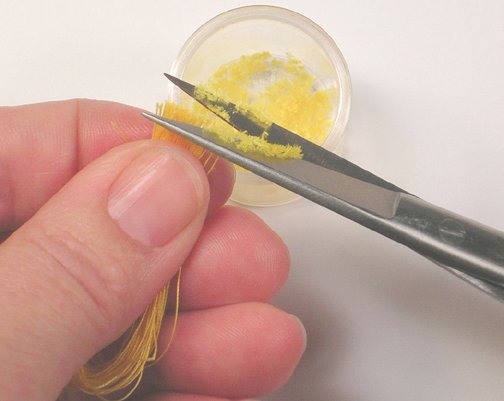
 13. Making your own flock is a tedious process. Remember...don't rush it. Try to cut a fine, consistent length with every clip. To fluff it up a bit in the container, gently stir with a toothpick.
Enlarge picture showing the flock
TIP
How much flock and how many different colors you cut will depend on which conure pattern you chose. If you are making a Jendaya conure you will only need a small amount of green and yellow. If you want to make a sun conure, you may want to cut some additional orange or red-orange.
How much flock and how many different colors you cut will depend on which conure pattern you chose. If you are making a Jendaya conure you will only need a small amount of green and yellow. If you want to make a sun conure, you may want to cut some additional orange or red-orange.
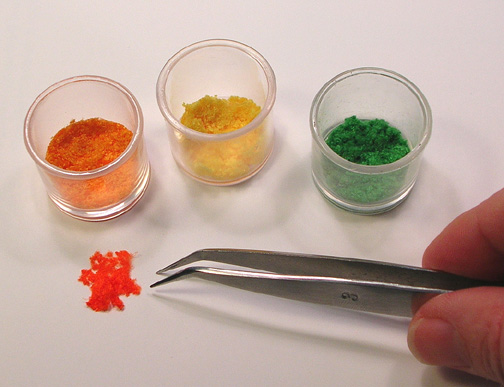
 14. Cut enough flock to generously cover the areas of color on your parrot sculpt. Store your cut flocking in a small container with a lid and set aside. This photo actually shows much more than what you will need (but it makes for a nice, colorful photo). You are now finished with cutting your thread into flocking. Set aside.
Enlarge picture showing flock colors you will need
 15. You will now begin applying feathers to your parrot sculpt. To begin the feathering process, you need a ruler and scissors to trim-to-length the tail feathers. Start by cutting 4 feathers at approximately inch in length.
Enlarge picture showing feather preparation
A WORD OR TWO ABOUT THE GLUE
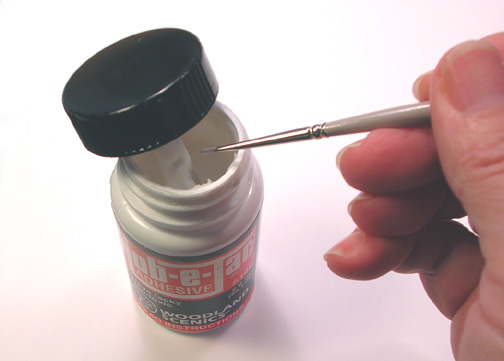
For this project, I am using Hob-e-Tac by Woodland Scenics. It is water-soluble, goes on white and sets up to a clear tacky in a couple of minutes. The feathers adhere to it very nicely and I do not have to wait for each stage or layer of feathers to dry completely before moving on to the next stage or layer of feathers (which I would have to do if I were using a craft glue like Aleenes Tacky glue).
The one drawback with using Hob-e-Tac is that you need to close up the bottle lid with each application otherwise the entire bottle will begin to set up and, you need to wash your paintbrush (with water) after each glue application (if you fail to wash your paintbrush, the glue it will set up on it yuk!).
O.K., enough preaching on gluelets get started.
 16. Use any glue you do use sparingly! If you use too much glue it will seep or bleed through your feathers and show when dry.
Enlarge picture showing type of glue
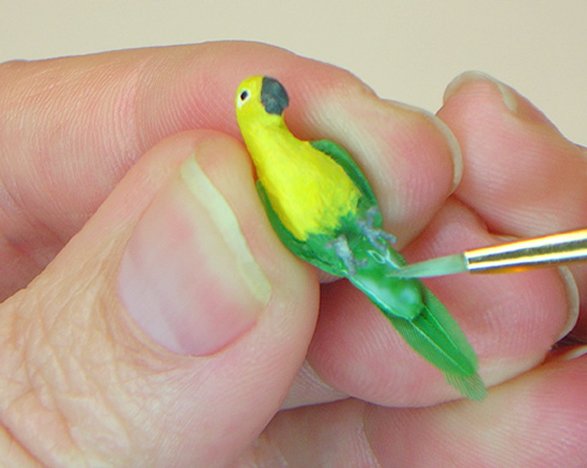
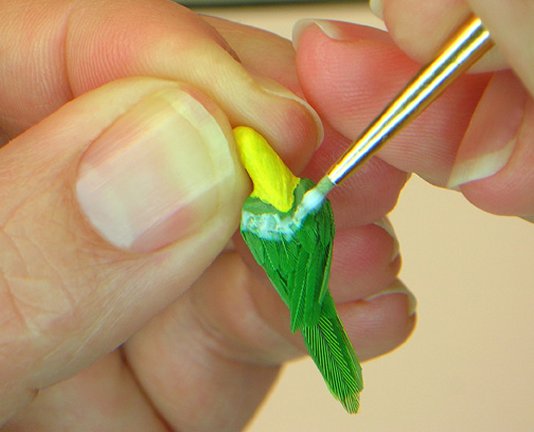
 17. Take your parrot sculpt in hand and apply the glue onto the tail section.
Enlarge picture showing where to glue to the tail area
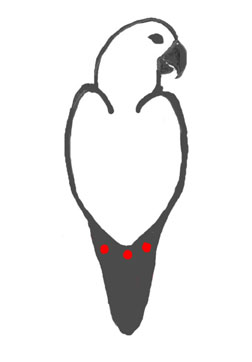
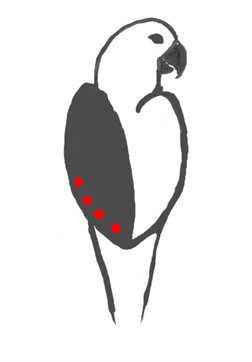
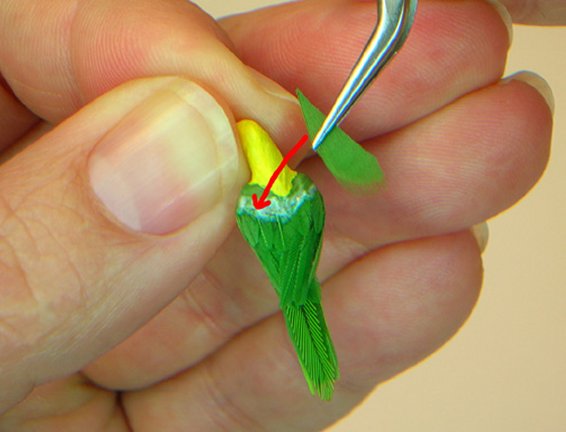
 18. The placement of the red dots in this diagram shows where the first 3 tail feathers will be placed onto your parrot sculpt.
Enlarge picture showing diagram for first tail feather placements
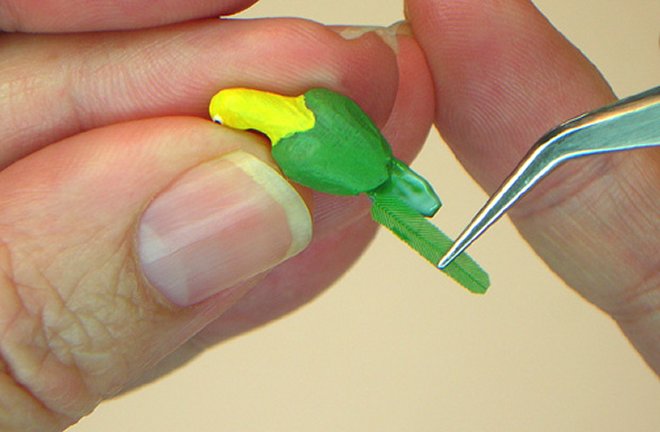
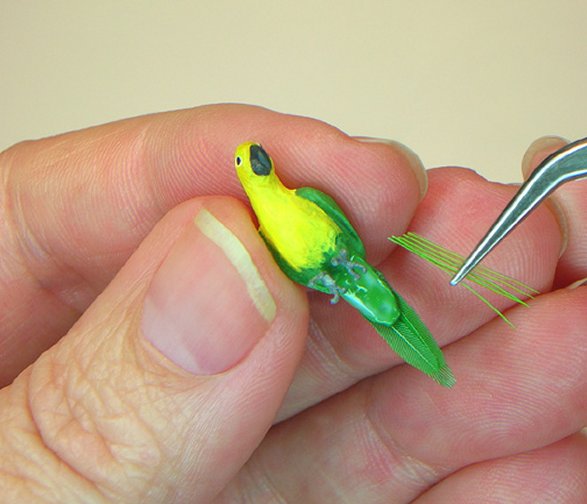
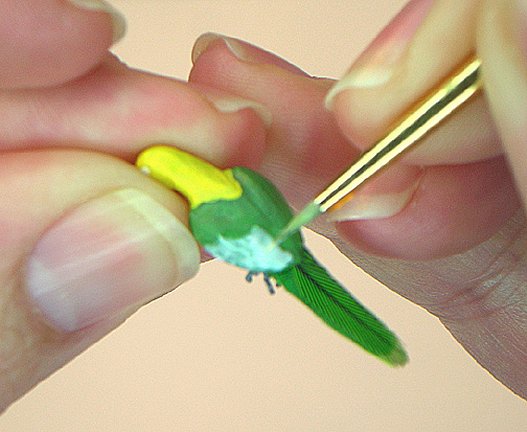
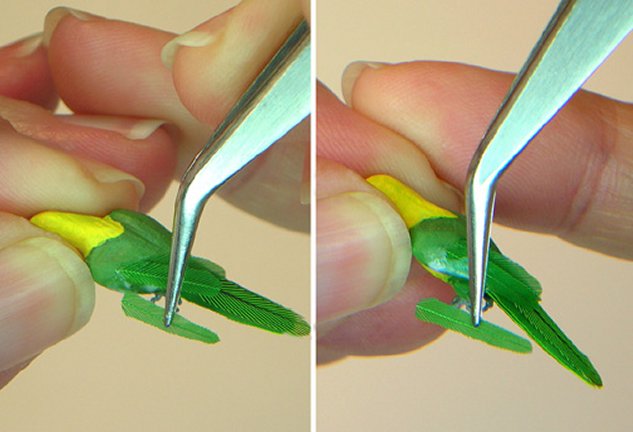
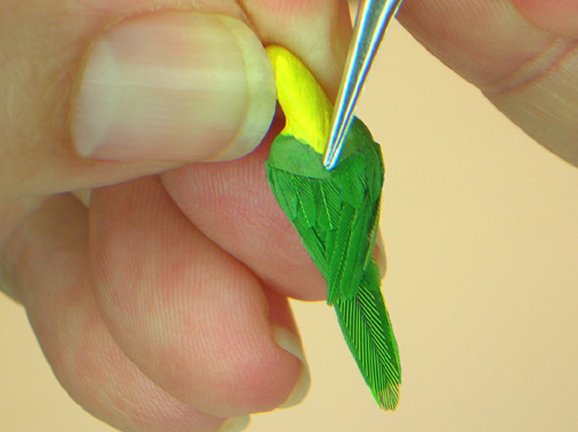
 19. With a pair of tweezers, apply the first tail feather. Gently press the feather into the glue to set. Remember not to use too much glue here or it will bleed through your feather.
Enlarge picture showing first feather
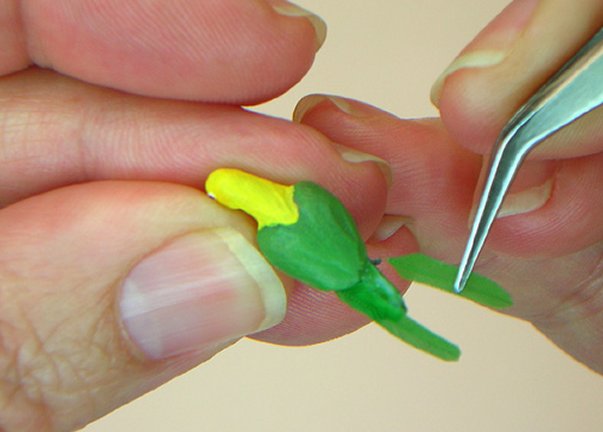
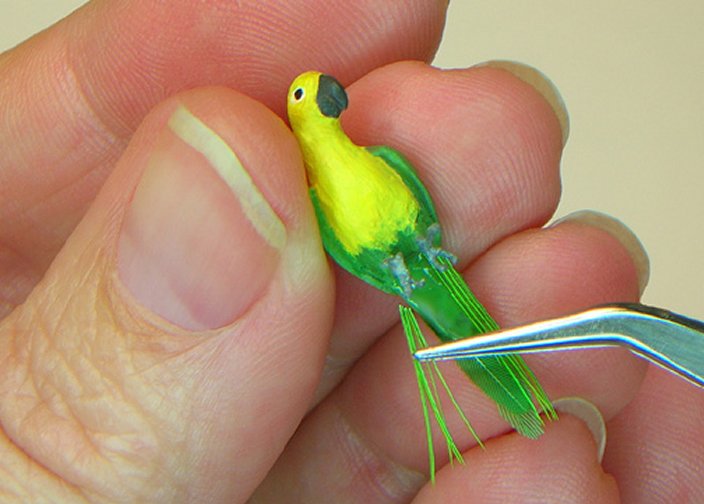
 20. Apply the second tail feather with your tweezers and gently press into the glue to set.
Enlarge picture showing first feather
TIP
If you are using a water-based craft glue like Aleenes Tacky glue or other, you will need to pause and wait between feather layer applications. For example, you can glue the top portion of the tail then wait a bit to let that dry before turning your parrot over and starting on the underside. This will give the glued feathers a chance to set up and dry.
If you rush ahead, you may end up shifting your feathers or pressing too hard into the wet glue with your fingers (trying to hold on to your tiny parrot). Sometimes the glue will bleed through and discolor the feather turning it darker or lighter when dry. The best way to avoid this is 1) not to apply the glue to thick; 2) dont press the feather too hard into the glue; and 3) let it dry between handling and adding another layer of feathers.
 21. Before applying feather #3, you may need to add a tiny bit of glue to set the feather to the top-middle portion of your parrot tail.
Enlarge picture showing where to glue before continuing
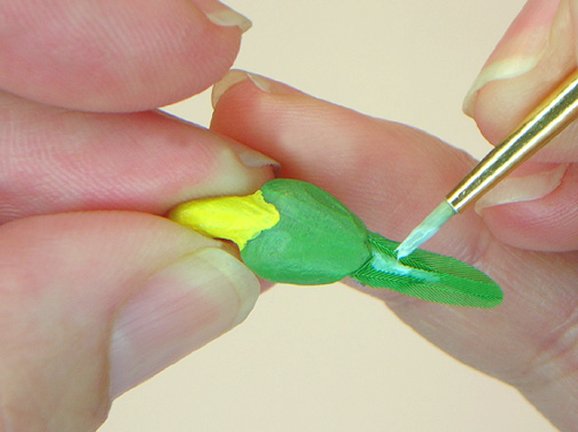
 22. Apply the third feather with your tweezers and press to set into the glue.
Enlarge picture showing where to apply the third feather
TIP
Use just a bit of pressure to "place" the feather. Once it is where you want it, gently "press" it into place with tweezers. You can also lightly touch it with your finger too - to "tap/press" it into place.
Use just a bit of pressure to "place" the feather. Once it is where you want it, gently "press" it into place with tweezers. You can also lightly touch it with your finger too - to "tap/press" it into place.
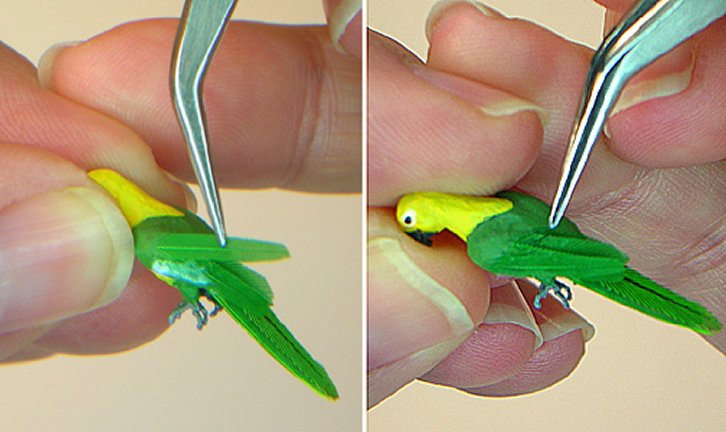
 23. Now, turn your parrot over in your hand and lets begin to apply some feathers to the underside of the tail section. Apply some glue.
Enlarge picture showing where to apply glue to the back of the tail
TIP
I use Aleene's Tacky glue on other animal flocking/furring projects - but not for birds (feathers). The Hob-e-Tac will set up clear and will grab the feathers just right (with a little practice). You still need to be careful not to "squish" or "mash" down on your newly placed feathers.
I use Aleene's Tacky glue on other animal flocking/furring projects - but not for birds (feathers). The Hob-e-Tac will set up clear and will grab the feathers just right (with a little practice). You still need to be careful not to "squish" or "mash" down on your newly placed feathers.
 24. Remember when I mentioned earlier in the tutorial, that you need to keep some of your feather trimmings. Here is an opportunity to apply some. With your tweezers, you will place a small strip of feather trimmings to both left and right sides of the underside of your parrot tail.
Enlarge picture showing where to apply feather trimmings
 25. Applying additional fillers. These feather trimmings are perfect feather fillers because they do not have a spine.
Enlarge picture showing additional feather trimmings
Q: It also appears that you are bending the spine of the feathers like this ) instead of a straight line from top to bottom
A: No bending. It may be that you are seeing how the "hen saddle" type of feather slightly curves a bit. It's best to have a straighter feather spine.
 26. Take your fourth and final tail feather and apply it in the middle of the underside of the tail section. This feather should slightly overlap your feather trimmings. Gently push the feather into the glue to set.
Bravo! You are finished with feathering the tail section of your parrot. Set your parrot sculpt aside, as you will now start to trim the wing feathers for application.
Enlarge picture showing the final tail feather application
BEFORE THE NEXT STEP
You will trim two (2) sets of wing feathers. First, the primaries (the longer wing tip feathers), and second, the primary-coverts (the smaller, second row of overlapping feathers).
Cut 8 primary wing feathers approximately 3/8 to less than inch in length (depending on the actual size of your parrot sculpt). If you are not sure, trim a feather and hold it up to where you would glue it to your parrot wing and gauge the length from there.
Next, cut 8-10 primary-covert wing feathers approximately inch or less in length. Again, use your judgment, depending on the size of your actual parrot sculpt. You will use these tiny feathers as a second row, by applying them to just barely overlap your first row of longer primary feathers. If you are creating a sun conure color pattern, you will want to cut some yellow primary coverts (shown in the photo).
 27. In this photo, I have cut feathers of different colors (green, light green & yellow). Again, if you chose to make a sun conure parrot, you will need some yellow primary-covert feathers. If you are making a jendaya conure you can cut all green feathers.
Enlarge picture showing different colors of feathers
 28. The following diagram shows approximately where you will glue your 4 primary wing feathers.
Enlarge picture showing the wing diagram
 29. Begin by applying a small amount of glue along the wing as shown in photo.
Enlarge picture showing where to apply glue to the wing
 30. With your tweezers take one of the long primary feathers and place it onto the wing glue (at an angle). Press gently to set. It might be easier to hold you parrot by the head during this process being careful not to get your fingers into the glue.
Enlarge picture showing where to place the primary feather
 31. Once the first wing feather is in place, pick up the second primary feather with your tweezers and set it into the glue next to the first feather. Your feather should slightly overlap the previous feather.
Enlarge picture showing the placement of the second feather
 32. Repeat this process with the next two feathers so you have a total of four primary feathers on each wing.
Enlarge picture showing the repeat process
 33. Once you have all four primary feathers in place on one side you will want to repeat the steps on the other. Holding your parrot by its head (so as not to press into your glued wing feathers) -- apply the glue. With your tweezers take one of the long primary feathers and place it into the glue (at an angle crossing over the first set of wing feathers. See photo example. Press gently to set.
Enlarge picture showing placement of feathers
 34. Continue to apply the remaining three primary feathers into place (slightly overlapping them).
Enlarge picture continuing to apply the remaining three primary feathers
 35. When you are finished, you should have four primaries feathers on each wing.
Enlarge picture showing four primaries feathers
 36. Once you have all your primary feathers in place, its time to add the smaller primary-covert feathers. These feathers will be glued to the wings above the primary feathers. This second row of feathers will consist of at least 4 on each side. If you are creating a sun conure this row should be yellow. If you are making a jendaya color pattern this row will be green. Apply glue.
Enlarge picture showing placement of smaller primary-covert feathers
 37. With tweezers place a primary-covert feather onto the glue, just slightly overlapping your primary row. Continue to apply these feathers, one by one, until you have placed all four. You can use your tweezer ends or finger to gently press into the glue to set. See photo example.
Enlarge picture showing placement of smaller primary-covert feathers
TIP
Depending on the size of your parrot, you may decide that you want to add one or two more primary-covert feathers. If you notice that you have areas on the wing that look as if they need another feather or two just trim a few more and add them where needed. You are the artist!
Depending on the size of your parrot, you may decide that you want to add one or two more primary-covert feathers. If you notice that you have areas on the wing that look as if they need another feather or two just trim a few more and add them where needed. You are the artist!
 38. Once you have finished applying the primary-covert feathers on the first wing You will need to repeat the same process on the other wing. First apply the glue. Then with your tweezers place a small primary-covert onto the glue, slightly overlapping the first row of primary feathers. With tweezers, place the second, third & final fourth feather into place. Here I have selected a Jendaya conure color pattern - so I have placed both primary & primary-covert feathers in green.
Enlarge picture showing the repeat process of Step 36
TIP
You may feel that your parrots wing does not need to be trimmed with an X-acto knife at this stage thats O.K. I do this to remove any bulk feathers and uneven edges before I glue the next layer of feathers and flock. Use your own judgment its your parrot sculpt!
You may feel that your parrots wing does not need to be trimmed with an X-acto knife at this stage thats O.K. I do this to remove any bulk feathers and uneven edges before I glue the next layer of feathers and flock. Use your own judgment its your parrot sculpt!
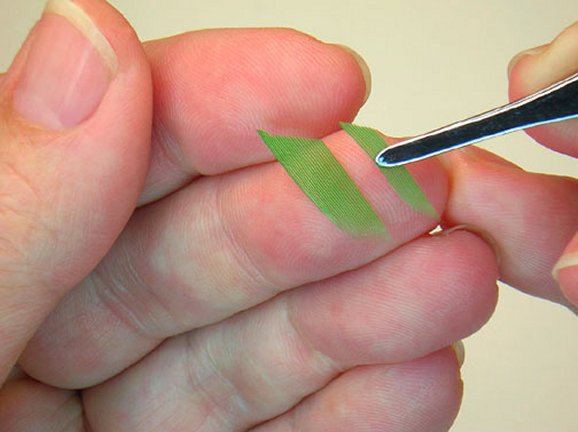
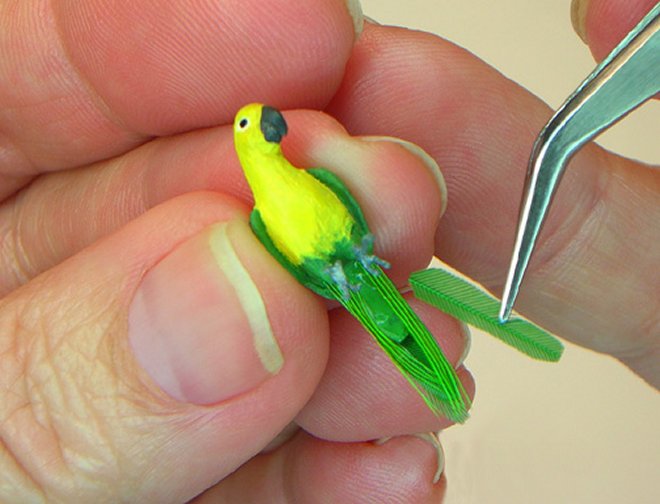
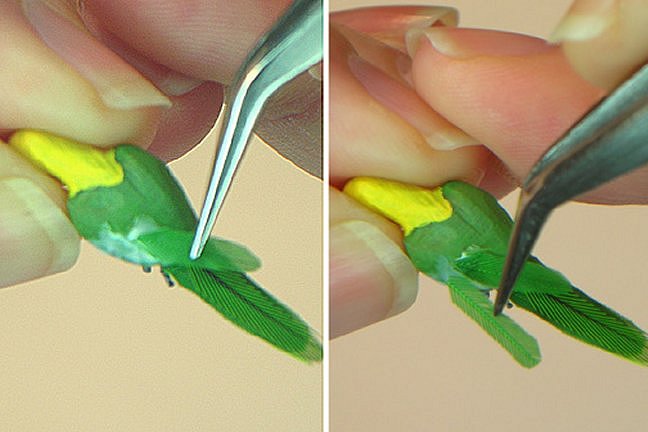
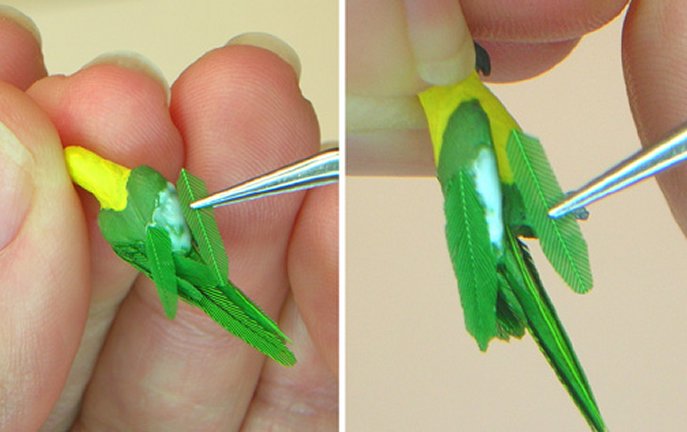
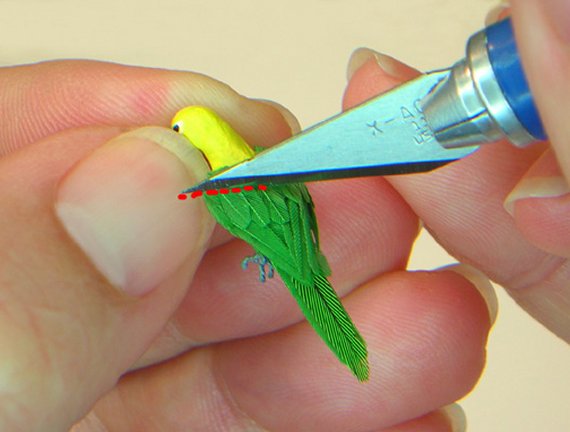
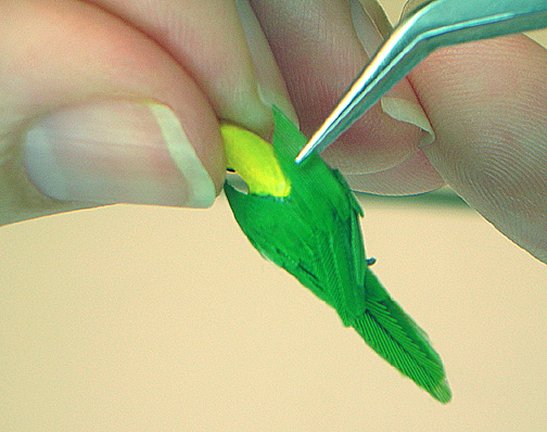
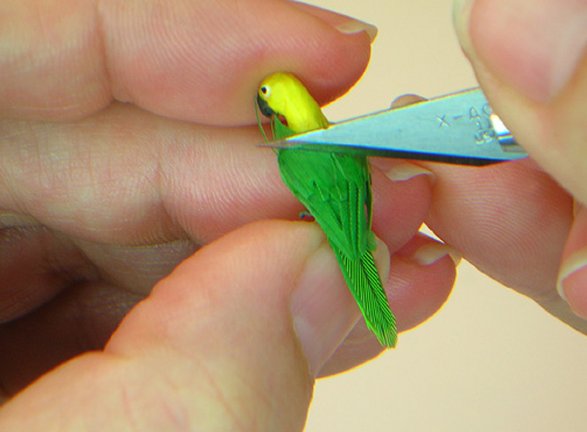
 39. If you have finished applying both primary & primary-covert feathers to your parrots wings, you are ready to "clean up or trim" your feather spines and lines before moving on to the next step. To do this, take an X-acto knife and very gently press/score (trim) the upper tips (edges) of your primary-covert feathers. Be very careful here that you do not press too hard and cut through your sculpt or your hand. If you are using a new, sharp blade, it will not take much pressure.
Enlarge picture showing how to clean up the feather spines
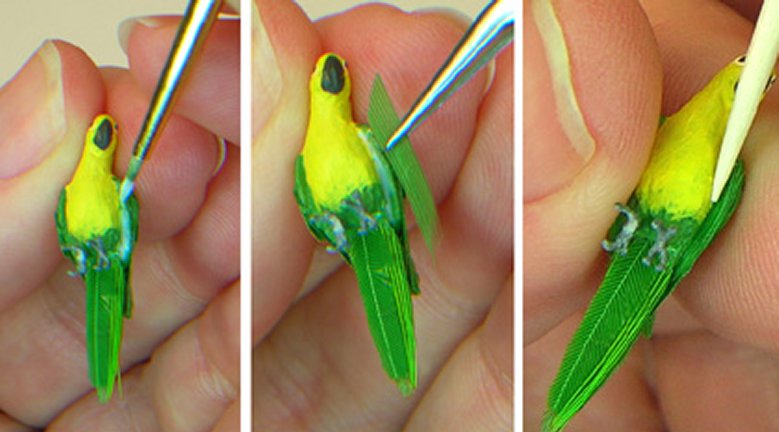
 40. After the feathers have been scored/cut remove excess feathers and glue with tweezers.
Enlarge picture showing how to use your tweezers
TIP
Now, to add a final thin layer of feather trimmings onto the back of your parrot wings. This is not a necessary step, but I like to finish out my wing feathers by taking a small piece of trim and overlapping my last layer of primary-coverts (on each upper wing). This feather technique looks especially nice if you are making a larger parrot like a Macaw.
Now, to add a final thin layer of feather trimmings onto the back of your parrot wings. This is not a necessary step, but I like to finish out my wing feathers by taking a small piece of trim and overlapping my last layer of primary-coverts (on each upper wing). This feather technique looks especially nice if you are making a larger parrot like a Macaw.
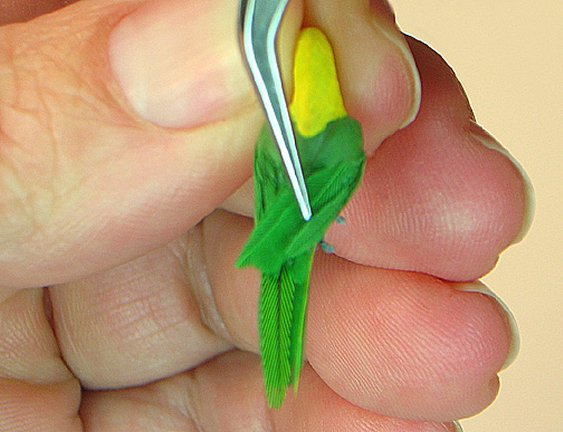
 41. Apply a bit of glue in a "V" shape as shown.
Enlarge picture showing where to apply glue on the back
 42. Take a small end section of a feather trimming and place over the glued area. It should overlap just a bit onto the primary-covert layer.
Enlarge picture showing where to place the feather trimming
 43. Do this on both wings. Because I am making a Jendaya color pattern this trimming is shown in green. However, if you are making a sun conure pattern you would want this feather trimming to be yellow.
Enlarge picture showing the repeated process on the other side
 44. If you should have any overlap of trimming (and you will probably have a small amount) - you can simply score and trim away using your X-acto knife.
Enlarge picture showing how to trim away overlap
 45. Finally, you will finish up the feather process by turning your parrot over and working on the underside of each wing. Depending on how deep you made your crease detail (under each wing) on your original parrot sculpt, will determine how much feather trimming you will use here. If you do not have any wing crease detail, then skip this step.
Apply a very small amount of glue using a fine brush. With your tweezers, take a thin amount of feather trimmings and place onto glue. You may want to take a toothpick and gently press the feather trimming into the crease. Repeat on other wing. Trim away any excess "top" length with X-acto knife or scissors.
Enlarge picture showing how to feather the under wing
TIP
One of the hardest parts about feathering and flocking such a small parrot is handling it gently while you work. It's easy to mess up the feathers or grip too tightly and squish both feathers and glue. If you have to wait a bit until the glue has a chance to dry - the better. If you end up totally screwing up one or two of your feathers in the process - replace them before moving on to flocking.
One of the hardest parts about feathering and flocking such a small parrot is handling it gently while you work. It's easy to mess up the feathers or grip too tightly and squish both feathers and glue. If you have to wait a bit until the glue has a chance to dry - the better. If you end up totally screwing up one or two of your feathers in the process - replace them before moving on to flocking.
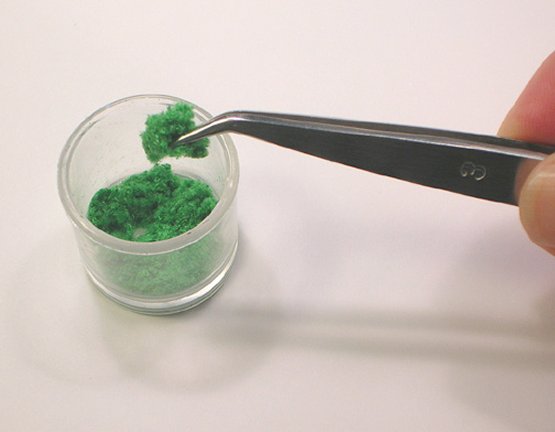
 46. You will need to retrieve your flocking and prepare it for gluing onto your parrot. Take your flocking and pinch a bunch with your tweezers.
Enlarge picture on retrieving the flock
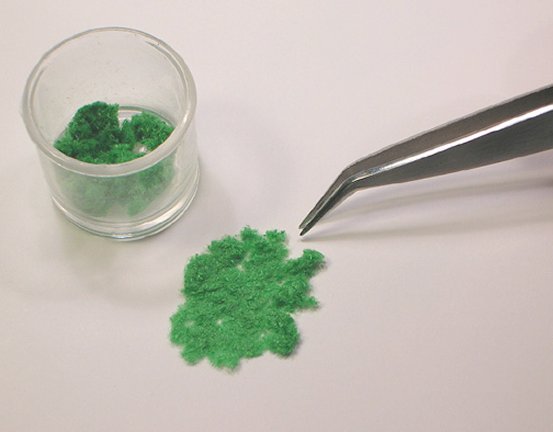
 47. Place this flock onto a clean, dust/lint-free work area. You want your parrot flock to be free of various bits of stuff (like hair, pieces of trimmed feathers, etc.)
Enlarge picture showing prepared work area
 48. Take your finger and tap the flocking as flat as you can. This makes it easier to pick up with the tweezers.
Enlarge picture showing how to tap the flock flat
TIP
Start with your parrots tail base, legs & chest area first. I have chosen the Jendaya color pattern, so my parrot has a little green on its lower parts then transitions to yellow on the chest. If you have chosen a sun conure this area can be done in all yellow flock.
Start with your parrots tail base, legs & chest area first. I have chosen the Jendaya color pattern, so my parrot has a little green on its lower parts then transitions to yellow on the chest. If you have chosen a sun conure this area can be done in all yellow flock.
 49. Apply a small amount of Hob-e-Tac glue. It helps to hold your parrot sculpt by the head during this process - so as not to damage your newly feathered areas by gripping too hard. With your tweezers pick up some flocking (a even, thin layer) and apply it to the glue. Cover the area as evenly as you can with flock. You may need to apply a couple of tweezer-loads, but keep them as thin a layer as possible. If you place a bulk of flock onto the glue, you are more apt to have a lumpy parrot.
Gently and evenly press the flocking into the glue to set using the end of your tweezers, toothpick, a sculpting spoon type tool, or fingers. Blow or very lightly "brush" away any excess flock using a paintbrush or micro-tip applicator before applying more glue.
Enlarge picture showing where to apply the green flock
 50. I have applied the green flocking to the bottom area and will transition to yellow flocking from the chest upward to the neck and head area. Work one small section at a time this will keep your fingers out of the glue.
Enlarge picture showing how to transition to yellow flocking
TIP
I like to use a micro-tip applicator for removing any excess flocking that remains stubborn and will not blow away. The excess flock tends to "stick" to the applicator brush. When removing excess flock - work very delicately, you do not want to remove to much or the glue will start to show. If you remove or brush away too much flock - just add a bit more glue and flock to the area and press.
I like to use a micro-tip applicator for removing any excess flocking that remains stubborn and will not blow away. The excess flock tends to "stick" to the applicator brush. When removing excess flock - work very delicately, you do not want to remove to much or the glue will start to show. If you remove or brush away too much flock - just add a bit more glue and flock to the area and press.
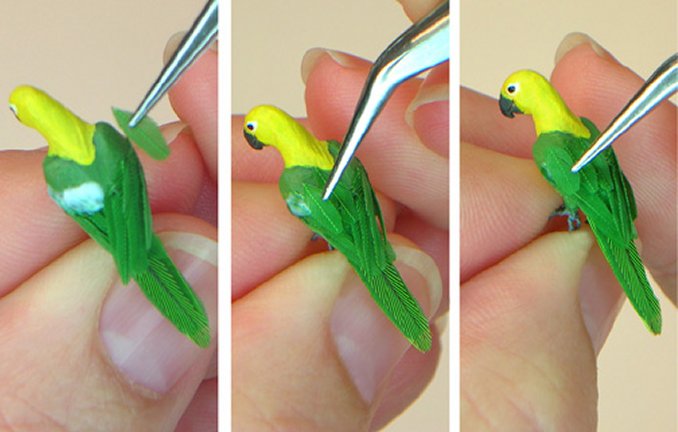
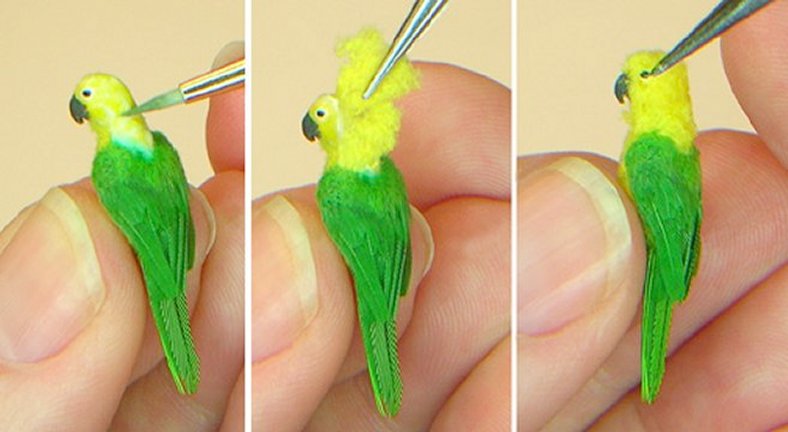
 51. Slowly work up the neck and head area of your parrot with glue, then flocking. Blow away any excess before you begin to add glue to a new section. Press the flock into the glue evenly and smoothly. I usually finish the underside first, then turn my parrot over and work on the back of wings and neck and head area.
Enlarge picture showing how you work the flock up the neck and head
 52. Turn your parrot over. During this stage of flocking, I find it helps to hold the parrots feet. Apply a small amount of glue on the back of the wings. Most of your wings are already covered in feather, except for the upper portion. I have chosen a Jendaya color pattern so this section is green flocking. If you are making a sun conure color pattern, this would be yellow flocking.
After you have evenly covered the glue with flock, press into the glue using your finger or tool of your choice. You want it to be smooth and even -- then blow, or brush away the excess before moving onto the final neck and head area.
Enlarge picture showing the final placement of flock on the underside
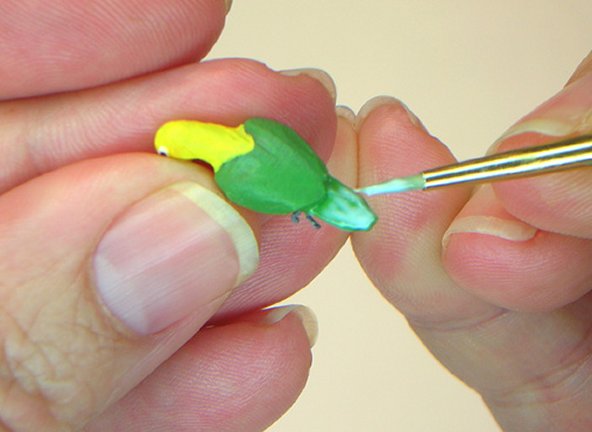
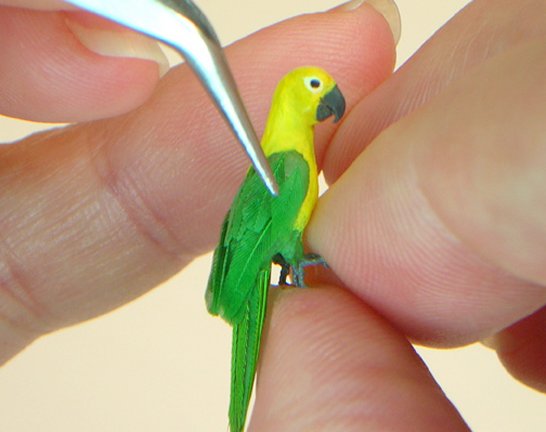
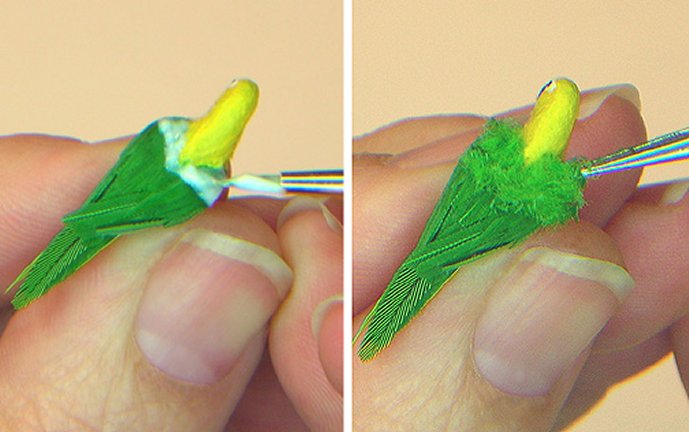
 53. Continue to hold your parrots feet, resting it onto your fingers. Apply glue to the neck and head area. Be careful not to apply any glue around the white eye area and beak. With your tweezers place some flock evenly and press using your fingers or tool of choice. Work slowly around the delicate eye and beak. If you do happen to get glue or flock onto these areas, just dip a paintbrush in a little water and wipe away. You can also use the tip of your tweezers and lift or push away the excess (but I prefer a moist, fine-tipped paintbrush (or microtip applicator) as it tends to grab the flocking and glue better). When you have finished pressing your flock into the glue evenly and smoothly -- blow or brush away the excess.
Enlarge picture showing how flock is applied to the head area
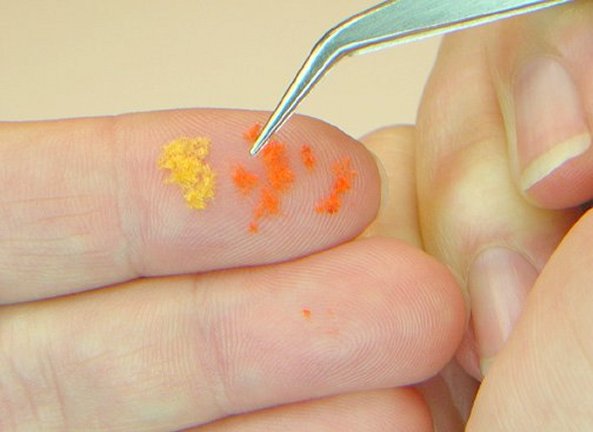
SOME FINAL DETAILS ABOUT COLOR
After flocking using either yellow or a combination of yellow and green (jendaya), you may chose to add a splash of dark orange or orange-red coloring to your parrot. Both the Jendaya & Sun conure have some of these colors (See Tutorial #1 color template for both Sun and Jendaya Conure examples).
After flocking using either yellow or a combination of yellow and green (jendaya), you may chose to add a splash of dark orange or orange-red coloring to your parrot. Both the Jendaya & Sun conure have some of these colors (See Tutorial #1 color template for both Sun and Jendaya Conure examples).
 54. There are several ways you can add this additional color. First, you can trim a tiny amount of orange or orange-red thread into flocking and apply with glue. I prefer this method when working on a larger parrot like a macaw.
Enlarge picture showing how to add color
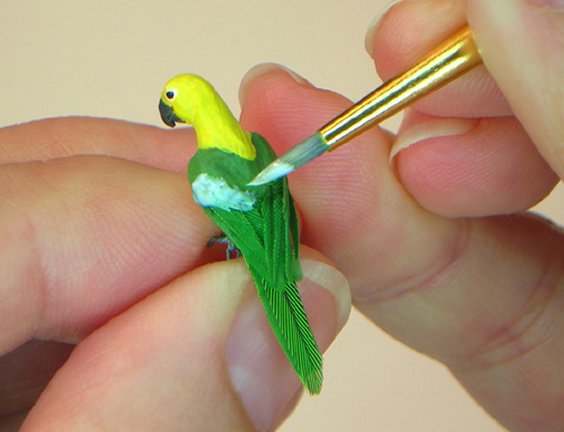
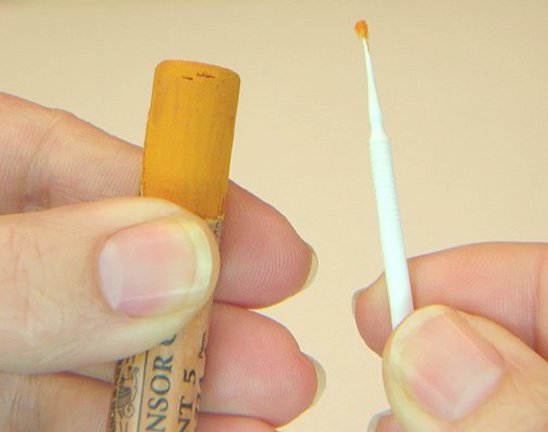
 55. You can also apply this color using a micro-tip fiber applicator and a soft chalk pastel. Rub a small amount of chalk pastel onto your micro tip and apply it to the flocking. For my Jendaya conure, I used a dark orange as well as a cobalt blue on the mid-wing section.
Enlarge picture showing how to use a micro-tip applicator
 56. If you chose to use pastels on your flocking, you will need to spray a fixative onto the surface to keep it from smearing or coming off when handled. After applying chalk pastel colors to the flocking, I will spray a very light coat of alcohol-free, hairspray onto my parrot to set the color. WARNING Do not use too much hairspray, or it will darken or spot your feathers.
Enlarge picture showing how to use chalks
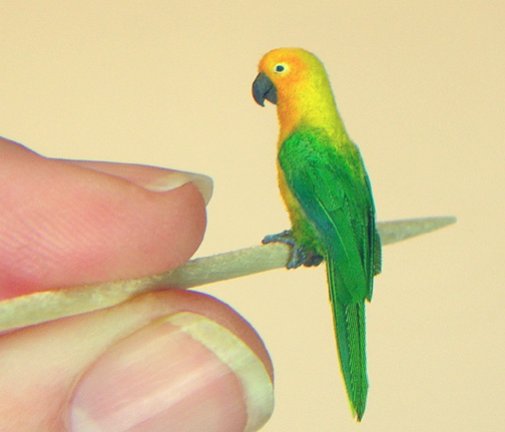
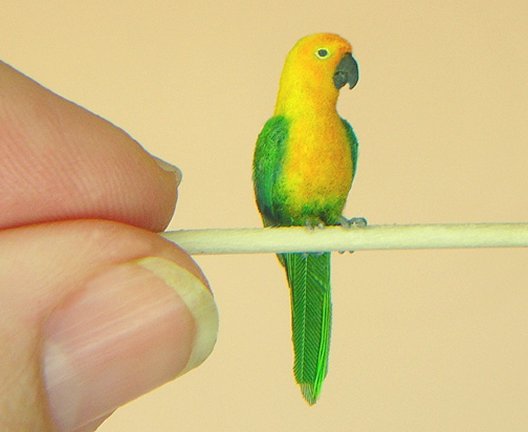
 57. Here is my little Jendaya Conure, who measures 1 inch in length from beak to tail.
Enlarge picture showing completed Jendaya Conure
 58. You have completed your Conure! I hope you had as much fun with this project as I did.
Enlarge picture showing different angle of completed Jendaya Conure
This is the end of Tutorial 2
You have finished your basic parrot sculpt; made the wire feet and attached them to your sculpt; baked/cured your parrot in the oven, and finally painted it with acrylics & enamel. Congratulations! You are ready to move on to the Feather & Flock phase in Class 2. This final phase is where your miniature Conure Parrot will really take shape and come alive!
MEET THE ARTIST
 IGMA Fellow Kerri Pajutee is a self-taught artist that finds sculpting animals a pleasurable and challenging hobby that she has experienced over the last 30 years.
Each one of her animal sculpts are original, one-of-a-kind pieces and can be purchased at select miniature shows or by special order commission. In 2001, she achieved Artisan status for animal figures in the International Guild of Miniature Artisans IGMA. In 2004, she was honored with Fellow membership within the Guild.
Kerri says, she balances her life and hobby with wonderful, supportive family and friends. As a result, she creates her miniature animals on a part-time basis. Kerri says that this arrangement keeps her sane and her sculptures fresh and enjoyable.
Kerri is a valued member and Moderator of the Animal board in the CDHM Forum and has a CDHM Gallery available, just click here.
IGMA Fellow Kerri Pajutee is a self-taught artist that finds sculpting animals a pleasurable and challenging hobby that she has experienced over the last 30 years.
Each one of her animal sculpts are original, one-of-a-kind pieces and can be purchased at select miniature shows or by special order commission. In 2001, she achieved Artisan status for animal figures in the International Guild of Miniature Artisans IGMA. In 2004, she was honored with Fellow membership within the Guild.
Kerri says, she balances her life and hobby with wonderful, supportive family and friends. As a result, she creates her miniature animals on a part-time basis. Kerri says that this arrangement keeps her sane and her sculptures fresh and enjoyable.
Kerri is a valued member and Moderator of the Animal board in the CDHM Forum and has a CDHM Gallery available, just click here.
©
2008-2012 Kerri Pajutee
Reproduced with permission from Kerri Pajutee. All photographs and text appearing in this tutorial are the exclusive property of Kerri Pajutee. Permission is explicitly denied for any republication of text or photographs in this article without the prior express written consent of the author.
BACK