


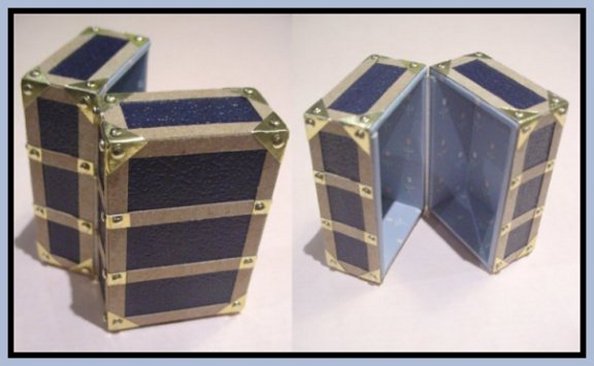
Learn To Make A Dolls
House Dolls Trunk
with CDHM Artisan
Debbie Dixon-Paver
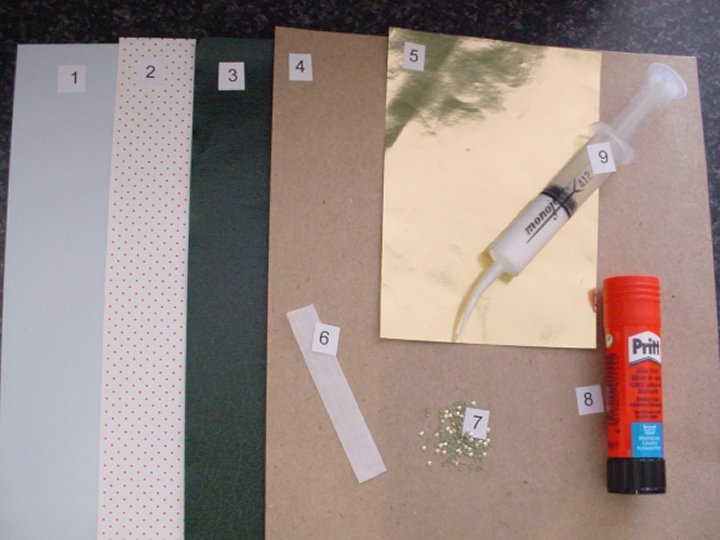
Tools and Materials Needed:
- Framing Mount Board: 1.5mm (0.05") Thick: Cut Into The Following Sized Pieces:
- 2 Pieces 29mm x 43mm (1.14" x 1.69")
- 4 Pieces 43mm x 13mm (1.69" x ½")
- 4 Pieces 29mm x 14.5mm (1.14" x 0.57")
- NOTE
Mount board or matboard in the picture framing industry, is a thin, flat piece of
paper-based material included within a picture frame, which serves as additional
decoration and separates the art from the glass. It comes in many different colours
on one side, but is white on the other side. The one I have used is 1.5mm thick.
Should you find one that is 2mm thick, then change the 14.5mm measurement to 15mm.) - Wallpaper: Mini-Print: (Avoid Stripes And Borders)
- Scrapbooking Card: Leatherette Type Paper In Colour Of Your Choice
- Card: Thin Brown: (similar Thickness To Manilla Card)
- Foil Paper: Gold: (slightly Heavier Than Regular Aluminium Foil)
- Cotton Or Polycotton Fabric: 10mm x 70mm (0.39" x 2.75"): Fraychecked Around The Edges
- 64 Gold Studs (or Sequin Centres)
- Glue Stick
- Tacky Glue: In A Glue-Syringe
- Tools
- Craft knife
- Cutting mat
- Ruler: Metal Type
- Pencil
- Ruler: Regular Wooden Type
- Scissors
- Toothpicks - All paper used during this tutorial is "A4" in size
 Close-up image of materials needed
Enlarge picture of basic supply requirements
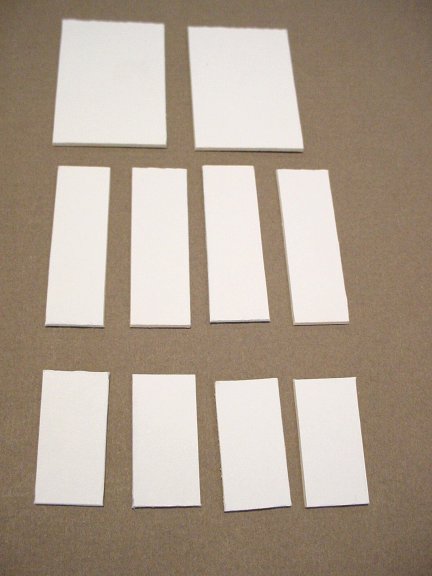
 1. Start by cutting your mount board into ten pieces of the following sizes:
- Two (2) pieces cut to 29mm x 43mm (1.14" x 1.69")
- Four (4) pieces cut to 43mm x 13mm (1.69" x ½")
- Four (4) pieces cut to 29mm x 14.5mm (1.14" x 0.57")
Set aside.
Enlarge picture showing sizes to cut the mat board
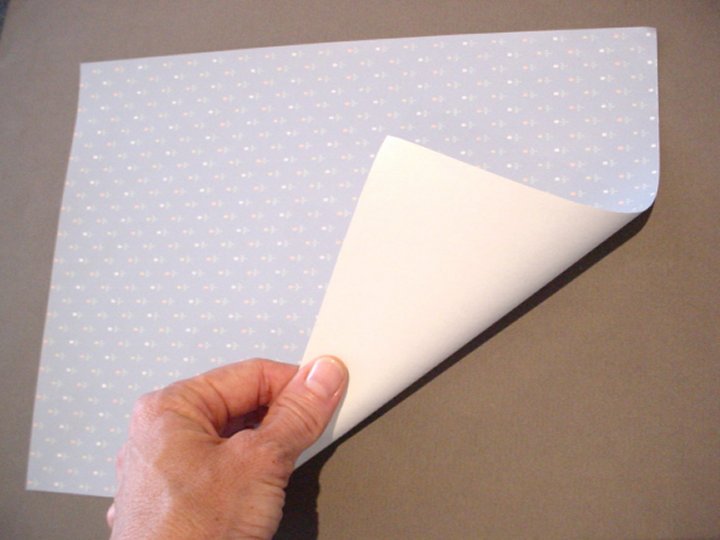
 2. Take up your piece of patterned wallpaper and flip it over to the back side.
Enlarge picture showing where to start with the wallpaper
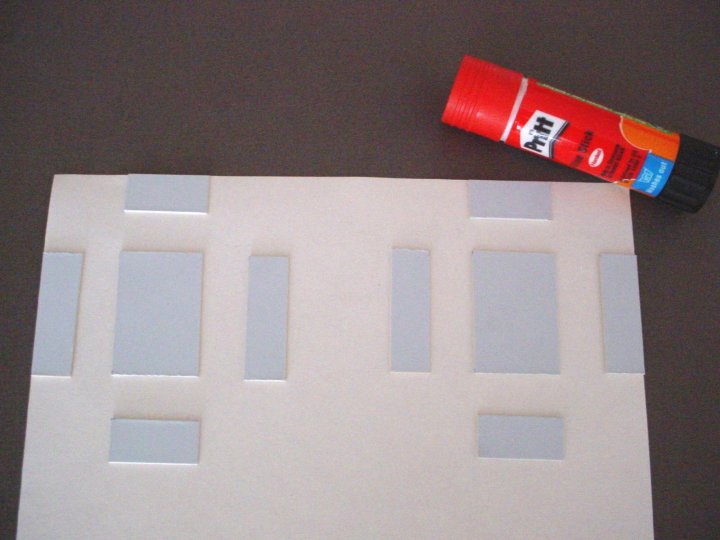
 3. Using your glue stick, paste your 10 pieces of mount board onto the wrong side of your patterned wallpaper. Leave at least a 15mm (½"-¾") gap between pieces.
Enlarge picture showing where to glue the mount board to the wallpaper
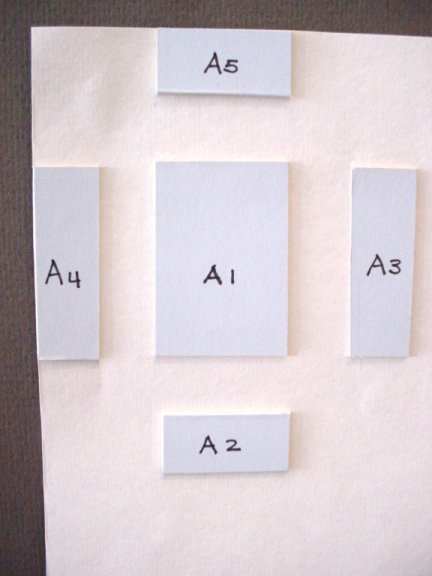
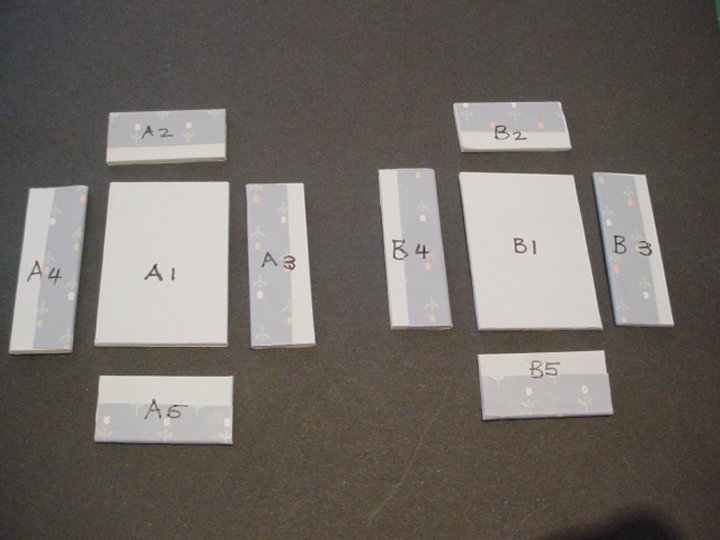
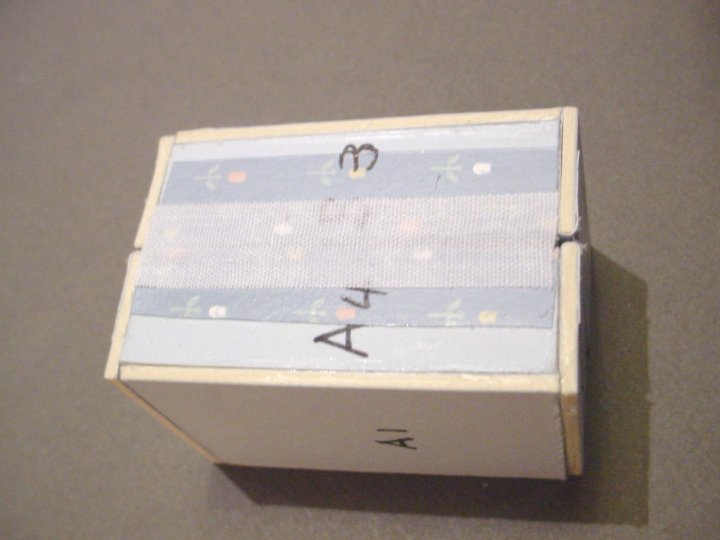
 4. Using a pencil, label your mount board pieces like this: A1, A2, A3, A4, and A5 (reference the image).
Enlarge picture showing how to mark the first part of the mount board
TIP
Label the pieces EXACTLY as I have, not just randomly, or you'll have a problem if you're using a patterned wallpaper that must keep the pattern in the same direction.
Label the pieces EXACTLY as I have, not just randomly, or you'll have a problem if you're using a patterned wallpaper that must keep the pattern in the same direction.
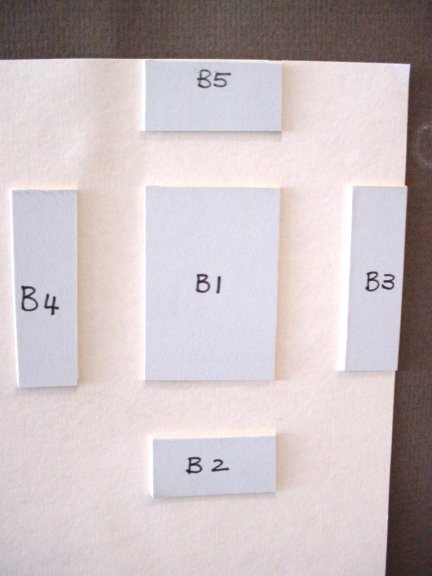
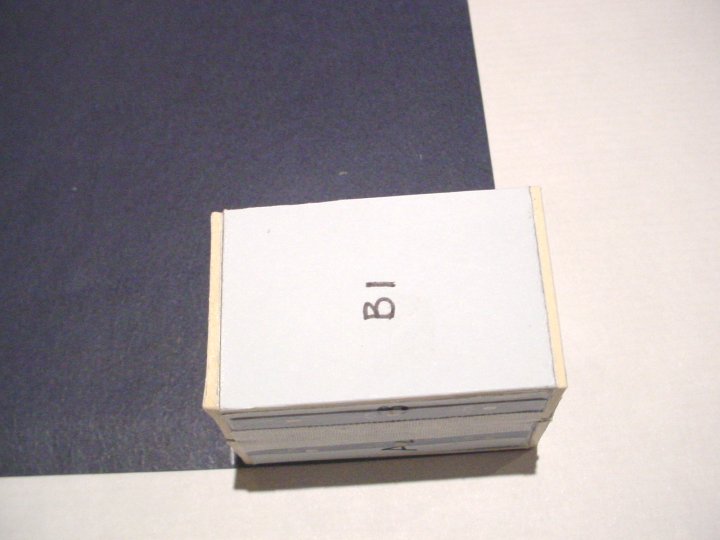
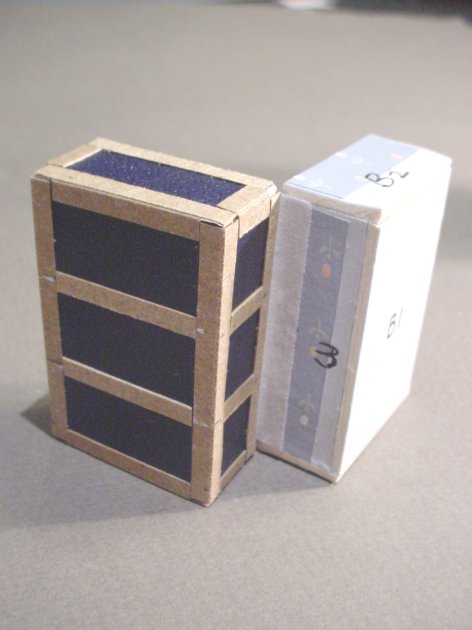
 5. The right side is to be labeled like this: B1, B2, B3, B4 and B5
Enlarge picture showing how to mark the mount board
 6. Using a craft knife on a cutting mat or a small pair of scissors, cut out your pieces as shown, leaving 1cm (1/3") of your wallpaper sticking out beyond the board as shown on 4 of the 5 pieces of your A-side.
Enlarge picture showing how to cut the pieces marked A
 7. Then repeat for side marked B.
Enlarge picture showing how to cut the pieces marked B
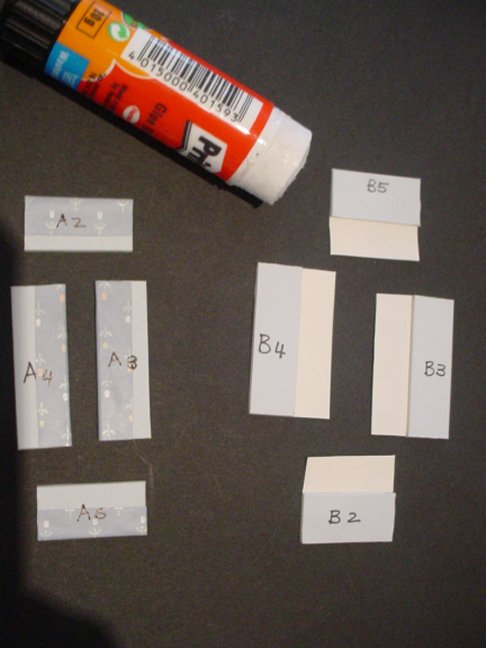
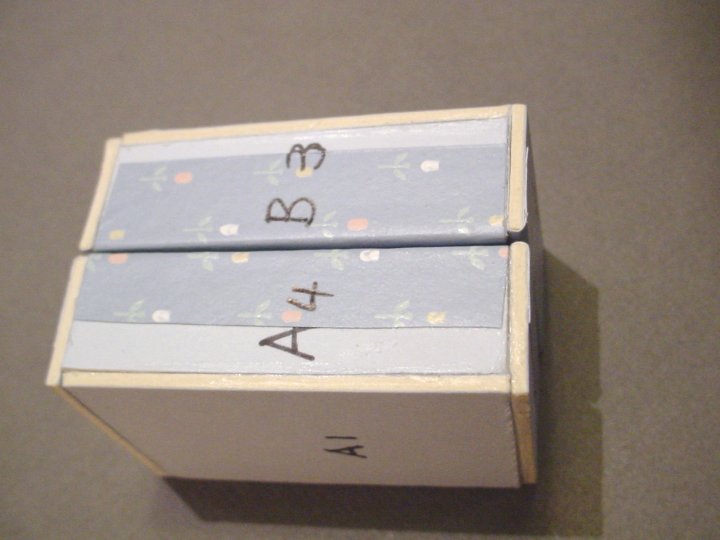
 8. Take the 8 pieces that have wallpaper extending from them and use your glue stick to glue these extended bits onto the mount board. (Pieces A2, A3, A4, A5 and B2, B3, B4 and B5.)
When you glue down the wallpaper it will probably cover the "labels" which you marked onto your pieces earlie; just write them again as they certainly help when it comes to assembling the trunk.
Enlarge picture showing the gluing of wallpaper edges on the A parts
 9. Your ten pieces should now look something like this.
Enlarge picture showing progress so far
 10. Pick up pieces A1 and A2. Using a glue syringe full of tacky glue, or a toothpick, run a line of glue along the top, narrow edge of piece A1 and push piece A2 up against it and hold. (Important: Do not put A2 onto A1 - it butts up against it).
Enlarge picture assembling A1 and A2 together
TIP
If you have printed your own wallpaper, don't use too much glue, otherwise the ink on the paper will run.
If you have printed your own wallpaper, don't use too much glue, otherwise the ink on the paper will run.
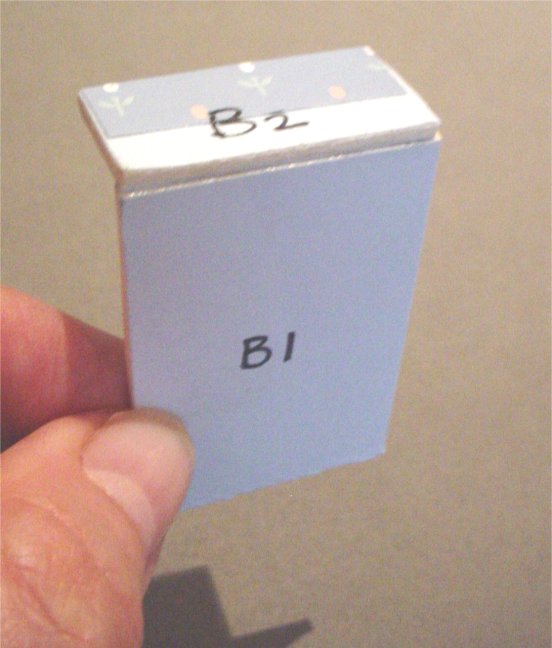
 11. While that is drying, pick up pieces B1 and B2 and repeat the previous step. Glue B1 up against B2.
Enlarge picture assembling B1 and B2 together
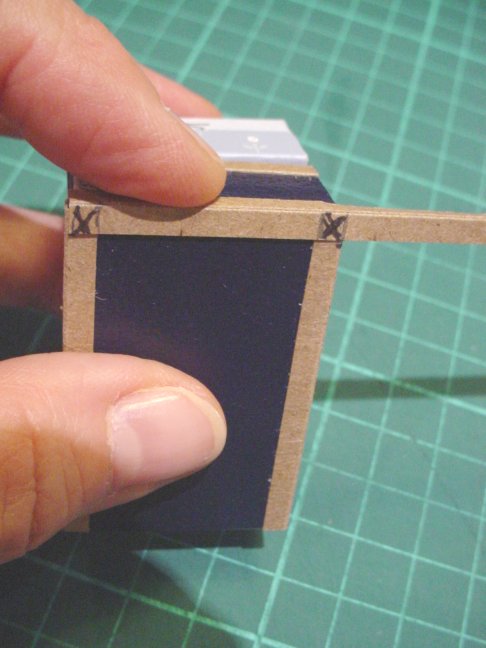
 12. Next, put a line of tacky glue along the rough, long side of A3 NOT the long edge that has wallpaper folded over it, the other long edge, and also along one short edge and glue it on top of A1 as shown in the image.
Enlarge picture showing where to glue the third piece
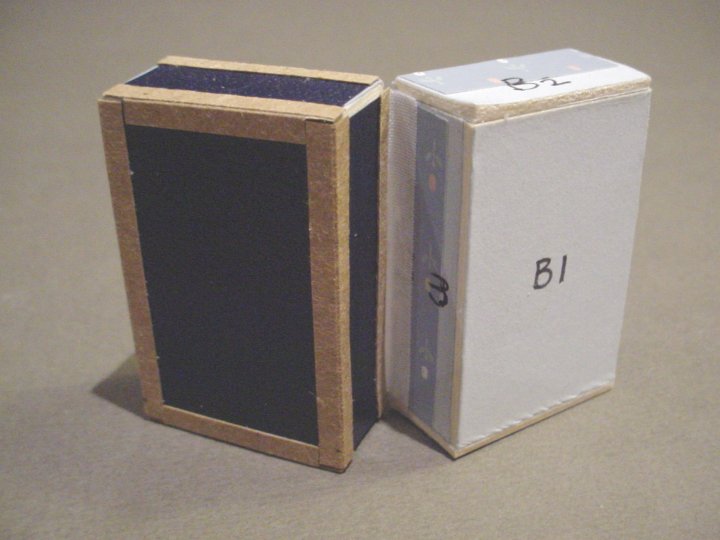
 13. Now repeat the previous step and put a line of tacky glue along the rough, uncovered edge of B3 and glue it onto B1, so that it butts up to B2. Your two sides of the trunk should now look something as shown in the image.
Enlarge picture showing where to attach B3 to B1
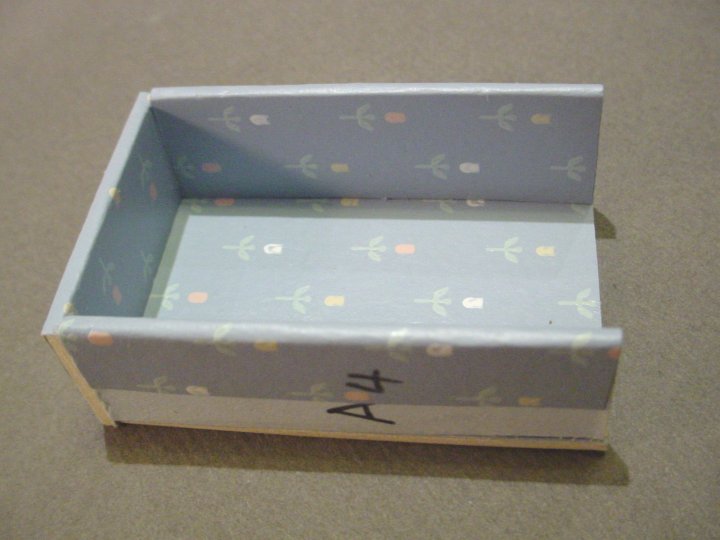
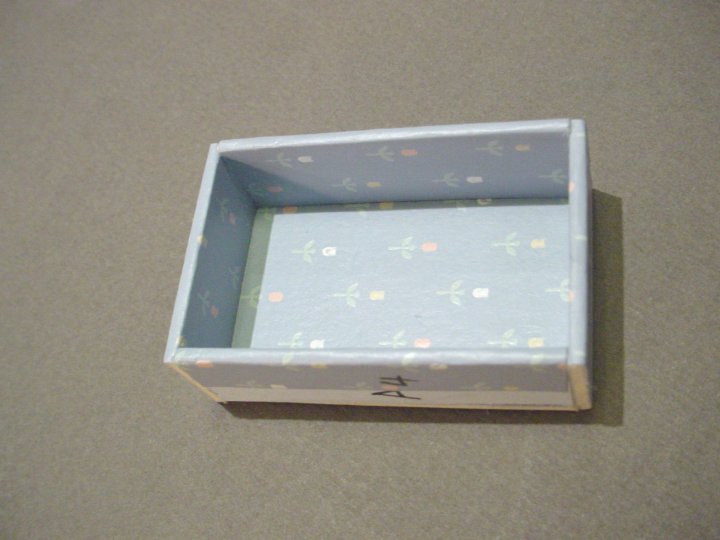
 14. Next, use your tacky glue to attach A4 onto A1, so that it butts up to A2, as shown in the image.
Enlarge picture showing the assembling of A4 to A1
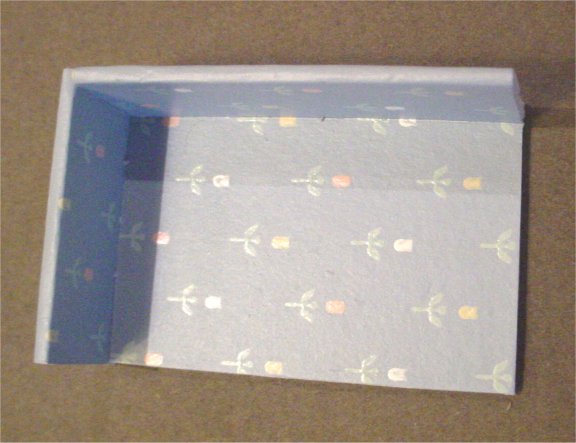
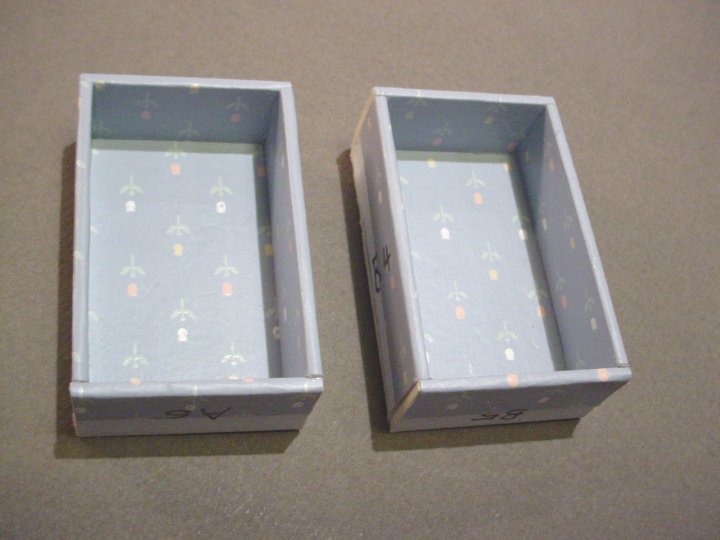
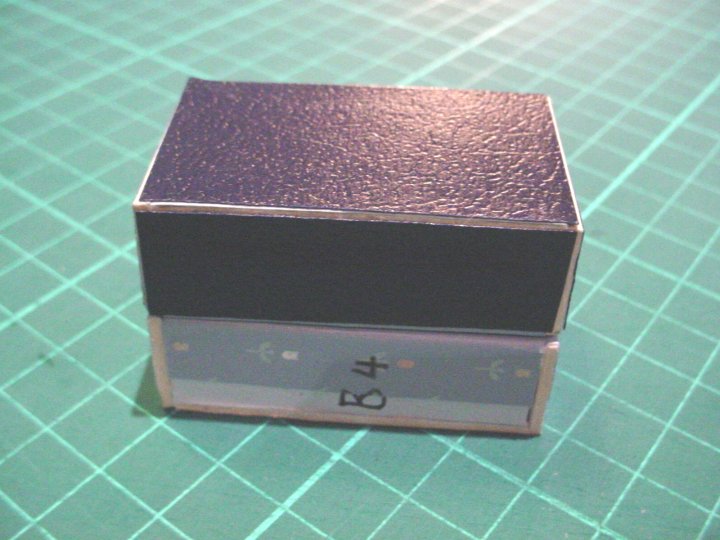
 15. Next, glue B4 onto B1 so that it pushes up against B2. Your two sides should now look like this.
Enlarge picture showing progress so far
 16. Glue piece A5 against A1, butting up to A3 and A4 like this.
Enlarge picture showing the joining of A5 to A1
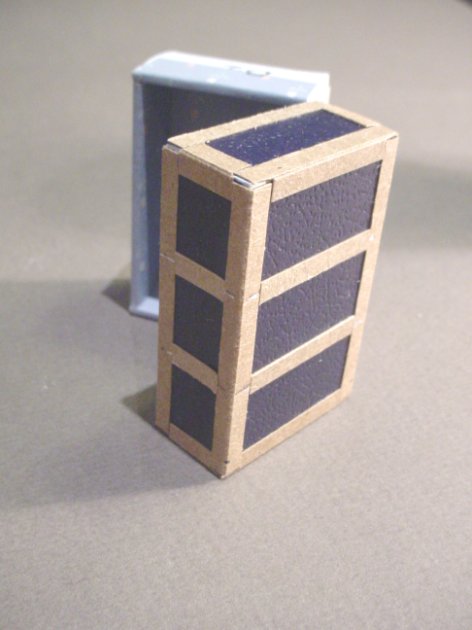
 17. Finally glue B5 against B1, butting up against B3 and B4. Your two sides should look something like this.
Enlarge picture showing where to glue the two parts
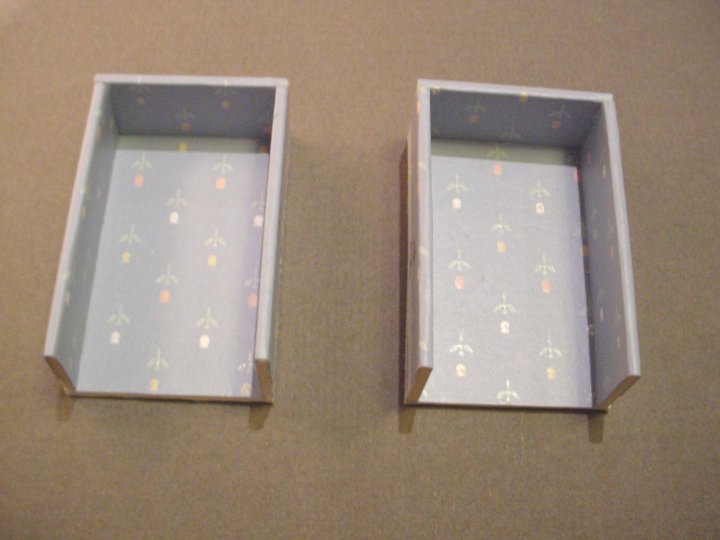
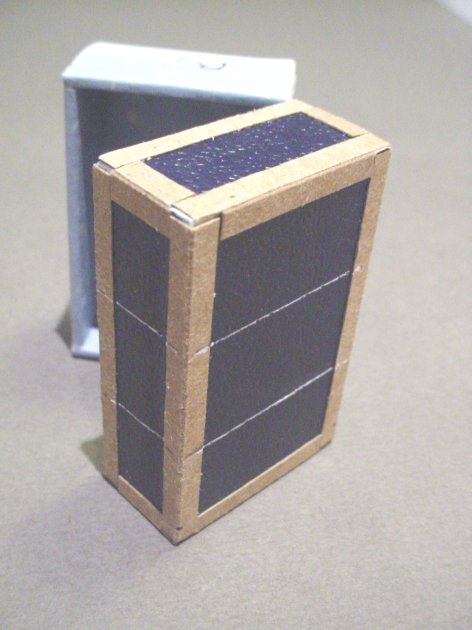
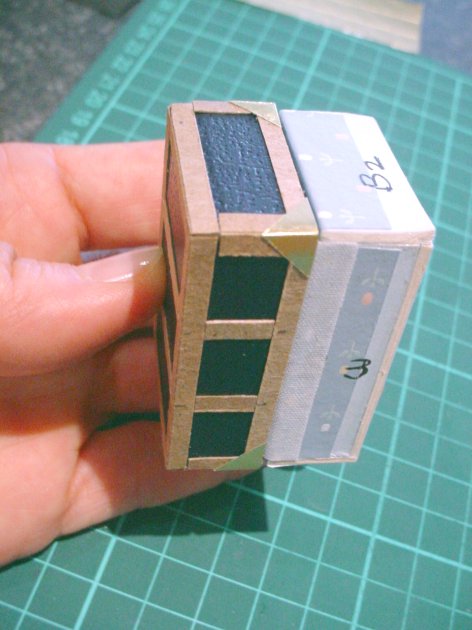
 18. Now place the two sides A and B so that their openings face each other and they are almost touching about 1mm (0.039") apart.
Enlarge picture showing the two sides A and B facing each other
 19. Take your strip of white cotton fabric, place it onto the length of the trunk and mark off where to cut it. Then use your glue stick to paste this cotton strip down, joining the two sides of the trunk together.
Enlarge picture showing where to join the two sides
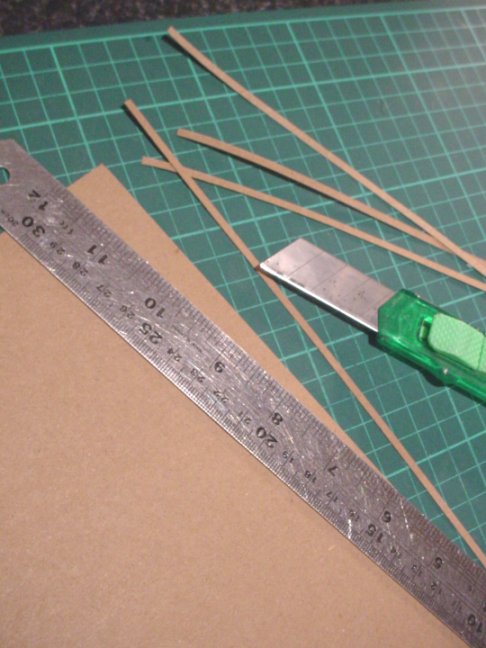
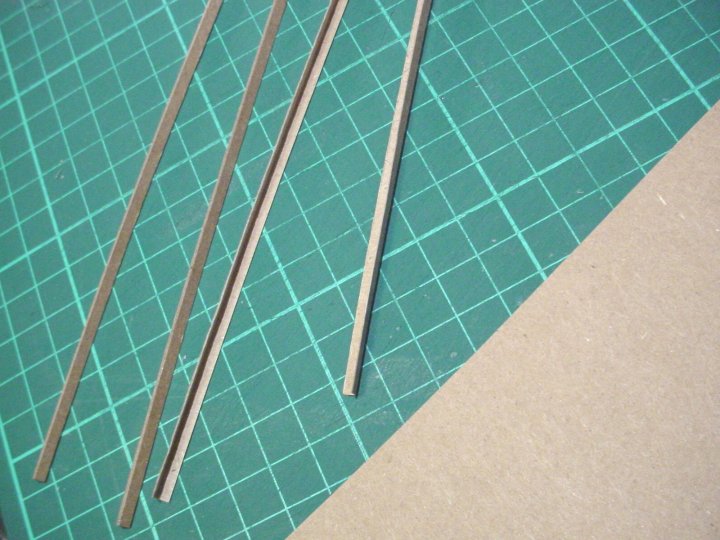
 20. Put your trunk aside for the cotton strip to stick properly and do the following: Take your brownish-coloured card, put it onto a cutting mat and then use a craft knife and metal ruler to cut about six 3mm (0.118") strips from this card.
Enlarge picture showing size to cut the brown card
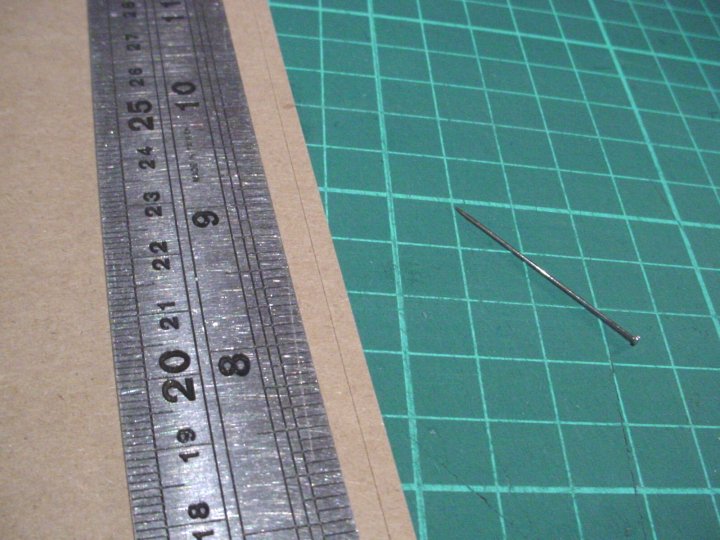
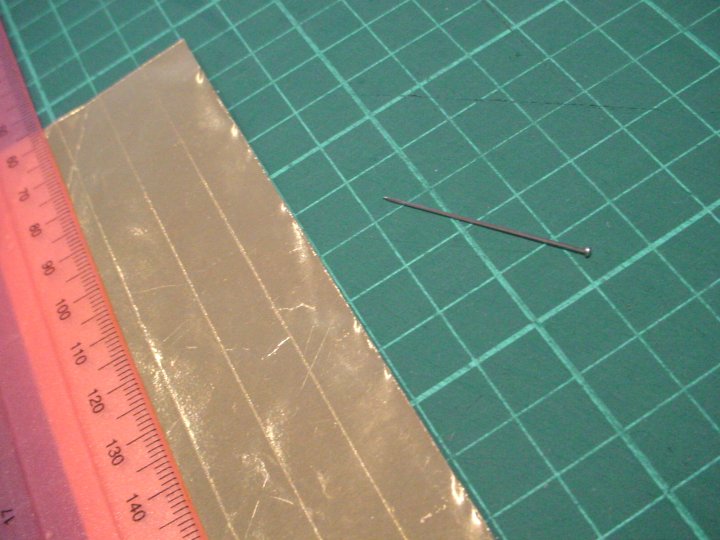
 21. From the same brown card, measure a 3mm (0.118") strip, but instead of cutting it, use a pin or embroidery needle to gently score against the ruler.
Enlarge picture showing where to score the brown card
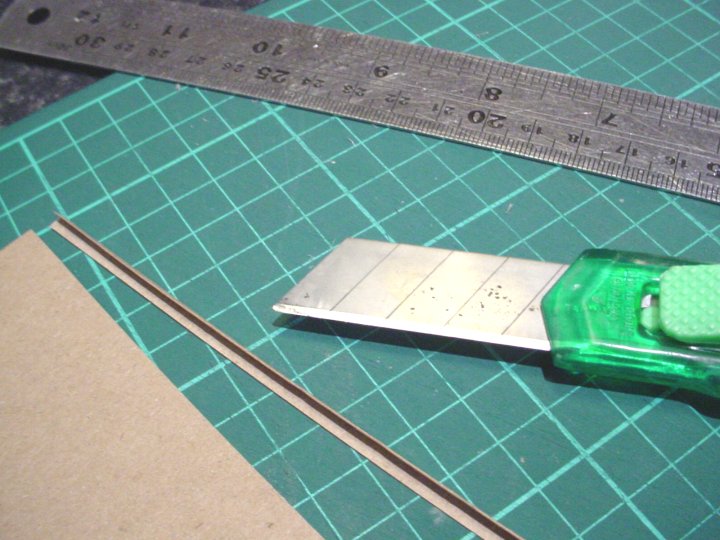
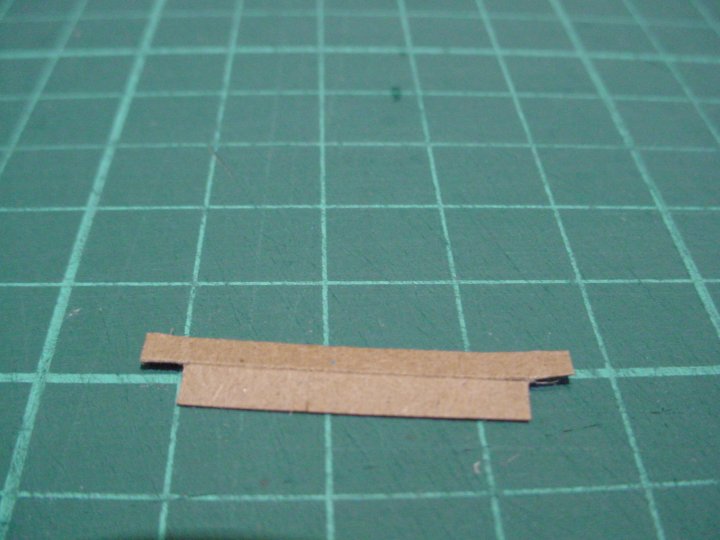
 22. Then, 3mm (0.118") from that scored line, cut with your ruler and craft knife again. You will have a 6mm (0.24") strip that has been gently scored down the centre, so that it can be folded perfectly in half.
Enlarge picture showing where to cut and score the brown card
 23. Cut 3 more of these strips that are scored down the centre, so that you have 4 in total.
Enlarge picture showing how to repeat Steps 22-23
TIP
Now you will be working on just one side of the trunk only. This will complete that side. The other side is identical. You will need to repeat the process on the opposite side afterwards.
Now you will be working on just one side of the trunk only. This will complete that side. The other side is identical. You will need to repeat the process on the opposite side afterwards.
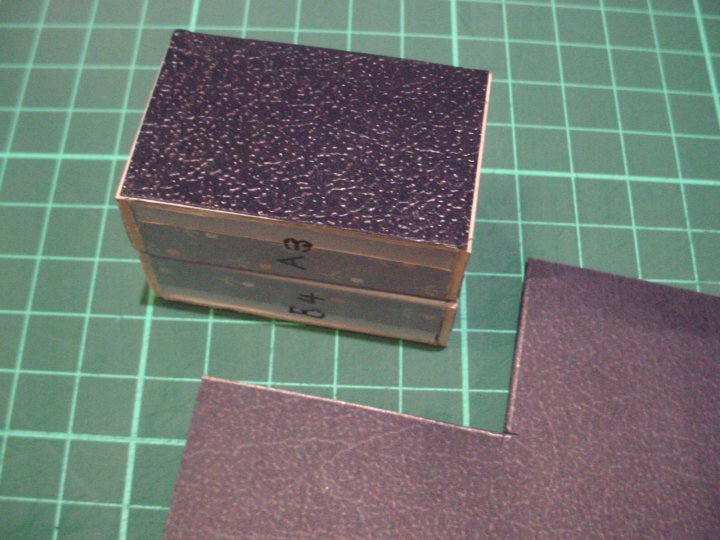
 24. Take your "faux leather" paper or scrapbook card, turn it over to the wrong side and place your trunk down on it in one corner. Draw around the trunk with a pencil.
Enlarge picture showing where to draw the outline
 25. Use your craft knife to cut inside of your pencil lines. Check your cut piece against the trunk for size. Now paste the cut piece onto the trunk using your glue stick. It must not hang over the edges, rather let it be 1mm (0.039") or so smaller.
Enlarge picture showing the glued piece onto the trunk
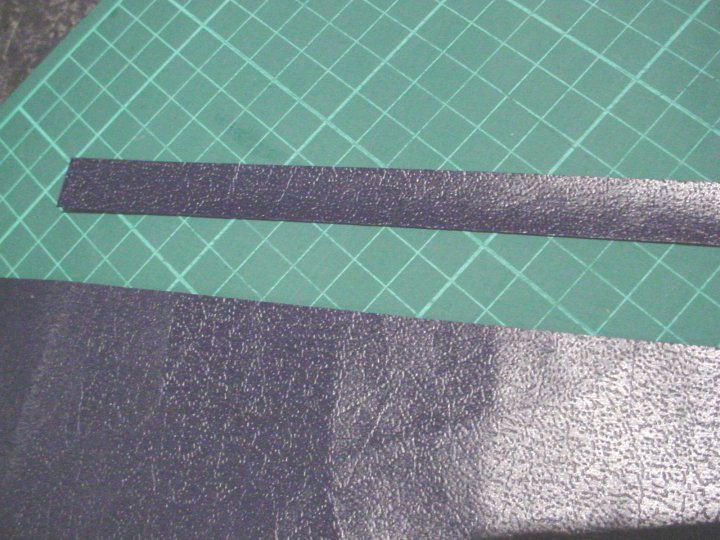
 26. Now cut a strip from this same paper/card about 13mm (½") wide by the length of the paper.
Enlarge picture showing size of strip to cut
 27. Use this strip to cut off 4 pieces which you need to glue to the remaining 4 sides of A (A2, A3, A4 and A5).
Enlarge picture showing four additional strips
TIP
Don't worry about little gaps of mount board showing, these will be covered in later steps.
Don't worry about little gaps of mount board showing, these will be covered in later steps.
 28. Take a strip of the 3mm (0.118") brown card that you previously cut. Now glue and place along the 4 edges of 'A' closest to 'B', as shown in image.
Enlarge picture showing the four strip cuts
 29. Next, use your scored strip to do the very same thing, but on the outer edges of side 'A'. Cut 2 pieces to cover your long outer edges of 'A'. Glue on with tacky glue.
Enlarge picture showing the four scored strip cuts
 30. The next two pieces need to be cut from the folded brown strips once again. You'll need to make little cut outs for a snug fit when gluing, as shown in the image.
Enlarge picture showing another cut strip
 31. After measuring, cut the strip. It should look as shown in the image.
Enlarge picture showing the cut strip
 32. Glue this piece on, then repeat Steps 30, 31 and 32 on the bottom side of 'A' until your trunk looks as shown in the image.
Enlarge picture showing the glued strip on the trunk
 33. Use the same folded/scored strips to finish off the remaining 4 very short edges left on the 'A' piece. Measure, cut and glue; reference the image for how it should appear at this stage.
Enlarge picture showing where to glue the short edge strips
 34. Use your ruler and a pencil to divide your trunk into thirds across its length. (Lines are about 15mm (0.594") apart. I've used a white gel pen where you would draw your lines with the pencil.
Enlarge picture showing the trunk measured into thirds
TIP
Before starting this next step, note to not glue a brown strip onto a brown strip, only between.
Before starting this next step, note to not glue a brown strip onto a brown strip, only between.
 35. Take another of your 3mm (0.118") brown card strips and use it to cut and paste pieces that cover wherever my white lines are on the navy blue.
Enlarge picture showing how to cover any remaining areas
 36. Another view of how to glue the brown strips over the lines.
Enlarge picture showing a different view
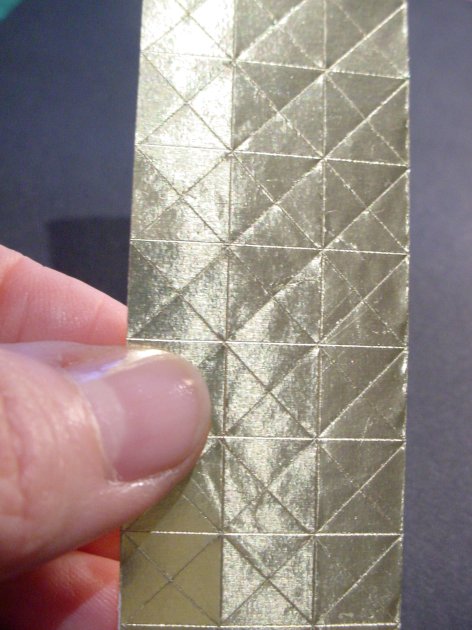
 37. Now, using the gold metallic paper, preferably on a cutting mat marked in centimetres, score a piece of the gold paper into 1cm (0.39") blocks with a pin. Have at least 16 blocks.
Enlarge picture showing how to score the gold metallic paper
 38. Then score lines diagonally through the blocks to form perfect crosses.
Enlarge picture showing how to score lines diagonally
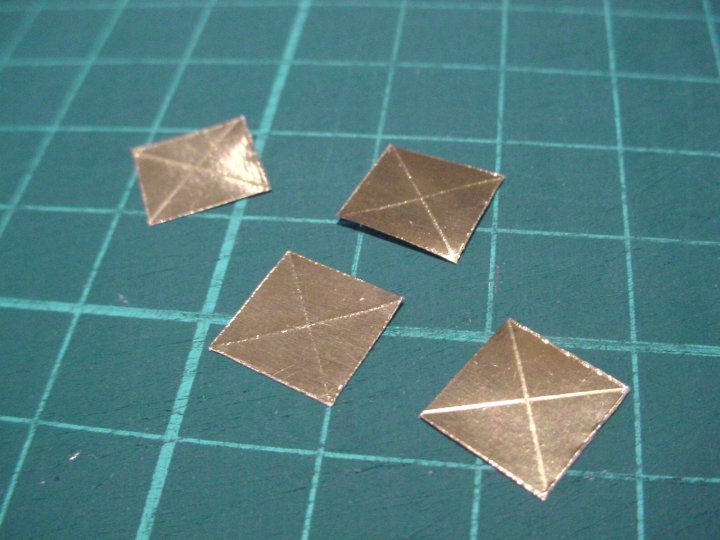
 39. Carefully cut 4 of these gold blocks out.
Enlarge picture showing the four cut diamond blocks
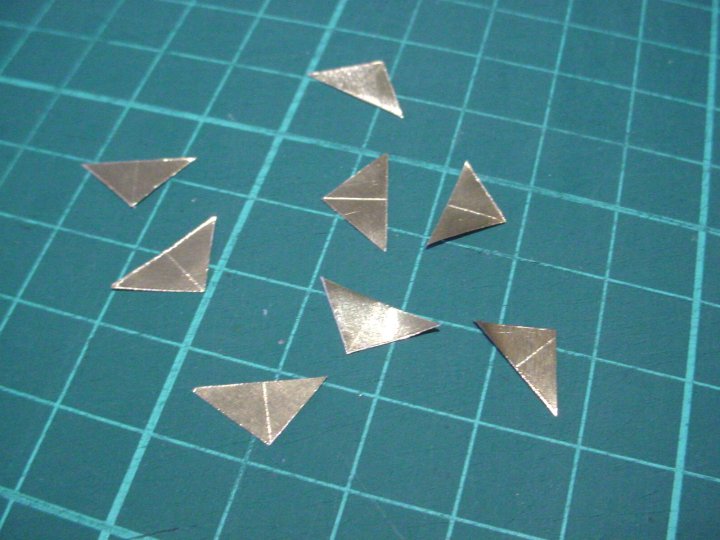
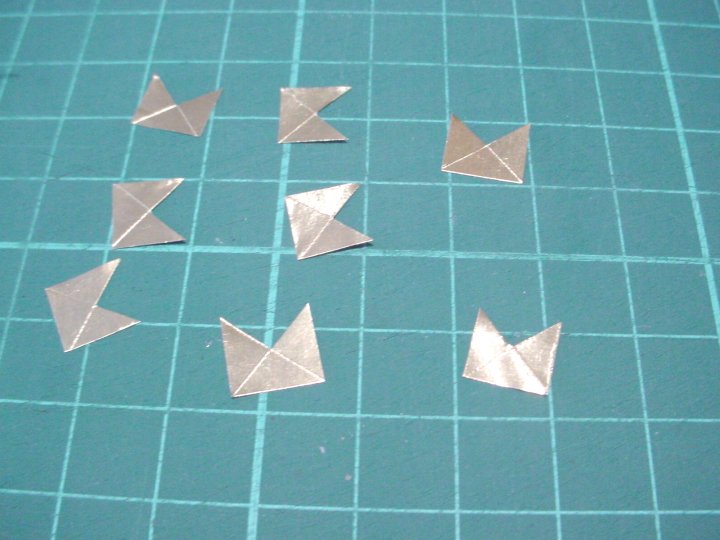
 40. Then cut these gold blocks diagonally across the centre so that you have 8 triangular "halves", as shown.
Enlarge picture showing the triangular halves
 41. Fold the gold triangles carefully on the scored line, then using your tacky glue, paste 4 of these on the 4 corners of side A of your trunk closest to side B. (The other 4 gold triangles will be used on side B later, so put them aside).
Enlarge picture showing where to fold the triangle blocks
 42. Take 8 more gold squares (4 of these will be used on side 'B' of the trunk later). Carefully cut a quarter section out of each square (see image for comparison). I find that a small sharp pair of scissors works best here.
Enlarge picture showing where to cut out the ¼ section
 43. This next step requires the utmost patience. First pick up a gold square that has had a quarter section cut out. On the scored lines gently bend it, put tacky glue on and paste over the 4 outer corners of side 'A'.
Enlarge picture showing how to apply the corners
 44. Next, cut a 3mm (0.118") strip of gold paper. From the strip cut off 3mm (0.118") squares and glue two on the front of the trunk like this.
Enlarge picture showing additional gold applications
 45. Then paste (glue) two of the gold blocks on the back, as shown.
Enlarge picture showing additional gold adornments
 46. Use more of the 3mm (0.118") gold strips to cut off pieces about 7-8mm (apprx ¼") in length, which are folded and glued onto the trunk to look like this. Reference the image for additional details.
Enlarge picture showing even more gold adornments applied to the trunk
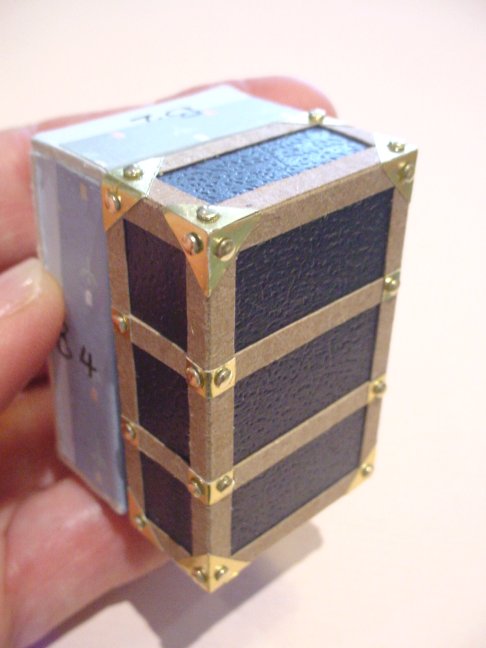
 47. Finally, glue gold studs or sequin centres onto your gold papered bits if required, to look like the trunk in the image.
Enlarge picture showing application of the gold studs
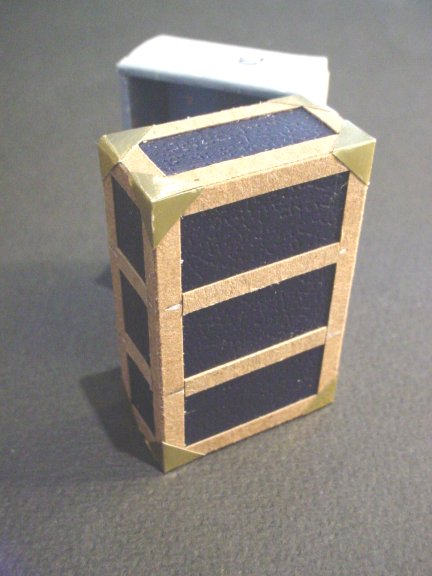
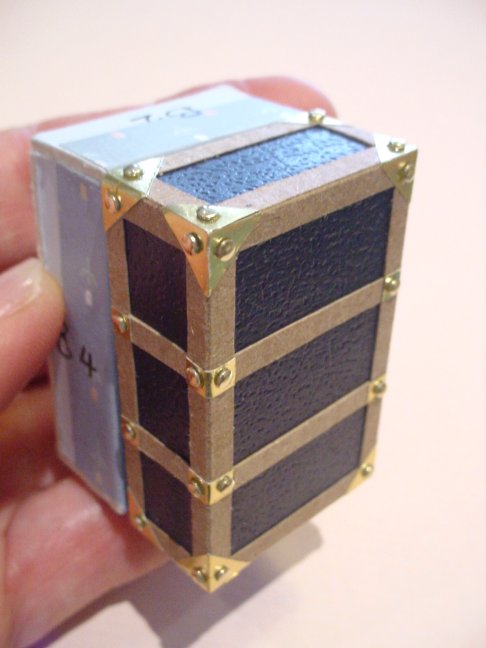
 48. Repeat from Step 20 through to Step 43 to finish off side 'B' of your trunk. Your trunk is now completed and should look like the image.
Enlarge picture showing completed trunk on one side
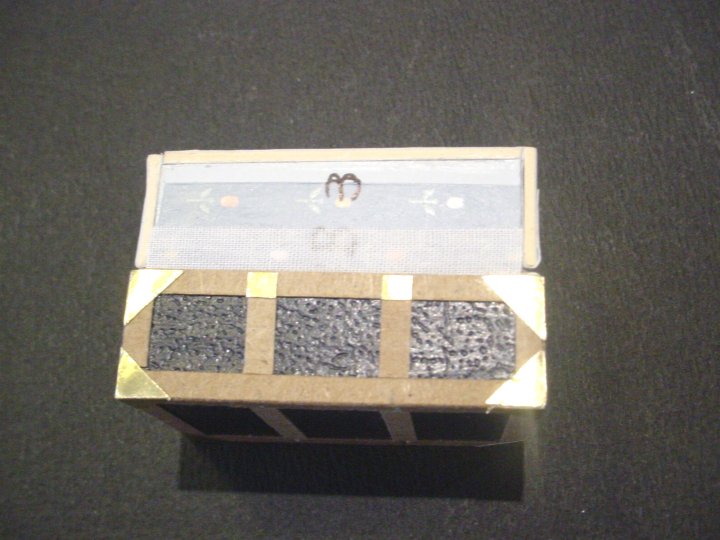
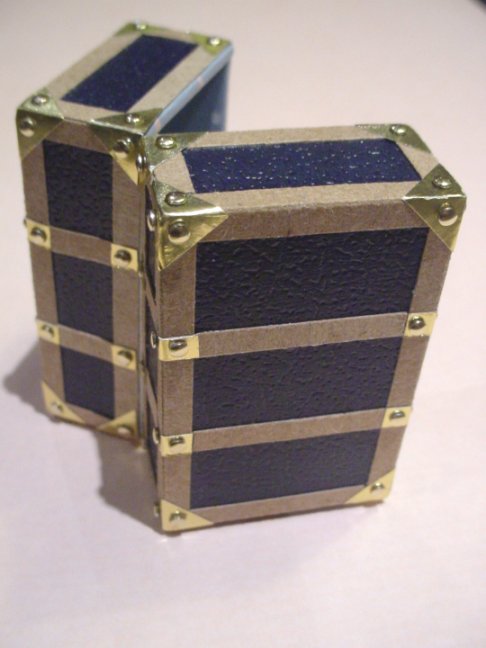
 49. Your trunk is complete. Now you need to make something to put inside your trunk.
Enlarge picture showing completed trunk
MEET THE ARTISAN
 South Africa born artisan Debbie Dixon-Paver lives with her daughter on the east coast of the country. Professionally trained as a school teacher specializing in art, that experience now enables her to work full time as a miniature doll maker.
Professionally she sells dolls under the pseudonym Debbie Cooper Dolls. Specializing in 1:12 scale hand poured, china-painted, porcelain dolls from all different periods in history, from ancient to modern. She sells soley from her CDHM Gallery (click here).
Asked how she got into making such beautiful dolls, she will tell you that about 15 years ago, when her daughter was born, she put together a Victorian dollshouse kit for her nursery. When it came to finding "little people" to inhabit this house, it was as though she'd hit a brick wall.
The dolls which she really liked were way too expensive for her budget. So she ordered some "cheap and cheerful" dolls through mail order and when they arrived she was so disappointed with them. They were made from porcelain and china-painted, but were positively awful. When she was working as a teacher, she worked extensively with a kiln. This, combined with the disappointment of the dolls she had purchased, made her try her hand at making her own porcelain dolls. It was very difficult as she soon discovered that there were hardly any miniature dollmakers in her country to learn from. Working with porcelain was very different to firing or glazing earthenware and stoneware, which she was accustomed to working with. Now as they say, the rest is history.
Debbie is a valued member of the CDHM miniature Forums .
Visit the CDHM Doll Galleries to see Debbie's creations.
South Africa born artisan Debbie Dixon-Paver lives with her daughter on the east coast of the country. Professionally trained as a school teacher specializing in art, that experience now enables her to work full time as a miniature doll maker.
Professionally she sells dolls under the pseudonym Debbie Cooper Dolls. Specializing in 1:12 scale hand poured, china-painted, porcelain dolls from all different periods in history, from ancient to modern. She sells soley from her CDHM Gallery (click here).
Asked how she got into making such beautiful dolls, she will tell you that about 15 years ago, when her daughter was born, she put together a Victorian dollshouse kit for her nursery. When it came to finding "little people" to inhabit this house, it was as though she'd hit a brick wall.
The dolls which she really liked were way too expensive for her budget. So she ordered some "cheap and cheerful" dolls through mail order and when they arrived she was so disappointed with them. They were made from porcelain and china-painted, but were positively awful. When she was working as a teacher, she worked extensively with a kiln. This, combined with the disappointment of the dolls she had purchased, made her try her hand at making her own porcelain dolls. It was very difficult as she soon discovered that there were hardly any miniature dollmakers in her country to learn from. Working with porcelain was very different to firing or glazing earthenware and stoneware, which she was accustomed to working with. Now as they say, the rest is history.
Debbie is a valued member of the CDHM miniature Forums .
Visit the CDHM Doll Galleries to see Debbie's creations.
©
2008-2010 Debbie Dixon-Paver
Reproduced with permission from Debbie Dixon-Paver. All photographs and text appearing in this tutorial are the exclusive property of Debbie Dixon-Paver. Permission is explicitly denied for any republication of text or photographs in this article without the prior express written consent of the author.
BACK
Copyright © 2004-2012
Custom Dolls, Houses & Miniatures / CDHM
Custom Dolls, Houses & Miniatures / CDHM