


Making Miniature Leather Shoes
by Susan Cobb
Materials Needed:
-
Premo or Sculpey III Clay in Light Brown or Brown
Note: Amount of clay needed depends on doll size-for a 1:12 doll; 1/2 of a 2oz. package is adequate. - Stiff Bristled Nylon Art Brush
-
Sculpting Tools
-- Large Dull Craft Needle
-- Smaller Dull Tip Craft Needle
-- Sharp Tip Craft Needle - Brown Embroidery Floss
- E6000 Industrial Glue or Aileen's Tacky Glue
- Scissors
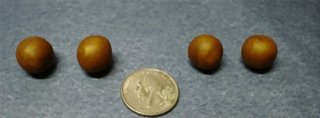
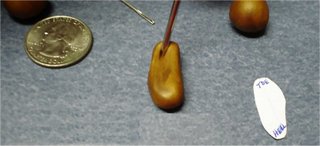
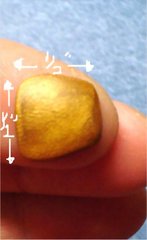
 1.
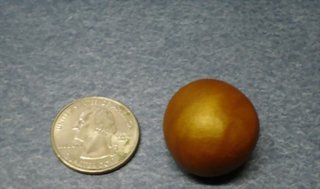
Start with a "shooter marble" large size ball of clay. I have used a half and
half mix of Premo's Burnt Amber & Premo Gold. Mix and condition your clay.
1.
Start with a "shooter marble" large size ball of clay. I have used a half and
half mix of Premo's Burnt Amber & Premo Gold. Mix and condition your clay.
Enlarge Picture to determine size to start with.
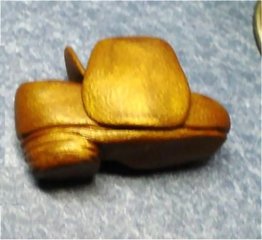
 2.
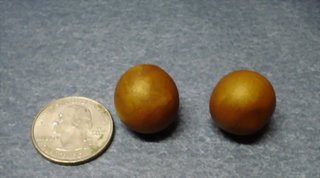
Here is the clay ball, after being mixed and worked to condition it. Conditioning the clay
evenly distributes the plasticizers in the clay and allows it to be more elastic, easily workable,
2.
Here is the clay ball, after being mixed and worked to condition it. Conditioning the clay
evenly distributes the plasticizers in the clay and allows it to be more elastic, easily workable, and produces even curing.
Enlarge Picture of conditioned clay.
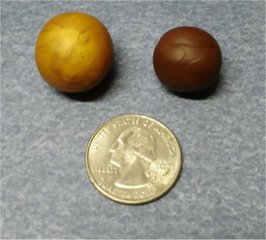
 3. Divide the clay ball in half.
Enlarge Picture of two divided clay balls.
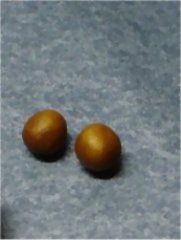
 4. Now divide these balls into half again. You should now have 4 smaller balls of clay. Set two of the
 smaller balls aside, these will be used to make the second shoe in your pair.
Enlarge Picture of four smaller balls.
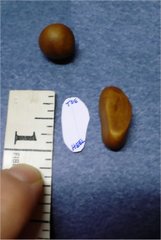
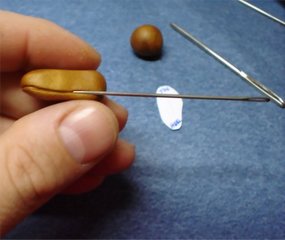
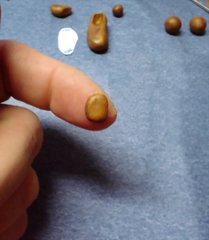
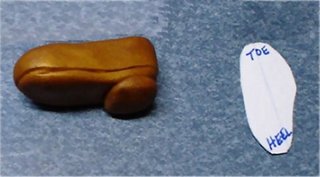
 5. Using one of the remaining balls, form a basic foot shape. You can make a paper template to help you
 determine the correct size and shape of your shoe.
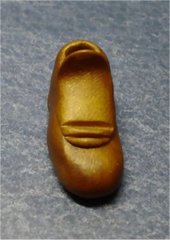
Enlarge Picture forming a basic foot shape.
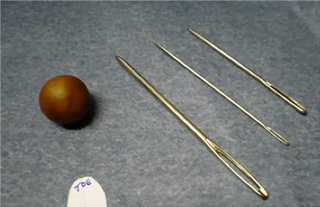
 6. Here is a picture of the craft needles that I use to sculpt. You will need the sharp and largest blunt needle pictured for this project.
Enlarge Picture of the craft needles for sculpting detail.
 7. Use the sharp tip needle to etch a line around the shoe shaped piece of clay. This will create the sole of the shoe.
Enlarge Picture showing how to create sole of shoe.
 8. Use a blunt tip needle to indent the opening of the shoe.
Enlarge Picture showing how to create shoe opening.
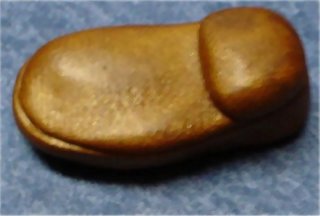
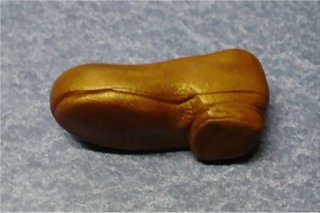
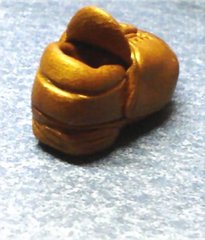
 9. This is what your shoe should look like so far.
Enlarge Picture of shoe so far.
 10.
Using another of the marble sized balls, pinch off two (2) large pea sized balls;
then two (2) smaller pea sized balls. You will have a small remainder scrap piece left.
10.
Using another of the marble sized balls, pinch off two (2) large pea sized balls;
then two (2) smaller pea sized balls. You will have a small remainder scrap piece left.
Enlarge Picture of more small balls of clay.
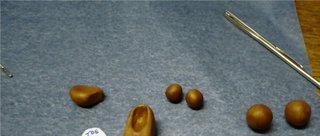
TIP:
Now you have the base of your shoe, at this point if I was making the shoe to fit on a doll, I would add the doll leg and sock (with armature wire inserted) into the shoe opening, so the shoe could bake directly onto the doll's leg, creating a stronger bond. But, this is only going to be a "display" shoe for your doll's house.
Now you have the base of your shoe, at this point if I was making the shoe to fit on a doll, I would add the doll leg and sock (with armature wire inserted) into the shoe opening, so the shoe could bake directly onto the doll's leg, creating a stronger bond. But, this is only going to be a "display" shoe for your doll's house.
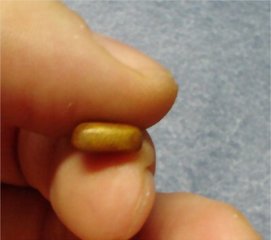
 11. Squash one of the smaller balls flat (about 1/8" thick) and flatten one edge to form a heel shape.
Enlarge Picture of flattened ball.
 12. Edge view of newly formed heel.
Enlarge Picture of edge view.
 13.
Gently press your newly formed heel onto the sole of the shoe, being careful to not
press too hard or you will squash your shoe top. Maintain the heel shape by gently
reshaping the heel with your finger or the side of the one of your needles as you
seal the clay pieces together.
13.
Gently press your newly formed heel onto the sole of the shoe, being careful to not
press too hard or you will squash your shoe top. Maintain the heel shape by gently
reshaping the heel with your finger or the side of the one of your needles as you
seal the clay pieces together.
Enlarge Picture showing how to press sole to shoe base.
 14. Bottom view of the heel attached to the shoe sole.
Enlarge Picture to view heel to shoe.
 15.
Using your sharp tip needle, make multiple scores along the side of the heel, pressing
gently/slightly toward the shoe. This will serve a dual purpose: 1) this will
seal the heel to the shoe and 2) add texture to the heel.
15.
Using your sharp tip needle, make multiple scores along the side of the heel, pressing
gently/slightly toward the shoe. This will serve a dual purpose: 1) this will
seal the heel to the shoe and 2) add texture to the heel.
Enlarge Picture of scored lines along the heel.
 16. Soften the marks on the edge of the heel by gently smoothing it with your finger.
Enlarge Picture of more small balls of clay.
 17.
Hold the shoe by the sides at the heel end with one hand. Make a small indent
in the side of the shoe, in front of the heel. Redraw the sole line if you smudge it.
17.
Hold the shoe by the sides at the heel end with one hand. Make a small indent
in the side of the shoe, in front of the heel. Redraw the sole line if you smudge it.
Enlarge Picture of side indent.
 18.
Use the remaining small pea sized ball to form the shoe tongue. Squash the ball flat
and elongate the piece into an oval shape. It should be approximately 5/8 inches
long by 1/2 inch wide. Place it on the top of the shoe.
18.
Use the remaining small pea sized ball to form the shoe tongue. Squash the ball flat
and elongate the piece into an oval shape. It should be approximately 5/8 inches
long by 1/2 inch wide. Place it on the top of the shoe.
Enlarge Picture of shoe tongue.
 19. Use the side of your sharp tipped needle to make two (2) indents
across the toe end of the shoe tongue.
19. Use the side of your sharp tipped needle to make two (2) indents
across the toe end of the shoe tongue.
Enlarge Picture of defining the tongue.
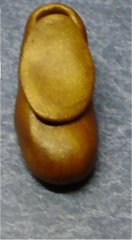
 20. Side view of the shoe so far.
Enlarge Picture of work in progress.
 21.
Use your finger to curve the shoe opening end of the tongue slightly upward. Smooth
down both sides of the tongue, pressing gently to seal it to the shoe sides.
21.
Use your finger to curve the shoe opening end of the tongue slightly upward. Smooth
down both sides of the tongue, pressing gently to seal it to the shoe sides.
Enlarge Picture of top of tongue.
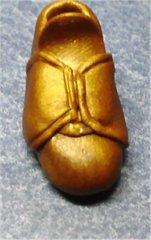
 22.
Divide one of the remaining pea sized balls in half. Squash one of these smaller
balls flat and form a triangle shape.
22.
Divide one of the remaining pea sized balls in half. Squash one of these smaller
balls flat and form a triangle shape.
Enlarge Picture of small balls.
 23.
Then gently flatten the top point of the triangle. The triangle should be approximately
1/16 inch thick (or less, get it as thin as possible). It should measure
approximately 1/2 inch across the longest flat edge (bottom side) by 1/2 inch
from the flattened tip top of the bottom edge.
23.
Then gently flatten the top point of the triangle. The triangle should be approximately
1/16 inch thick (or less, get it as thin as possible). It should measure
approximately 1/2 inch across the longest flat edge (bottom side) by 1/2 inch
from the flattened tip top of the bottom edge.
Enlarge Picture of triangle measurements.
 24.
Place the clay on the shoe, with the longest side on the shoe/sole seam line. The front
should end where the toe side of the shoe tongue ends. The back should end where the
tongue starts to curl upward at the shoe opening.
24.
Place the clay on the shoe, with the longest side on the shoe/sole seam line. The front
should end where the toe side of the shoe tongue ends. The back should end where the
tongue starts to curl upward at the shoe opening.
Enlarge Picture showing shoe flap.
 25. Front view illustrates where the piece should be in relation to the shoe tongue.
Enlarge Picture showing shoe flap and tongue.
 26. Another view of placement.
Enlarge Picture showing another view.
 27.
Fold the clay piece down over onto the top of the shoe. Press the edges gently onto
the shoe. Use your sharp tip needle to trace a line 1/16 inch along the outer edge
of the clay side piece.
27.
Fold the clay piece down over onto the top of the shoe. Press the edges gently onto
the shoe. Use your sharp tip needle to trace a line 1/16 inch along the outer edge
of the clay side piece.
Enlarge Picture folding flap.
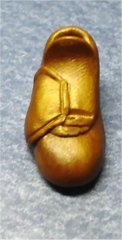
 28. Repeat this step for the other side of the shoe using the remaining
 pea sized ball of clay.
Enlarge Picture showing both flaps.
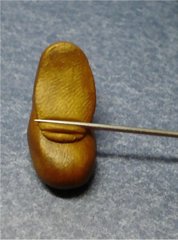
 29. Use your sharp tip needle to poke holes in the shoe for the laces.
Enlarge Picture showing lace holes.
 30.
Use your sharp tip needle again to etch a line in the clay from the tongue
side of the shoe opening around the back tot he other side of the shoe.
30.
Use your sharp tip needle again to etch a line in the clay from the tongue
side of the shoe opening around the back tot he other side of the shoe.
Enlarge Picture showing defined edge of shoe.
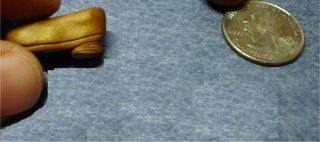
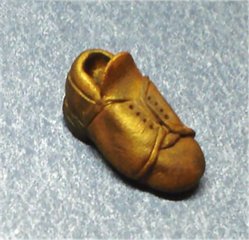
 31. We are ready to add color depth to the shoe using art chalks.
Enlarge Picture of art chalks.
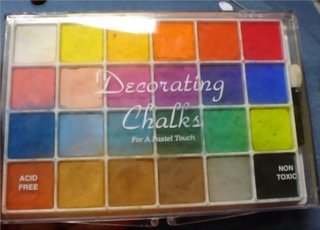
TIP:
If you find that the clay is getting soft, periodically put the clay in the refrigerator for short periods to cool it down between steps.
If you find that the clay is getting soft, periodically put the clay in the refrigerator for short periods to cool it down between steps.
 32.
Use the side of your sharp tip needle to make small lines at wear points on the
shoe. This will give the shoes a lived in look once the chalks have been applied.
32.
Use the side of your sharp tip needle to make small lines at wear points on the
shoe. This will give the shoes a lived in look once the chalks have been applied.
Enlarge Picture showing wear points.
TIP:
If you are only making display shoes and not to be actually worn by a doll, you can also darken the inside of the shoe openings with dark color chalk, which will give the shoe opening the illusion of depth.
If you are only making display shoes and not to be actually worn by a doll, you can also darken the inside of the shoe openings with dark color chalk, which will give the shoe opening the illusion of depth.
 33.
Lightly brush dark brown and black chalk into the creases and across the wear
marked areas to give the shoes the patina of real leather.
33.
Lightly brush dark brown and black chalk into the creases and across the wear
marked areas to give the shoes the patina of real leather.
Enlarge Picture showing applied chalks.
 34. Use the black chalk to darken the sole and heel areas of the shoe.
Enlarge Picture showing applied chalk to bottom of shoe.
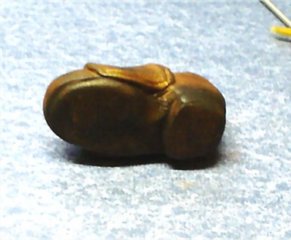
TIP:
The chalk does not need to be sealed since it is baked into the clay. However, if you want a shiny shoe finish you can seal the shoe with Sculpey glaze.
The chalk does not need to be sealed since it is baked into the clay. However, if you want a shiny shoe finish you can seal the shoe with Sculpey glaze.
 35.
Now bake your shoe according to the clay manufacturer's recommendations for the type of
clay you are using. My shoe needed to bake for approximately 40 minutes at 275 degrees.
35.
Now bake your shoe according to the clay manufacturer's recommendations for the type of
clay you are using. My shoe needed to bake for approximately 40 minutes at 275 degrees.
Enlarge Picture showing preparation for baking.
 36. While the clay is baking, separate out a single strand of embroidery floss to use as a lace.
Enlarge Picture showing embroidery floss.
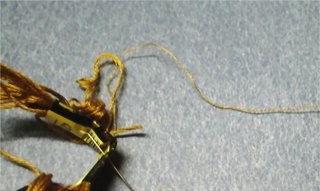
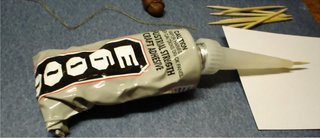
 37.
You can use e6000, Aileen's Tacky glue or any super glue to attach the lace strands
onto the shoe. Have several sharp toothpicks handy for this step.
37.
You can use e6000, Aileen's Tacky glue or any super glue to attach the lace strands
onto the shoe. Have several sharp toothpicks handy for this step.
Enlarge Picture of glue.
TIP:
I just want to add here-if you use super glue, make sure it is one that you have pre-tested on the type of clay you are working with. Some super glue will react with clay with nasty results. I really like the E6000 glue for an all around glue.
I just want to add here-if you use super glue, make sure it is one that you have pre-tested on the type of clay you are working with. Some super glue will react with clay with nasty results. I really like the E6000 glue for an all around glue.
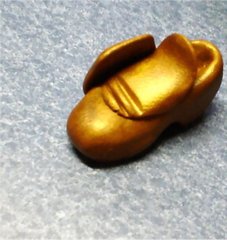
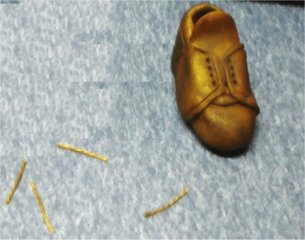
 38.
Cut several short lengths of the floss thread. Apply a little glue to one end; using
a sharp toothpick poke the end of the thread down into the pre-drilled lace hole in the
shoe. Measure the distance to the opposite heel and trim the thread to length. Apply
glue to the remaining lace end and poke the tip into the corresponding lace hole. Tie
a bow with a length of the floss thread and apply glue to the back of the bow. Attach
the bow to the shoe.
38.
Cut several short lengths of the floss thread. Apply a little glue to one end; using
a sharp toothpick poke the end of the thread down into the pre-drilled lace hole in the
shoe. Measure the distance to the opposite heel and trim the thread to length. Apply
glue to the remaining lace end and poke the tip into the corresponding lace hole. Tie
a bow with a length of the floss thread and apply glue to the back of the bow. Attach
the bow to the shoe.
Enlarge Picture of applied laces.
TIP:
If you have trouble getting the laces placed, try putting a little bit of glue on the tip of the lace, then give it a twist to stiffen it the floss. Add a tiny spot more glue and stick it in the lace hole that way. Then tip the other side of the lace with glue and use tweezers to guide it into the other side of the shoe.
If you have trouble getting the laces placed, try putting a little bit of glue on the tip of the lace, then give it a twist to stiffen it the floss. Add a tiny spot more glue and stick it in the lace hole that way. Then tip the other side of the lace with glue and use tweezers to guide it into the other side of the shoe.
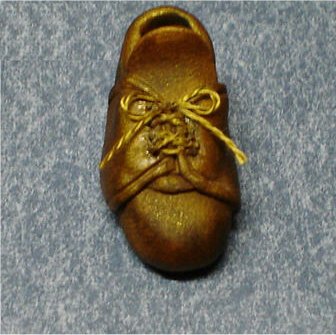
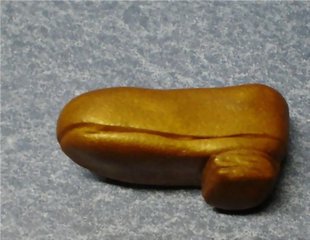
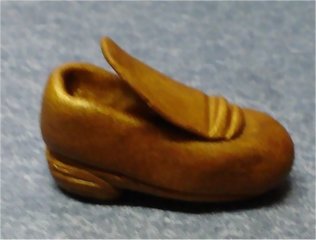
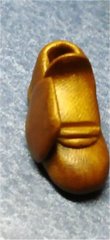
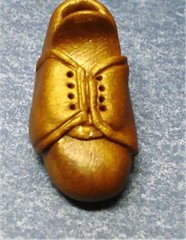
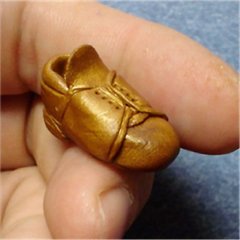
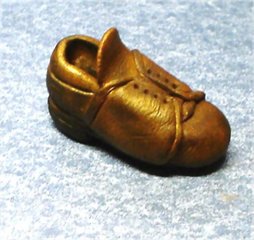
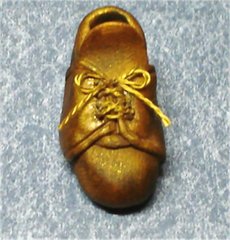
 39.
You have now finished a laced leather look clay doll shoe to display in your doll
house. Repeat the same steps to make and finish the other shoe now.
39.
You have now finished a laced leather look clay doll shoe to display in your doll
house. Repeat the same steps to make and finish the other shoe now.
Enlarge Picture of finished shoe.
MEET THE ARTIST
Susan Cobb is a stay at home wife and mother. She makes dolls and miniatures as her main hobby. She started making mainly miniatures about a year, year and a half ago, after joining CDHM. She became interested in trying minis after browsing through the CDHM Artisan listings.
Before she started making miniatures, she had been making fairies. She says that she doesn't really specialize in any one area, rather she makes a variety of miniatures, including dolls, animals, birds, and miscellaneous dollhouse stuff for around the house. She has been working in clay for two and a half years.
Susan Cobb is a valued member of the CDHM Forums. Visit the Galleries today.
© 2007-2013 Susan Cobb and CDHM.org
Reproduced with permission from Susan Cobb. All photographs and text appearing in this tutorial are the exclusive property of Susan Cobb.
Permission is explicitly denied for any republication of text or photographs in this article without the prior express written consent of the author.
Permission is explicitly denied for any republication of text or photographs in this article without the prior express written consent of the author.