


Making a Miniature Cake by
IGMA Fellow Betsy Niederer
Materials Needed:
-
Premo Polymer Clay:
5053 Burnt umber - 12oz block
5001 White - 1 block
5310 Translucent - 1 block
(If you don't like to use Premo, just get a good deep brown, and a medium yellow in the clay of your choice, as well as white and translucent.)
5572 Cadmium yellow - 1 block - Kato Polyclay Medium - 2oz bottle (available at Polymer Clay Express -- You can use TLS or liquid Fimo as an option if you can't find Kato)
- 1 4x4 ceramic tile - or something flat that can go in the oven like an old plate (please don't use the plate for food once you use it for clay)
- Kemper Rose Cutter Set - # K50 (available at Polymer Clay Express)
- Pasta machine, an acrylic roller, or a bottle for rolling clay
- 2 or 3 popsicle (craft) sticks for mixing clay
- Several toothpicks (cocktail sticks)
- 1 pin
- cornstarch or powder
- 1 single edge razor blade
- Baby wipes or some paper towels to keep your hands clean
- Kemper Clay Cutter - 3/16th inch circle (if you don't have one you can use a drinking straw)
- Delta Texture Magic - one tube of white (they have this at Michaels and AC Moore) If you can't find this you can use modeling paste
- One glue syringe
Preheat your oven to either 275°F ( 135°C) if you are using Premo or Sculpey, or 265°F (129°C) degrees if you are using Fimo.
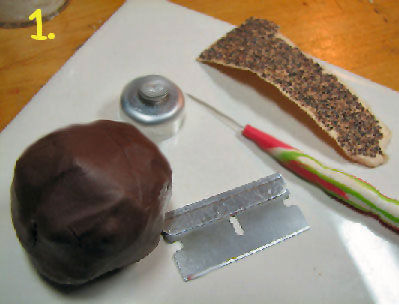
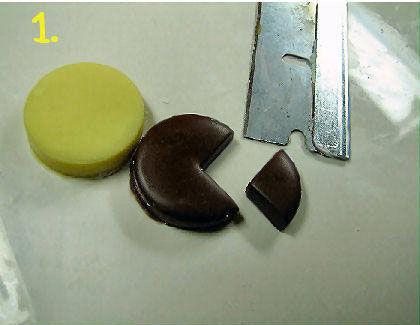
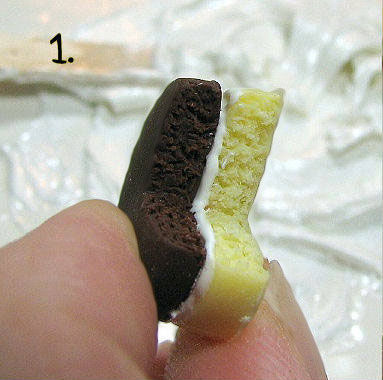
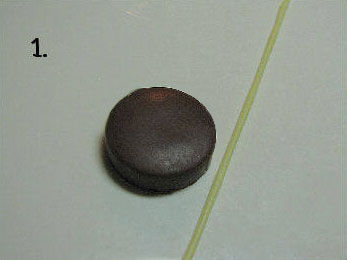
 1. You will need a piece of your burnt umber or dark brown clay, pasta machine or rolling device, the ¾ inch (2 cm) rose cutter, a pin, a cutting blade, and a piece of sand paper (optional). I always work on my ceramic tile so I can transport my work directly into the oven. If you don't have a tile you can bake your cake on foil or a paper plate (it won't burn).
Break off a piece of your brown clay (1/4 of a block is more than enough) and mush it in your hands until it is soft and workable. Enlarge Picture of cake materials
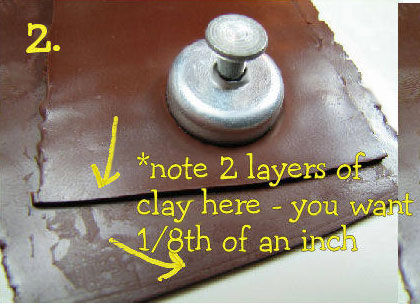
 2. When your clay is ready, roll it through your pasta machine to get the air bubbles out. You will want your cake layers to measure about 1/8th of an inch thick ( 4 mm). To do this on my machine I roll the clay through the thickest setting. I cut the clay in half and lay half on the tile. I roll the second piece through the 4th smallest setting, then lay that on top of the first piece of clay on the tile. Since all machines are different you'll have to see what works best for you.
Enlarge Picture of rolled polymor clay
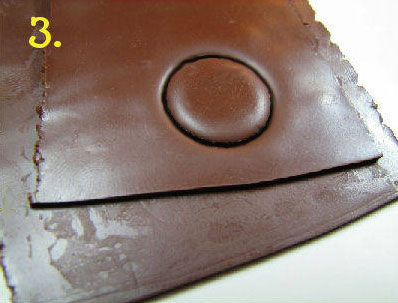
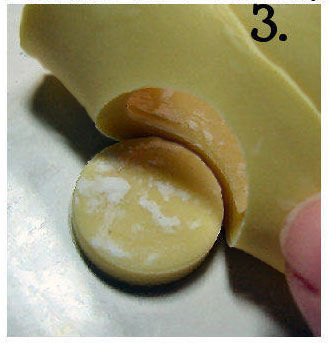
 3. Cut the clay. Your cake layer "should" stick to your tile and not come off inside the cutter. If it does, just try again after brushing some cornstarch over the clay, and dusting the inside of the rose cutter. Brush off any excess cornstarch.
Enlarge Picture of clay cutting
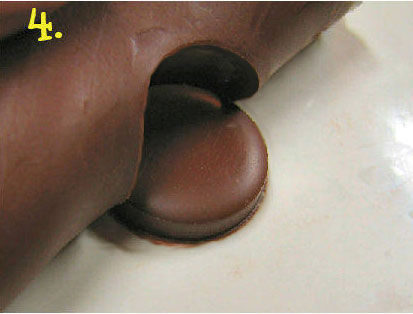
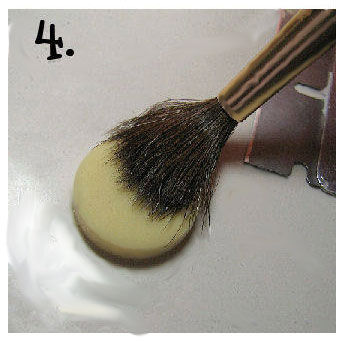
 4. Pull the excess clay away, leaving your layer.
Enlarge Picture of removing excess clay
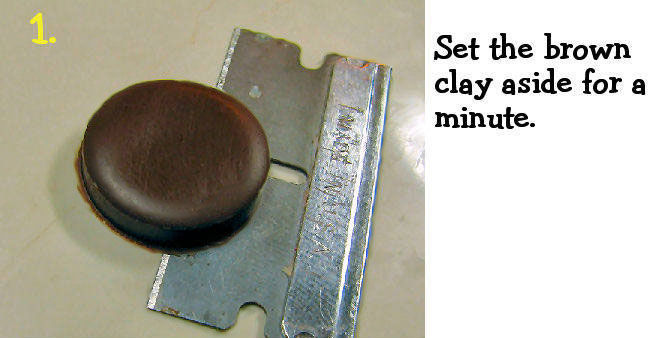
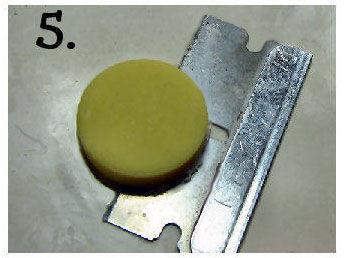
 5. Use your blade to loosen the layer from the tile, and set it aside to cool a bit and harden.
Set the brown clay aside for a minute.
Enlarge Picture of loosening the clay
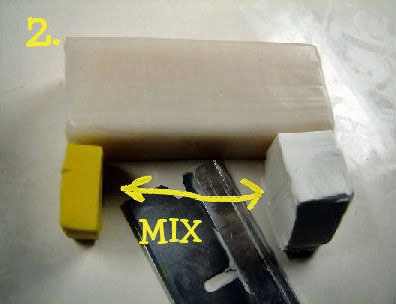
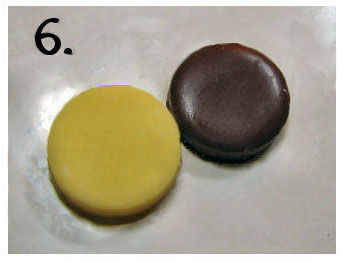
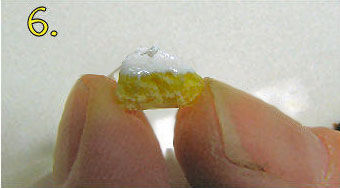
 6. To make the vanilla layer you'll need ¼ of a bar of translucent. Then break off ¼ of the bar of white, and use ¼ of that. Break off ¼ of a bar of yellow, and use about 1/8th. These proportions are shown in the picture. Mix the white and yellow together.
Enlarge Picture of mixing the Polymer clay
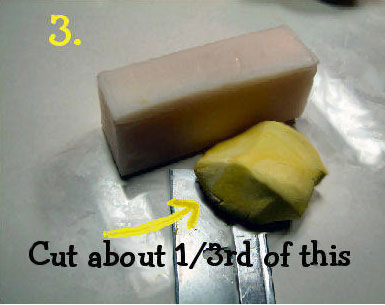
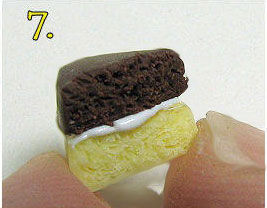
 7. Take about 1/3rd of the light yellow mix and set it aside.
Enlarge Picture of setting aside the Yellow clay
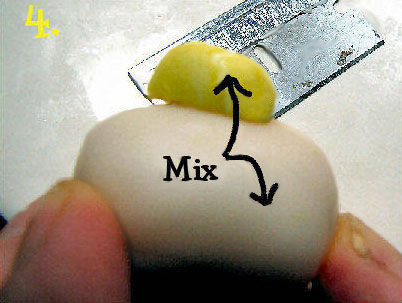
 8. Condition the translucent, and add the 1/3rd chunk of yellow. The proportion should look approximately like that in the picture. If you have any questions - err on the side of less yellow. You can always add more later if necessary. Mix this well!
It is important to remember that when you are going to start working with your white and translucent clay that you wash your hands to get off any of the brown, and any dust. I always dust my hands with cornstarch too, just to be sure all of the dust is off. You'd be surprised what can be on your hands!
8. Condition the translucent, and add the 1/3rd chunk of yellow. The proportion should look approximately like that in the picture. If you have any questions - err on the side of less yellow. You can always add more later if necessary. Mix this well!
It is important to remember that when you are going to start working with your white and translucent clay that you wash your hands to get off any of the brown, and any dust. I always dust my hands with cornstarch too, just to be sure all of the dust is off. You'd be surprised what can be on your hands!
Enlarge Picture of mixing translucent and Yellow clay
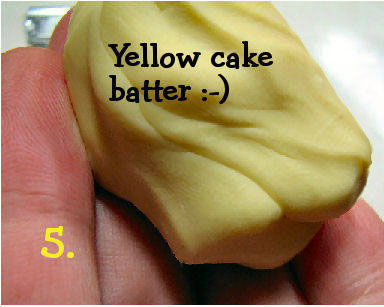
 9. You will hopefully end up with a very translucent light yellow. Translucence is very important when making vanilla cakes - too much of the colored clay will make your cake look chalky after it is baked. You'll have enough to make lots of cakes, so store the excess in a plastic baggie to keep it clean.
Enlarge Picture of mixed cake batter
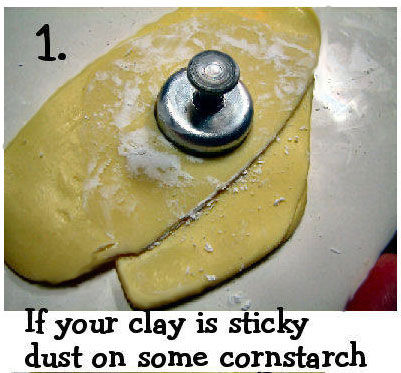
 10. Proceed as before, you will want the layer to measure about 1/8th inch (4mm) thick. I find that this mix tends to be a bit stickier than the brown, so I dusted the clay with cornstarch.
Enlarge Picture of the dusted cake layer
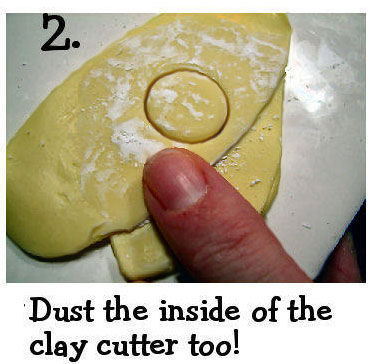
 11. Cut out your circle. If it doesn't stick to the tile, remember to dust the inside of the cutter with cornstarch.
Enlarge Picture of cutting the Vanilla layer
 12. Remove the excess clay
Enlarge Picture of removing excess cake layer
 13. Dust off the top.
Enlarge Picture of dusting the top of the cake layer
 14. Remove the layer with your razor blade and set it aside for a minute to cool
Enlarge Picture of set aside the Vanilla layer
 15. We're ready to cut slices!
We're going to cut the slices before we texture the cake.
Enlarge Picture of Preparting to cut Slices
TIP: Remember, if your clay is sticky you can dust it with cornstarch, then brush it off when you're done!
 16. Starting with the chocolate layer, cut a slice with your blade. To show off the inside best I try to get a slice about ¼ the size of the cake.
Enlarge Picture of cutting the cake Slices
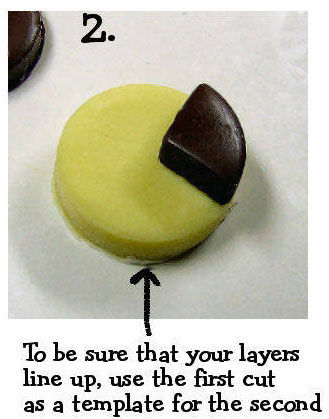
 17. Since the layers will be lined up, you'll want them to look even. Use the chocolate wedge as a template on the vanilla layer to get a similar slice.
Enlarge Picture of lining up the layers
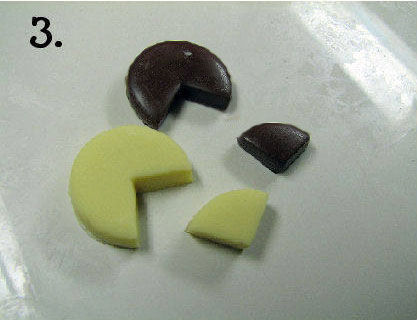
 18. Cut the miniature cake layers as shown.
Enlarge Picture of cutting the layers
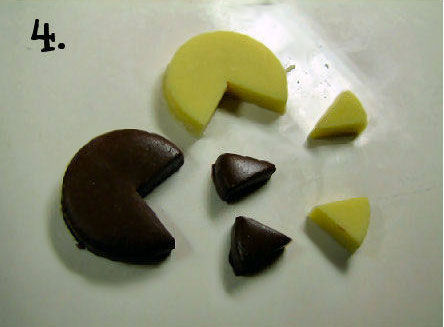
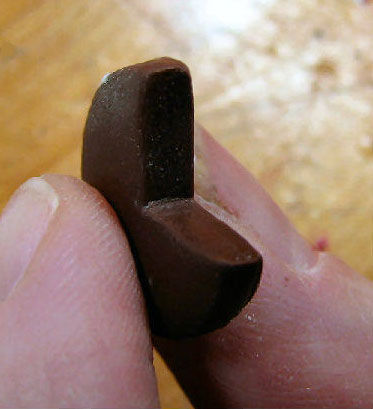
 19. Cut the slices in half to make 2 servings of cake.
Enlarge Picture of slicing the layers again
TIP: The key is to hold your cake lightly so it stays in shape. If the clay is getting too soft just place it in the freezer for a few minutes to firm it up again. You can also dust your fingers with cornstarch. If you get fingerprints on the cake don't worry! They will be covered with icing
 20. Texturing the layers is a little tricky if you have hot hands. You want to try to keep the layer's shape, so hold it very, very gently as shown. If you find the clay is getting mushy and not holding it's shape you can place it in the freezer for a minute. We're not going to worry about fingerprints on the top of the cake because it's going to be covered with icing.
Enlarge Picture of holding the Cake
 21. (a)The lazy way of making the cake texture is to press a piece of sand paper against the cut surface. It looks better if you do it the hard way. This method is just if you are in a hurry to complete your miniature cake!
Enlarge Picture of using sand paper to texture a Cake
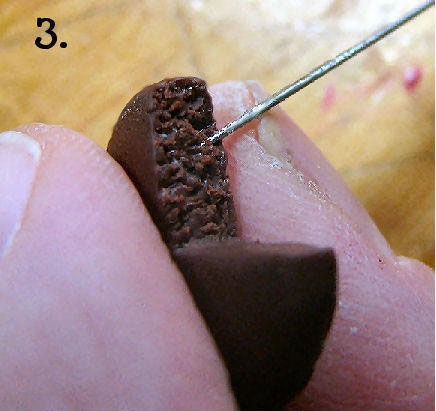
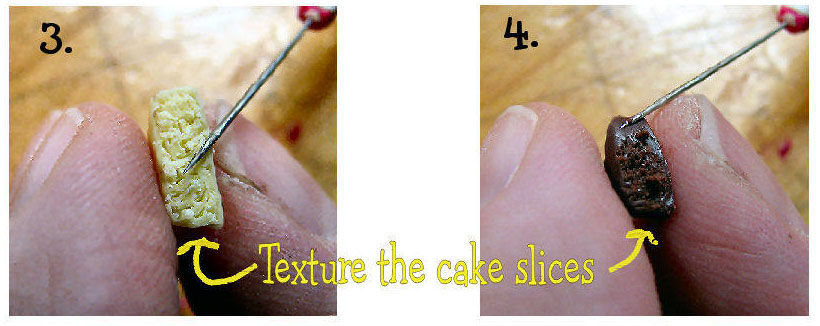
 21 (b) The Preferred method of texturing the cake: is to use a pin to tease up the clay on the cut surface. Be gentle, you don't want it to look like you've obviously stirred up the clay. You might have to go over it a couple of times.
Enlarge Picture of using a pin to realistically texture your Cake
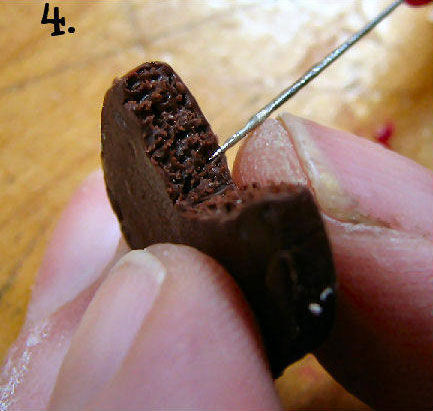
 22. Texture the entire cut cake surface.
Enlarge Picture of surfacing the cut Cake surface
 23. Now that the vanilla layer has cooled a bit you can proceed as above. If your cake gets warm and starts to lose its shape, remember you can always freeze it for a few minutes. Remember to hold the clay very gently, and work slowly.
Enlarge Picture of texture vanilla slice
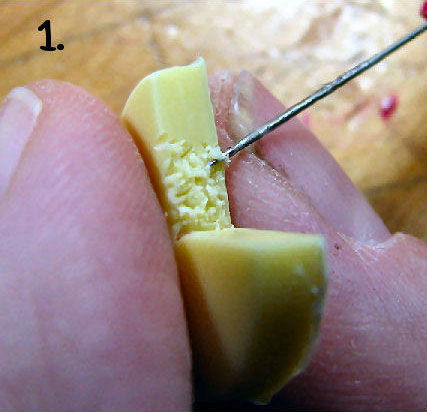 24.Texturing the entire cut surface of the Vanilla slice.
Enlarge Picture of the textured the whole vanilla slice
 25. Texture the cut cake slices too. I generally only do one side since I have the slices laying on a plate.
Enlarge Picture of the texturing cake slices
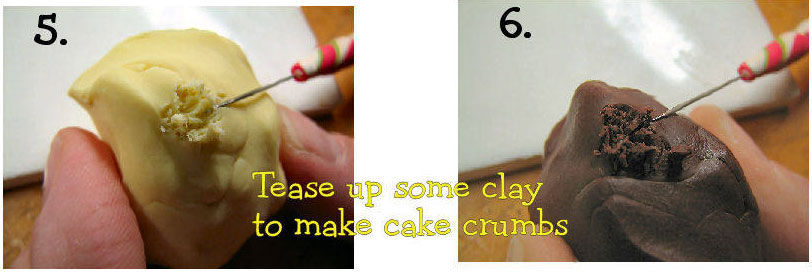
 26.You'll want some crumbs for the cake plate, so use your pin to make some vanilla and chocolate crumbs
Enlarge Picture of making Chocolate and Vanilla crumbs
TIP:
Don't poke holes in the clay - you want to scrape the pin against the clay surface - swirl it, make little circles, anything that helps to give the cake texture.
If it doesn't look crumbly enough try and cool it in the fridge and try again.
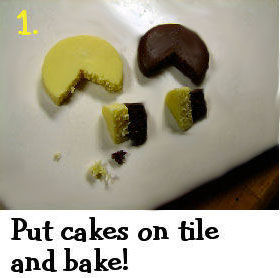
 27. Set your layers, slices, and crumbs on your tile and bake for about 15 minutes in your preheated oven. Don't worry about not baking them for the entire thirty minutes (in the case of Premo and Fimo) since they will be going into the oven two more times. We just want to harden them up so we can frost them.
Enlarge Picture of baking your Miniature Cake
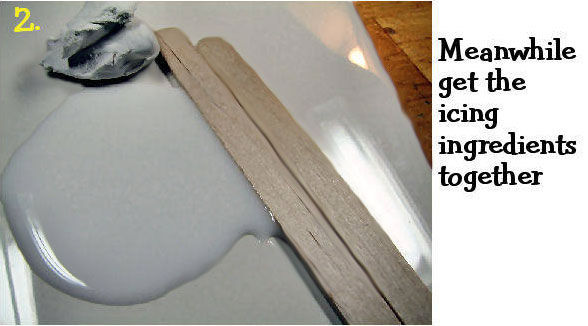
 28. Lets make icing! You'll need a tile, liquid Kato Fimo or TLS, and a lump of white clay - about 1/8th of your 2oz. bar. You'll probably need several craft sticks because you'll most likely break them while mixing (I always do).
Enlarge Picture of preparing Cake icing
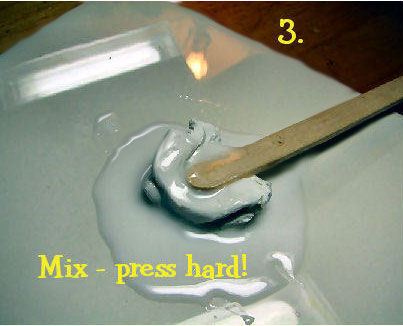
 29. Start mixing the solid and liquid clay together. If you're using TLS or liquid Fimo it may take a bit more muscle, but it will come together I swear!
Kato seems to mix better, which is why it's now my favorite liquid clay. Note the proportions in the picture.
29. Start mixing the solid and liquid clay together. If you're using TLS or liquid Fimo it may take a bit more muscle, but it will come together I swear!
Kato seems to mix better, which is why it's now my favorite liquid clay. Note the proportions in the picture.Keep mixing: you'll have to use some muscle! Press hard to get the clays to come together.
Enlarge Picture of mixing the solid and liquid clays
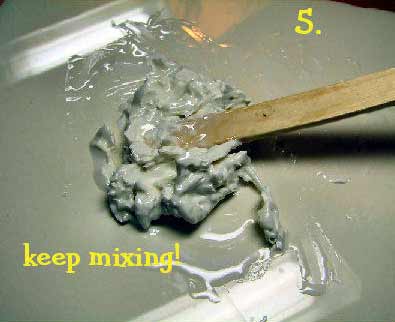
 30. Keep mixing! Your clay should look approximately like the picture. This may take a while so don't give up!
Enlarge Picture of mixing the solid and liquid clays
 31. If your clay mix looks too dry like mine did - just add more liquid Kato.
Enlarge Picture of Add more Liquid if dry
TIP:
if the icing looks too translucent you can mix it all back together again and add a tiny bit of the white mix to tone it down.
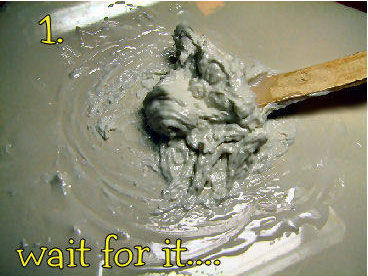
 32. I promise that these will mix! just keep mixing! It's worth the wait.
Enlarge Picture of Keep mixing!
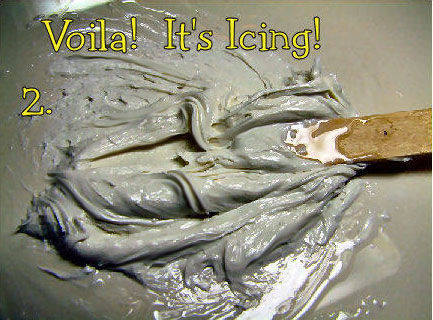
 33. Finally! eventually it looks like this: Betty Crocker's canned icing - best, fluffy, white, and inedible!
Enlarge Picture of the completed icing
TIP:
If for some reason your icing doesn't look like mine, it may be too liquidy. If that's the case just add more white clay and mix it up. If it's too stiff, just add a touch more Kato. It should be of a texture to hold swirls. If it's too lumpy it just means you haven't mixed it enough.
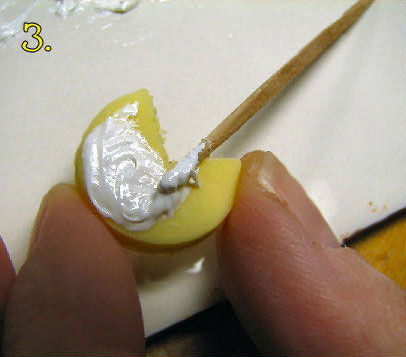
 34. Get your cake layers from the oven. be careful! they're hot! Please leave the oven on.
Let your cakes cool off before adding the icing, because if you don't (like a real cake) it will melt off.
Using a toothpick (cocktail stick) take a bit of the icing and spread it on top of one of the layers. We're doing the middle layer only right now.
34. Get your cake layers from the oven. be careful! they're hot! Please leave the oven on.
Let your cakes cool off before adding the icing, because if you don't (like a real cake) it will melt off.
Using a toothpick (cocktail stick) take a bit of the icing and spread it on top of one of the layers. We're doing the middle layer only right now.
Enlarge Picture of spreading the cake icing
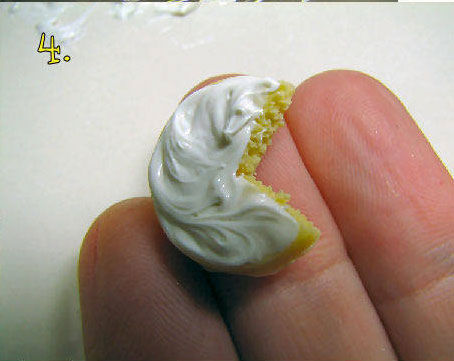
 35. When your layer is completely covered (don't worry about making swirls now)
Enlarge Picture of icing on the Cake
 36. Carefully put the top layer on, make sure they are even, and set them on your tile to bake.
Enlarge Picture of joining the Cake layers
 37.Be sure to ice the centers of your slices too. Set them on the tile.
Enlarge Picture of the Cake slices
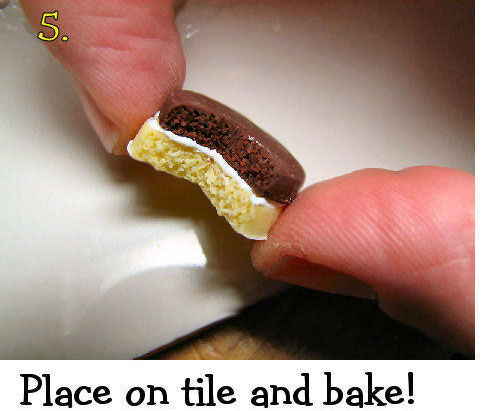
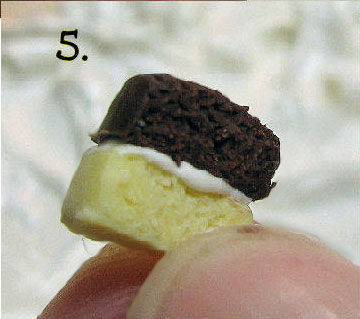
 38.This is how your miniature cake slice should look like!
Bake your cake for another fifthteen minutes to set the icing.
Enlarge Picture of miniature Cake slice
 39. Optional: Making miniature chocolate roses
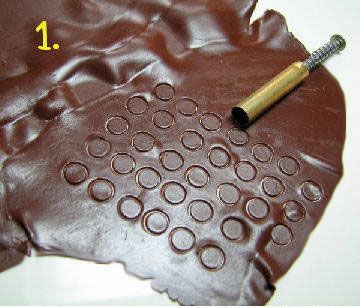
Take a chunk of your brown clay and work it enough to put it through the pasta machine. Start at the thickest setting and gradually run the clay through all of the settings until it is as thin as you can make it. Gently place this sheet on your tile and using your 3/16th Kemper circle cutter, cut a bunch of circles as shown. If you feel that your pasta machine didn't flatten them well, just squash them with your finger to make them nice and thin. If your clay doesn't stick to the tile while you are cutting, just dust it with a bit of cornstarch, and dust the inside of your cutter. You can always brush it off later.
Enlarge Picture of preparing miniature roses
 40. Remove the excess clay.
Enlarge Picture of the clay circles
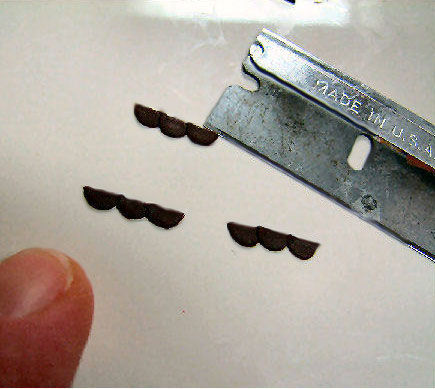
 41.We're going to start with tiny roses. Using your razor blade, cut some of the circles in half.
Use your razor blade to remove the halves, and arrange three halves as shown in the picture on your tile.
41.We're going to start with tiny roses. Using your razor blade, cut some of the circles in half.
Use your razor blade to remove the halves, and arrange three halves as shown in the picture on your tile.Make sure that they overlap just a tiny bit.
Enlarge Picture of slicing the clay circles
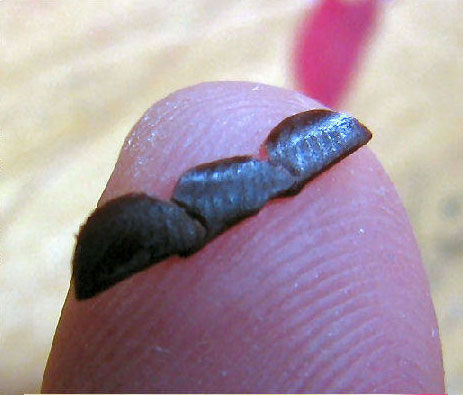
 42. Use your razor blade to remove the chain of three clay halves and carefully set them on the tip of one of your non-dominant fingers.
(if you're right handed, stick them on one of the fingers of your left hand)
Enlarge Picture of halved clay circles
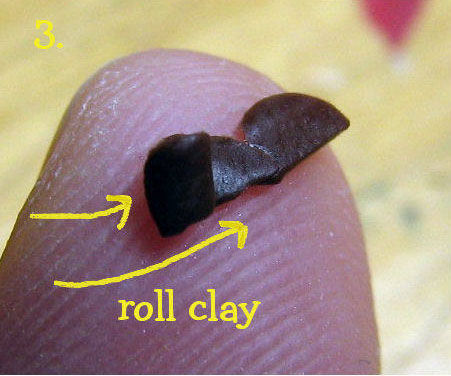
 43. Follow the arrows in the picture. just loosely roll the clay over itself. Make sure it is loose - if you've rolled too tightly just throw that one away and get more.
Enlarge Picture of rolling the rose petals
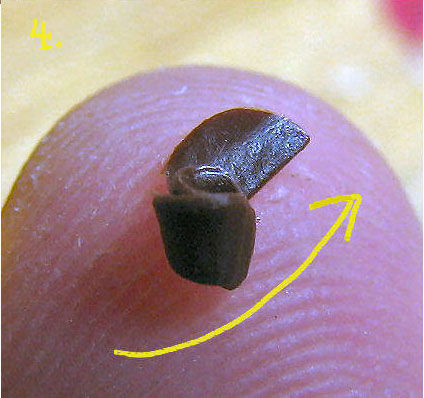
 44. Follow the arrows in the picture again.
Enlarge Picture of rolling the rose petals
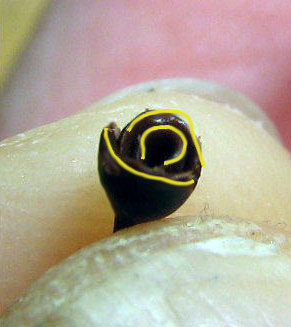
 45. Your little rose should look something like this. I've outlined the petals just so you can see them better. Crimp the bottom between your fingers to hold everything together.
Enlarge Picture of chocolate petals outlined
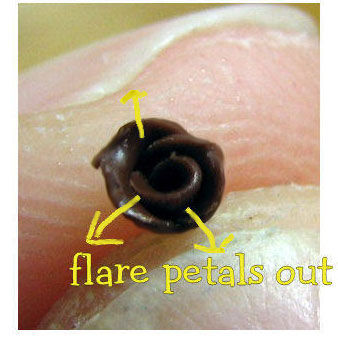
 46. Use a toothpick (cocktail stick) or a finger to gently tease the petals. That's it! Make as many as you wish.
You can set these aside to put on your cake if you wish
Enlarge Picture of flaring the chocolate petals
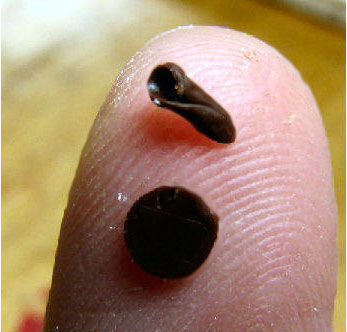
 47. Bigger Roses: Take one of the whole circles. Remember, if it's not as thin as you want it, just squash it with your finger before you use your blade to remove it from the tile.
Gently roll this circle into a thin cone shape as shown. You will be layering petals around this central core.
Enlarge Picture of making larger miniature roses
TIP:
The most important thing to remember about making the chocolate roses: Arrange the petals to sit gradually higher and higher above the center, People tend to either keep all the petals at the same height as the center, or they wind up placing the petals below the center making the rose look more like a pine cone !
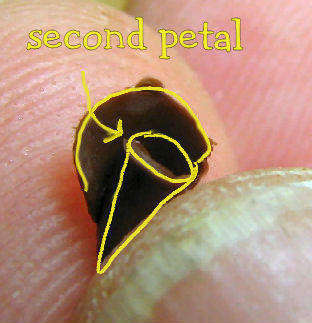
 48.Place the second circle on the core, making sure that this petal is slightly higher than the center as in the picture.
Enlarge Picture of overlapping the petals on the miniature roses
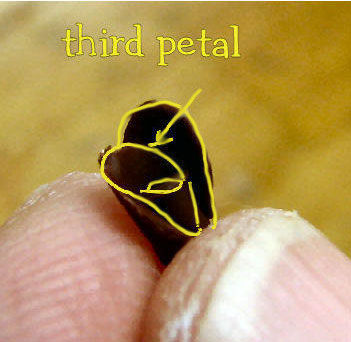
 49.
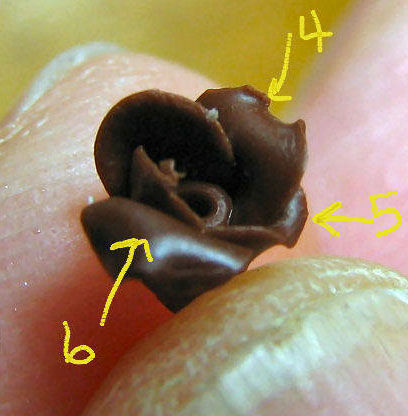
As you add petals, be sure to go in the same direction each time, slightly overlapping each one, and placing them each a little higher than the last. I outlined the petals for you to hopefully illustrate this.
49.
As you add petals, be sure to go in the same direction each time, slightly overlapping each one, and placing them each a little higher than the last. I outlined the petals for you to hopefully illustrate this.
Enlarge Picture of adding petals to the miniature roses
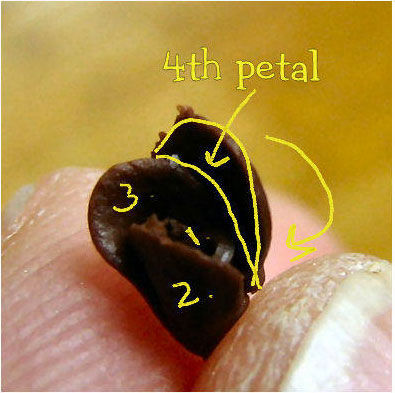
 50. Continue to add petals, remembering the rules above.
Enlarge Picture of continue adding petals
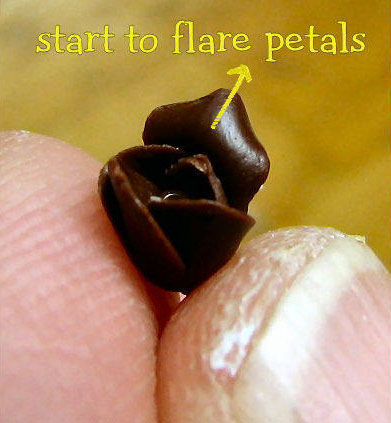
 51. You can start to flare your petals a little at this point. Use your fingers, a toothpick, or a pin to gently flare them out. To get that little point in the petal I use two fingers - I hold the rose in my left hand and use my thumb and index finger to make the flare.
Enlarge Picture of continue flaring the rose petals
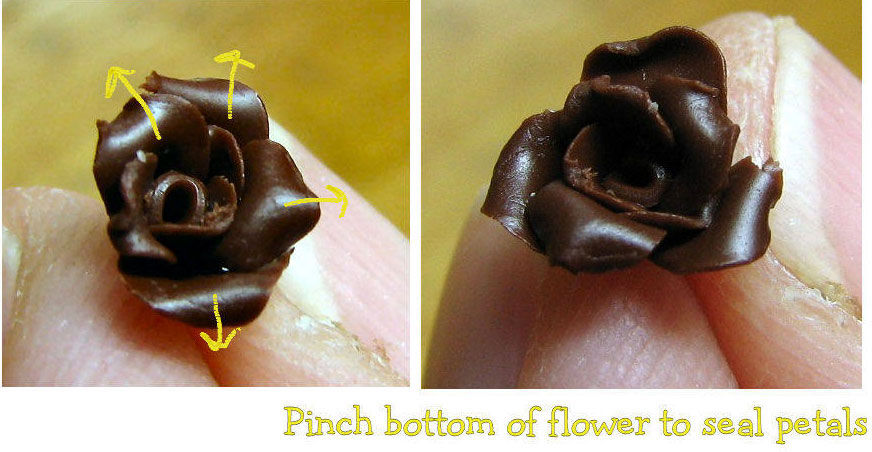
 52. Continue to add petals and flare them. You can add as many petals as you wish, just make sure your rose is relatively symmetrical. When your rose is done, just crimp the bottom into a point with your fingers to seal everything.
You can make as many roses as you wish - if your first roses look squished, don't worry - just keep practicing. This is one skill that the more you do it, the better you'll get.
52. Continue to add petals and flare them. You can add as many petals as you wish, just make sure your rose is relatively symmetrical. When your rose is done, just crimp the bottom into a point with your fingers to seal everything.
You can make as many roses as you wish - if your first roses look squished, don't worry - just keep practicing. This is one skill that the more you do it, the better you'll get.
Enlarge Picture of adding even more rose petals
 53.The finished rose effect
If you want to use these to decorate your cake, just set them aside.
Enlarge Picture of the finished rose effect
 54. Back to the Cake
When your cake comes out of the oven, it will be time to ice the top. Just be sure to let it cool.
Do not turn your oven off!
Let your cake cool off before putting on the icing so it doesn't melt!
Enlarge Picture of taking the cake out of the oven.
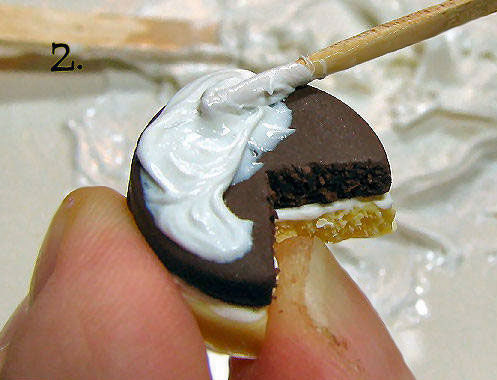
 55. Using a toothpick (cocktail stick) spread the icing on the top of your cake.
Enlarge Picture of spreading the cake icing.
 56. Spread the icing over the entire top - making sure that the icing doesn't drip over the cut or textured surface.
Enlarge Picture of spreading the top icing.
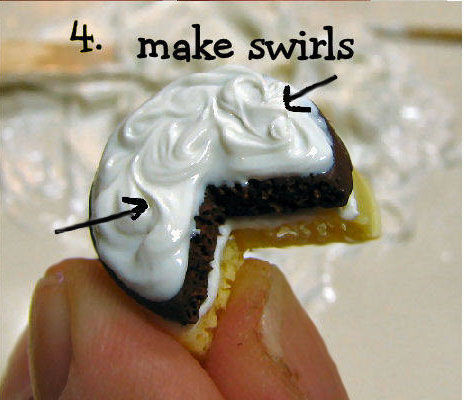
 57. Put enough icing on so you can play around and make some swirls. Put your cake back on the baking tile. If you want to add some of your roses you can do that now
 You don't have to add roses if you don't want to. If you do, trim off the point on the bottom of your rose so that it sits well in the icing.
Enlarge Picture of swirling cake icing
 58. Time to ice the cake slice
Enlarge Picture of ice cake slice
 59. You'll want to ice the top and side of your slices now too!
We are not icing the sides of the cake right now because it is easier to do that after the top has set. It's MUCH less messy! Bake your cake for about 15 minutes to set the top. If you want to put some of the icing in a bowl I have some pictures coming up.
Enlarge Picture of icing the slice
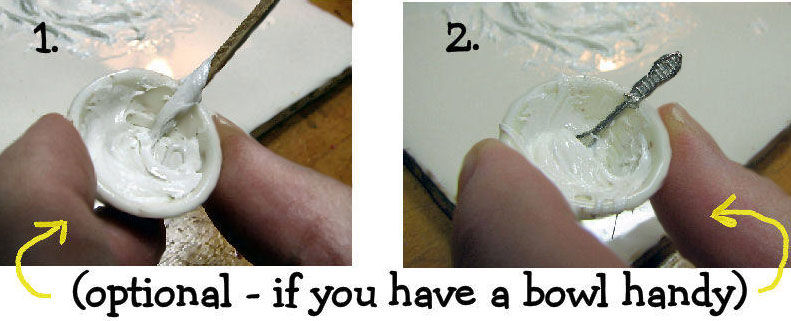
 60. This is optional!! If you have a bowl handy you can make yourself a messy icing bowl. Just add some with your toothpick - stir it around, and drip some over the sides. If you have a spoon you can add it now too.
Enlarge Picture of a messy icing bowl
TIP: Easy Piping Practice.
The piping is done after the cake is baked and the icing is set. If you absolutely have to you can bake your cake again (for example if you have to repair something) - let the modeling paste or Texture Magic dry before you re-bake your cake or it might bubble in the oven.
The piping is done after the cake is baked and the icing is set. If you absolutely have to you can bake your cake again (for example if you have to repair something) - let the modeling paste or Texture Magic dry before you re-bake your cake or it might bubble in the oven.
 61. Optional
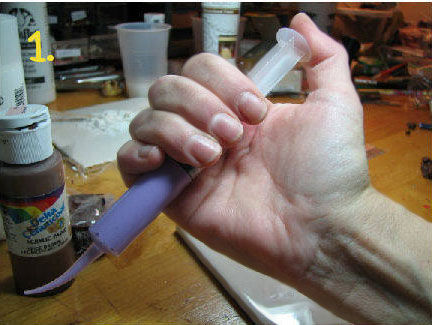
Starting with a glue syringe is nice because it is easy to hold on to. Fill your glue syringe with either Delta Texture Magic, or use the following: Put some modeling paste in a disposable cup and add a enough acrylic paint to color it in your favorite icing flavor. It should hold a peak, if it doesn't you can add some cornstarch to it. Stir with one of your craft sticks, and if you used cornstarch be sure to get all of the lumps out so it will go through the syringe. I find it easiest to hold the syringe as shown whenever possible.
Enlarge pictureglue syringe
 62.
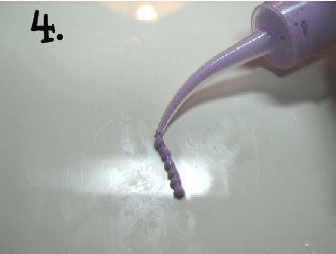
A simple way to start is to just squirt some straight lines of icing on the tile to see how the syringe feels. When you are comfortable, just wipe them off.
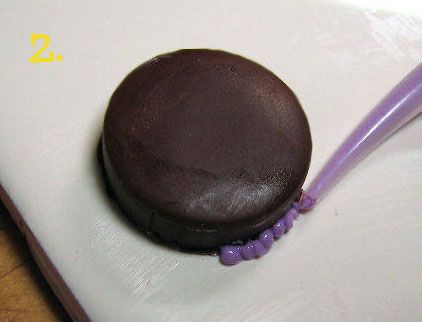
To make a line of "connected dots" that you can put on the edge of a cake start by gently pressing on the syringe plunger then releasing. Press on the plunger gently to make a small dot, release the pressure, then move the syringe a tiny bit to where you want the next dot. Try to make a line of these as illustrated.
62.
A simple way to start is to just squirt some straight lines of icing on the tile to see how the syringe feels. When you are comfortable, just wipe them off.
To make a line of "connected dots" that you can put on the edge of a cake start by gently pressing on the syringe plunger then releasing. Press on the plunger gently to make a small dot, release the pressure, then move the syringe a tiny bit to where you want the next dot. Try to make a line of these as illustrated.
Enlarge Picture of a using the syringe to pipe
 63.
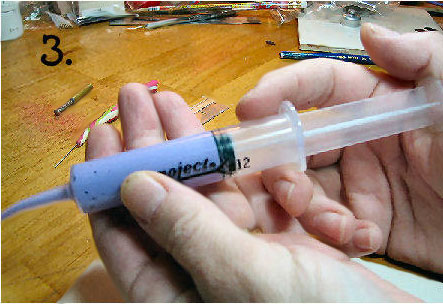
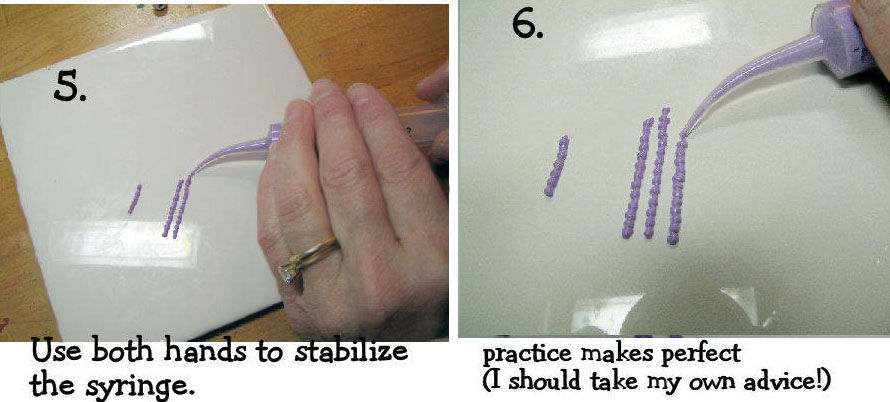
If your hand shakes, stabilize the glue syringe with your other hand. This will make it much easier to control where the icing goes!
Continue to practice making lines of connected dots - if you're having trouble -practice. I'm still not super good at it either, but I can fake it well enough
When you're done, just wipe off your tile.
63.
If your hand shakes, stabilize the glue syringe with your other hand. This will make it much easier to control where the icing goes!
Continue to practice making lines of connected dots - if you're having trouble -practice. I'm still not super good at it either, but I can fake it well enough
When you're done, just wipe off your tile.
Enlarge Picture of a controlling the syringe
TIP: Delta Texture Magic can be stored in your syringe if you put an air tight seal on the end of it.
Modeling paste can also, but you might need to stick a pin in the tip of your syringe to get it flowing again when you use it next.
Modeling paste can also, but you might need to stick a pin in the tip of your syringe to get it flowing again when you use it next.
 64.
When I'm decorating a cake I hold the syringe like this. You should do whatever is most comfortable for you.
64.
When I'm decorating a cake I hold the syringe like this. You should do whatever is most comfortable for you.
Enlarge Picture of a how to hold the syringe
 65.You can use this technique to decorate the bottom of your cake.
Enlarge Picture of a how to decorate the bottom of the cake
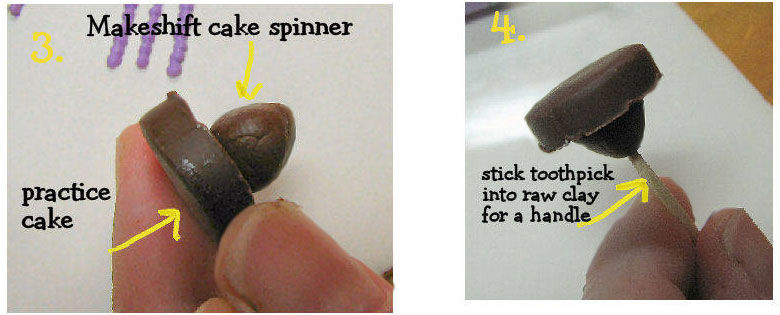
 66.Professionals use a turntable to pipe icing on big cakes. You might have a tiny one that you can use, but I don't so I had to come up with my own "spinner'. Take a chunk of scrap clay and attach it to the bottom of your cake as shown. Stick a toothpick into the bottom of the scrap clay to use as a handle. You can hold this in one hand to slowly spin your cake, while you pipe icing with the other.
Enlarge Picture of a how to make a makeshift cake spinner
66.Professionals use a turntable to pipe icing on big cakes. You might have a tiny one that you can use, but I don't so I had to come up with my own "spinner'. Take a chunk of scrap clay and attach it to the bottom of your cake as shown. Stick a toothpick into the bottom of the scrap clay to use as a handle. You can hold this in one hand to slowly spin your cake, while you pipe icing with the other.
Enlarge Picture of a how to make a makeshift cake spinner
 67.
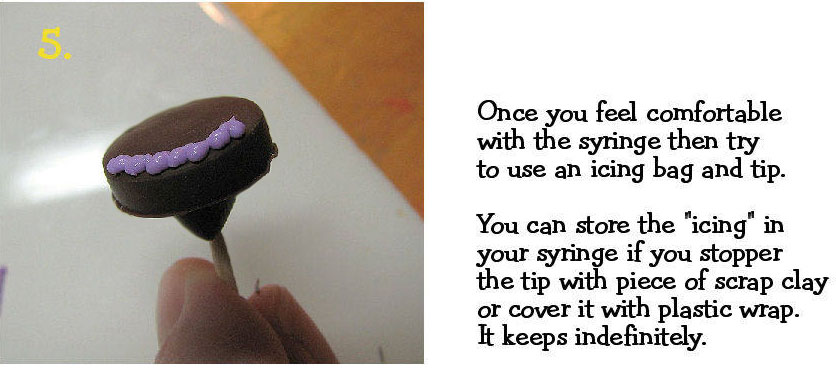
Practice making a line of dots on the top of your dummy cake (if you made one). Just remember that since this cake is baked, if you mess up just wipe it off and start again.
67.
Practice making a line of dots on the top of your dummy cake (if you made one). Just remember that since this cake is baked, if you mess up just wipe it off and start again.
Enlarge Picture of a practising to ice the cake
TIP:
When you feel comfortable with the syringe you can try using a pastry bag and tip. I buy the Wilton disposable plastic icing bags. The tips that you can use for miniatures are the Wilton open star tip #13, and the #1 circle tip. Ateco also makes really small star tips.
You can buy these from sugar craft You just have to be careful because they tend to clog up easily.
You can buy these from sugar craft You just have to be careful because they tend to clog up easily.
 68.
If you're having problems piping the cake:
68.
If you're having problems piping the cake: The simple method of "fake piping": roll a thin snake of your icing color. Make sure it's even or it will look artificial.
Enlarge Picture of the lazy icing method
 69.
Use a ball ended tool or a blunt toothpick to attach the snake to the bottom of your cake in sort of a zig zag fashion - poke the clay near the bottom edge of the snake, then near the top edge to make a "ruffle"
69.
Use a ball ended tool or a blunt toothpick to attach the snake to the bottom of your cake in sort of a zig zag fashion - poke the clay near the bottom edge of the snake, then near the top edge to make a "ruffle"
Enlarge Picture of using ball ended tool to texture
 70. Continue icing all the way around.
Enlarge Picture of continue icing the cake
 71.
closeup of cake icing texturing
71.
closeup of cake icing texturingRemember - you don't have to bake Modeling Paste or Texture Magic. You do have to bake this.
Enlarge Picture of icing closeup
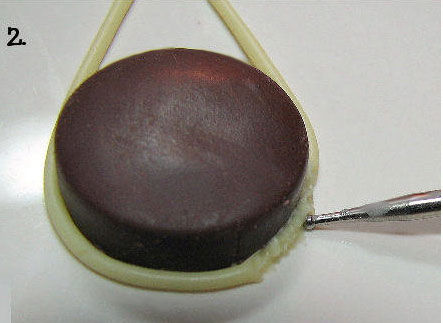
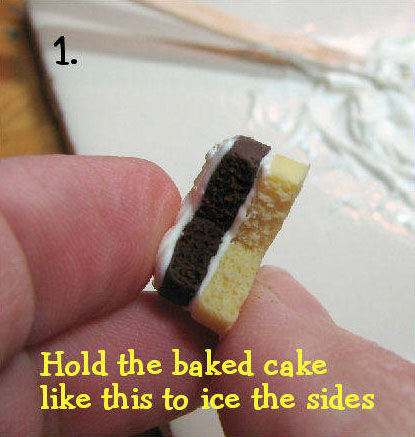
 72. Resume making the cake
Hold your cake as shown.
Enlarge Picture of holding the miniature cake.
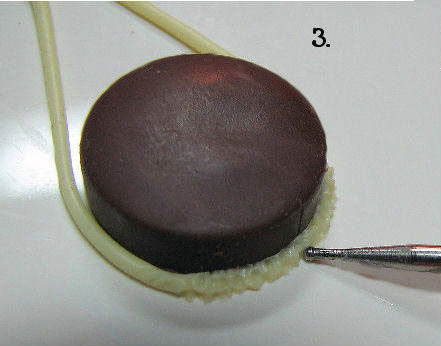
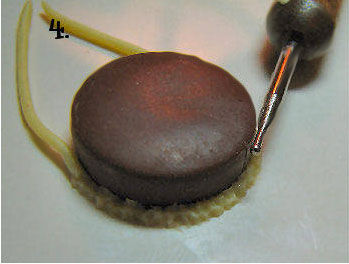
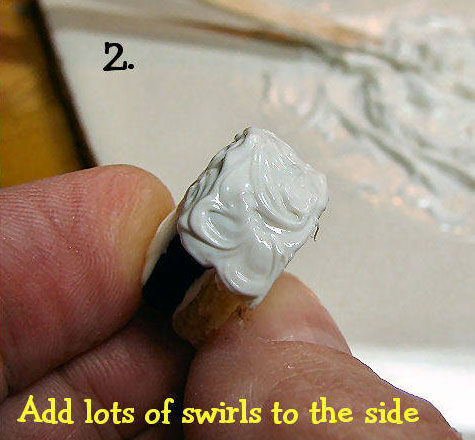
 73.
Using the toothpick, ice the sides of your cake - make sure you fill in any uneven spots where the layers come together.
73.
Using the toothpick, ice the sides of your cake - make sure you fill in any uneven spots where the layers come together.Make some swirls, then put your cake back in the oven for the final baking - 15 to 20 minutes should do it.
Enlarge Picture of icing the sides of the cake
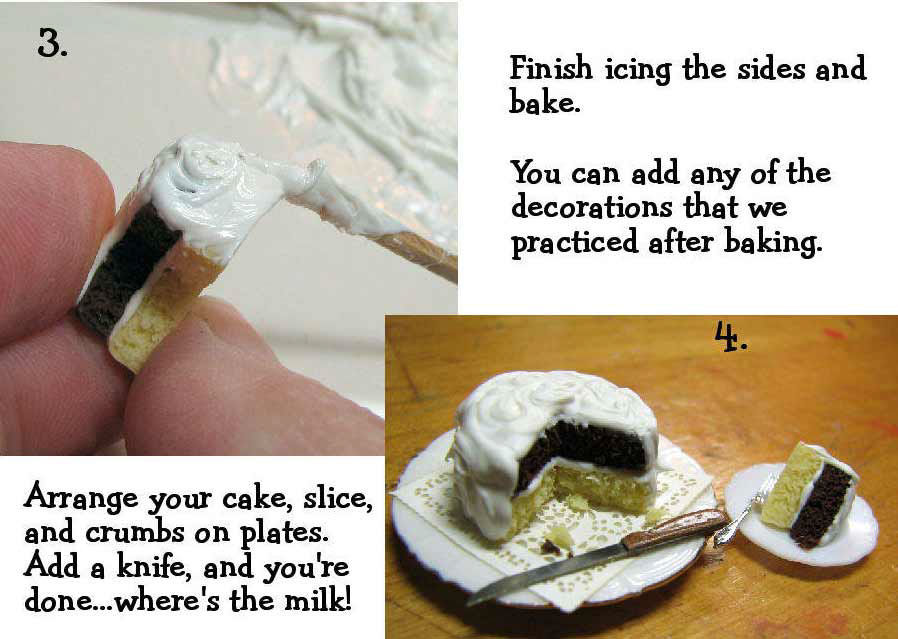
 74.
When your cake is finished you can pipe decorations on it, or just leave it plain like I did.
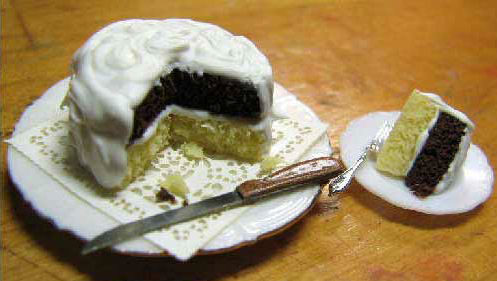
74.
When your cake is finished you can pipe decorations on it, or just leave it plain like I did.Find a pretty plate, doily, and a knife. Don't forget to put some crumbs on the plate too! That's it! If you'd like to add a bit of shine to your icing, let your cake cool and paint it with some acrylic varnish. I like to use a satin finish so it isn't too shiny.
Enlarge Picture of finished miniature cake
MEET THE ARTIST
 Betsy Niederer has been making miniatures for five years, after discovering that she could make miniature food for her childrens Barbie kitchen.
She is an IGMA member since 2003, an IGMA Fellow (Food category), and since 2006 a Guild school instructor.
Betsy Niederer has been making miniatures for five years, after discovering that she could make miniature food for her childrens Barbie kitchen.
She is an IGMA member since 2003, an IGMA Fellow (Food category), and since 2006 a Guild school instructor.
Betsy is a valued member of CDHM and Moderator on the CDHM Food Board in the CDHM Forum. Visit the Galleries today.
Betsy Niederer has been making miniatures for five years, after discovering that she could make miniature food for her childrens Barbie kitchen.
She is an IGMA member since 2003, an IGMA Fellow (Food category), and since 2006 a Guild school instructor.Betsy is a valued member of CDHM and Moderator on the CDHM Food Board in the CDHM Forum. Visit the Galleries today.
© 2007-2012 Betsy Niederer and CDHM.org
Reproduced with permission from Betsy Niederer. All photographs and text appearing in this tutorial are the exclusive property of Betsy Niederer.
Permission is explicitly denied for any republication of text or photographs in this article without the prior express written consent of the author.
Permission is explicitly denied for any republication of text or photographs in this article without the prior express written consent of the author.