


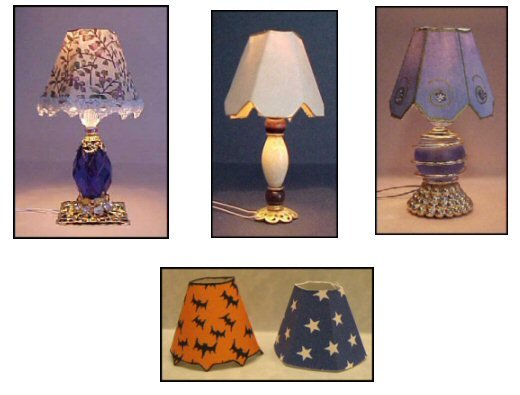
Making a Miniature Lampshade
by Pat Carlson
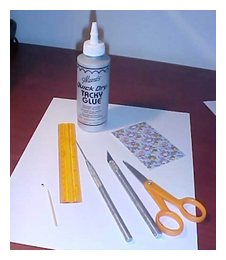
Materials Needed:
- Your printer
- One piece of heavy cardstock
- One piece of decorative paper - 3-1/2" x 2-1/2" (such as gift wrap or colored bond paper)
- Ruler
- Needle tool or sharp instrument for scoring
- Scissors or craft knife
- Glue Stick
- Tacky glue
- One round toothpick
- One small bead
 Close-up images of materials needed.
Enlarge Picture of supplies needed.
 1. Click enlarge image, then print the following lampshade template on cardstock.
Enlarge Picture of lampshade template
 2. Click enlarge image, then print the following harp template on cardstock.
Enlarge Picture of Harp Template
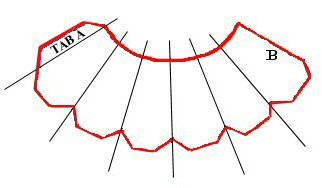
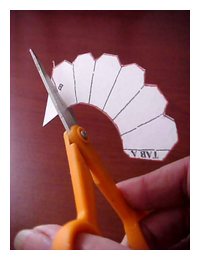
 3. Score the lampshade template along all black lines.
Enlarge Picture of scoring the template
TIP:
When selecting your decorative paper, you can use parchment paper, however, you may find it a bit "floppy"; you can strengthen it with Modge Podge or something after the shade is formed. Wallpaper is also a good material for making lampshades.
When selecting your decorative paper, you can use parchment paper, however, you may find it a bit "floppy"; you can strengthen it with Modge Podge or something after the shade is formed. Wallpaper is also a good material for making lampshades.
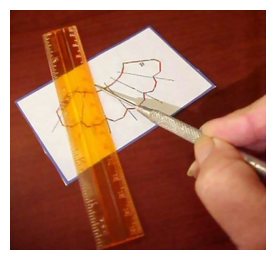
 4. Using the Glue Stick, glue the back of the lampshade template to the back of your decorative paper.
Cut through template and decorative paper on red lines.
Enlarge Picture of gluing and cutting
 5. Gently fold along score lines toward the template side to form the shade.
Enlarge Picture of folding the score lines
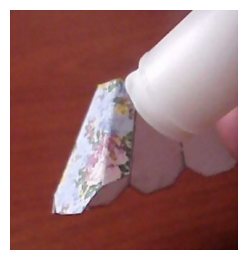
 6. Apply glue to decorative side of Tab A, then glue to the inside of Tab B
Enlarge Picture of gluing tab A to tab B
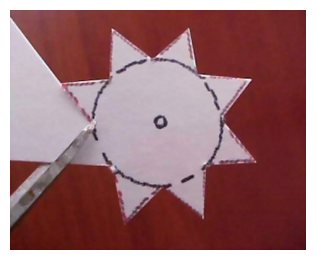
 7. Cut harp from cardstock along red lines.
Enlarge Picture of where to cut harp template
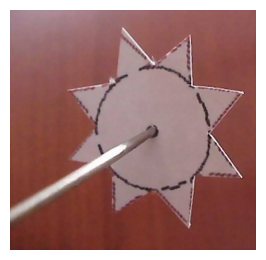
 8. Using the needle tool, poke a hole through the center of the harp.
Enlarge Picture using the needle tool
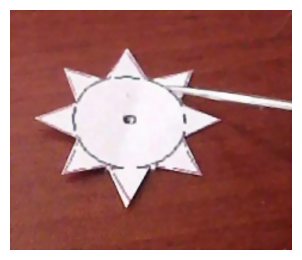
 9. Score harp along black lines, then bend harp points down along score lines.
Enlarge Picture to show scoring and bending of harp points
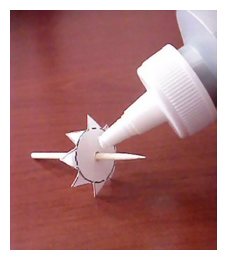
 10. Insert the toothpick into the hole in the center of the harp. Stick it through about 3/4" and glue in place. Put a small dab of glue (Aileen's tacky glue works best) on each point of the harp.
Enlarge Picture of the toothpick into harp.
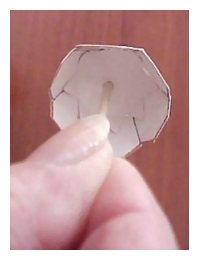
 11. With the points of the harp pointing down, insert the harp into the shade, gently pushing the glued points against the inside of the lampshade, making sure the harp sits evenly against the inside of the shade.
Enlarge Picture of Insert harp into shade.
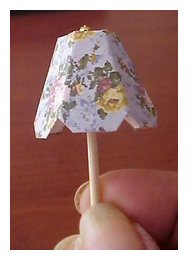
 12. Glue bead onto point of toothpick.
Enlarge Picture of finished shade.
TIP:
For a more finished look to your lampshade, paint the toothpick and the inside of the shade.
For a more finished look to your lampshade, paint the toothpick and the inside of the shade.
MEET THE ARTIST
 Pat Carlson has been making miniatures for twenty years and specializes in making readable, hardbound miniature books.
Pat is a valued member of CDHM and a Moderator in the CDHM Forum. Visit the Galleries today.
Pat Carlson has been making miniatures for twenty years and specializes in making readable, hardbound miniature books.
Pat is a valued member of CDHM and a Moderator in the CDHM Forum. Visit the Galleries today.
2007-2013 Pat Carlson and CDHM.org
Reproduced with permission from Pat Carlson. All photographs and text appearing in this tutorial are the exclusive property of Pat Carlson. Permission is explicitly denied for any republication of text or photographs in this article without the prior express written consent of the author.
Reproduced with permission from Pat Carlson. All photographs and text appearing in this tutorial are the exclusive property of Pat Carlson. Permission is explicitly denied for any republication of text or photographs in this article without the prior express written consent of the author.