


Making a Miniature Basket
by Yvonne Moxon
aka Boxoftrix Miniatures
Materials Needed:
- Crochet Cotton aka CC ~ I used Coats Chain Mercer size 3 in Ecru
- Small sharp scissors
- Pencil
- Tacky Clear drying glue ~ Hi Tack is ideal
- Cocktail sticks 2/3
- Ruler or measuring tape
- Ceramic tile
- Ribbon for finishing ~ I used 2mm Silk in Lilac
- 2.5 inch length of Floral wire about 1mm or 1/32� thick
- Small wire cutters
- Small round nose pliers
- Sewing thread in a matching colour to crochet cotton
- Needle
OPTIONAL EXTRAS: To make a movable wire handle below
 Close-up images of materials needed for Round & Oval Basket Tutorial
Enlarge Picture of supplies needed.
 1. Cut two (2) lengths of your crochet cotton: one a 40 inch length and the second, a 60 inch length.
Now take the shorter 40 inch length of crochet cotton and make a small loop at one end over the pencil.
Enlarge Picture of making a loop.
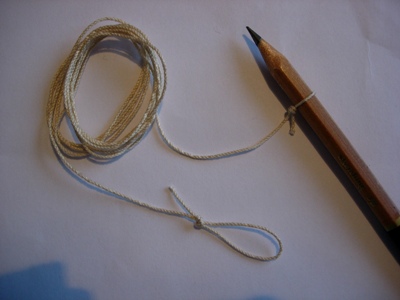
 2. Or you can make a small loop at one end and a double knot at the other end.
 Enlarge Picture for making a double-knot.
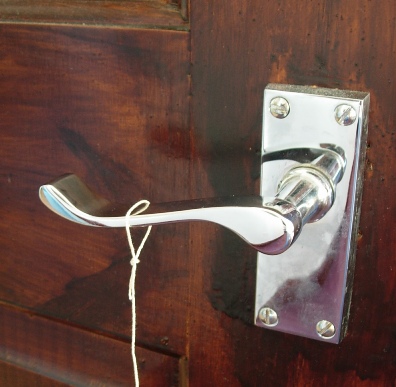
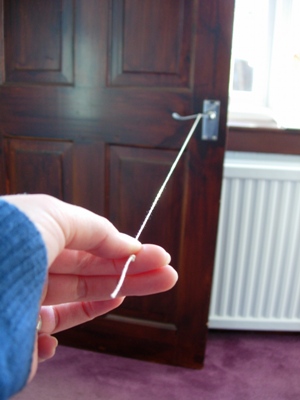
 3. Hook the loop onto a door handle or something that will put up a bit of resistance. Holding the knotted end,
the one opposite the looped end. Stand back until the thread is stretched out to its full length and taught.
Enlarge Picture on looping onto door handle.
TIP:
You may prefer to use a pencil looped on the end instead of a knot but I find it's a much slower process with the pencil.
You may prefer to use a pencil looped on the end instead of a knot but I find it's a much slower process with the pencil.
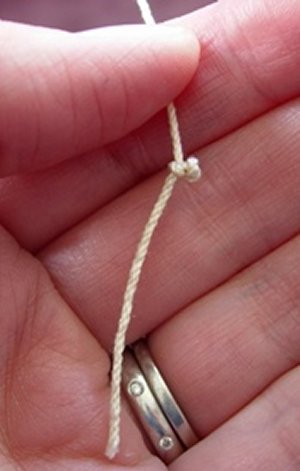
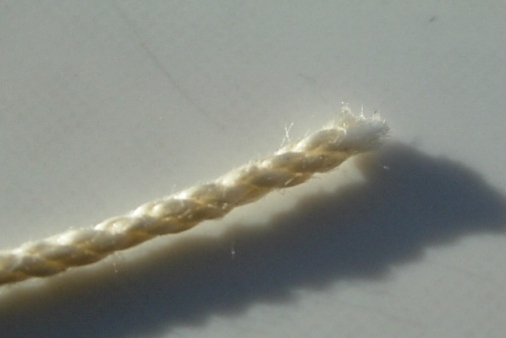
 4. If you look closely at your thread you will be able to see in which direction it has been twisted or spun.
Start twisting in the same direction by gripping the knot with your fingers and rolling it over and over.
Remember to keep the thread taught.
Enlarge Picture on how to identify direction of spun thread.
TIP:
It's very important to get the direction right or the thread will not twist but unravel.
It's very important to get the direction right or the thread will not twist but unravel.
 5. Keep the thread stretched out its full length and taught twisting until the thread feels very tight.
The tighter it gets the better but don't let it twist back on its self. Keep it full length away from you
until it measures about 31 inches; this length will vary slightly depending on how big you made your loops
(my loop is about 1 inch long).
Enlarge Picture of twisting the thread.
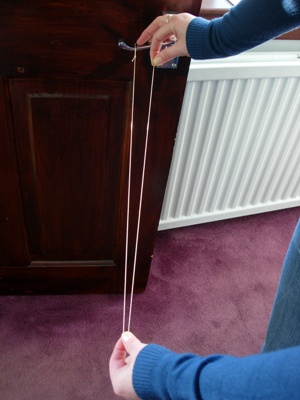
 6. Using a tape measure or ruler find the centre point & with two fingers grip the middle position. Keep
the thread pulled tight still holding the other end tight and put the two ends together. That's the looped
end on the door handle & the knotted end in your other hand. Remember to still keep it taught. Carefully,
while still keeping the length tight remove the loop from the door handle; still hold these ends together,
let the other end go (what was the middle section).
Enlarge Picture on finding the centre point.
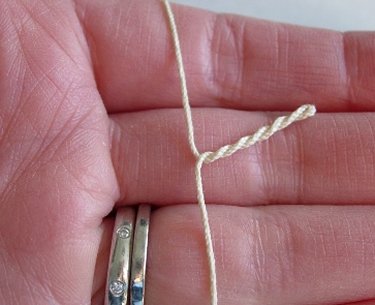
 7. Your threads should turn, joining together to make a twisted cord, loop the knotted ends into an new
knot below the other two, to keep the twist in and cut off the excess knot and loop from each.
Enlarge Picture of how the cord will look twisted together.
 8.
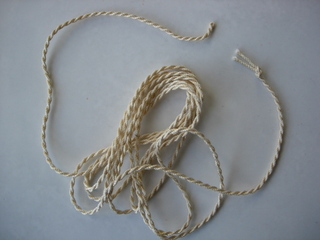
If the cord twists unevenly or jumps up into little side cords just hold it up by the end knot in one hand &
8.
If the cord twists unevenly or jumps up into little side cords just hold it up by the end knot in one hand &
run the fingers of your free hand down the cord to correct it. You can also gently twist them out and re-twist
the cord to sit even. Your finished cord should measure about 14 inches.
Enlarge Picture of full twisted thread.
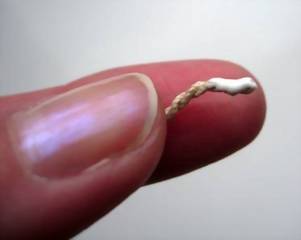
 9. Now you are ready to make your round basket base.
On a ceramic tile put a dollop of glue. Take your cocktail stick and on the neat end of your cord dot a little glue on the side.
Enlarge Picture of the ends to glue to get started.
 10. For an oval basket start your base with a fold over at the end of about � an inch as pictured. Then
follow on with Step 11; you will notice your base will begin to form an oval shape as you build it up.
Enlarge Picture for steps for making an oval basket.
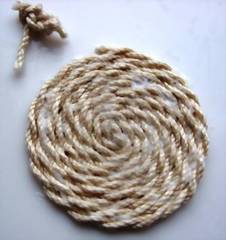
 11.
For a round basket, turn the end in from the beginning. Holding the cord between your index finger and thumb,
11.
For a round basket, turn the end in from the beginning. Holding the cord between your index finger and thumb,
use your other hand to wrap the cord around in a circle keeping it flat between your fingers. Dab a little
glue on to the side of the edge of the cord and wrap it around again. You are aiming to make a disk or round
shape. Each time you start a new wrap, glue the side of the cord again. Don't worry about getting glue over
the edged as it will soak into the cord and dries clear. Try to keep the disc shape tightly wrapped and flat.
Enlarge Picture of wrapping cord to make round basket.
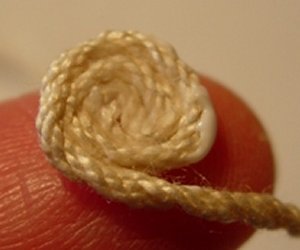
 12.
I always start the process off in this way, between my finger tips and as the disc gets bigger, I then transfer
12.
I always start the process off in this way, between my finger tips and as the disc gets bigger, I then transfer
to working on the ceramic tile. You may prefer to do this from the beginning on the ceramic tile, the technique
is whatever you find easiest.
Enlarge Picture showing shape being held between your fingers.
 13.
When you get to the end knot of your cord leave it aside with the knotted end still attached to dry. You will
13.
When you get to the end knot of your cord leave it aside with the knotted end still attached to dry. You will
find it easier to finish the end off when the glue has started to grip it. Use the point of your scissors to
cut away the knot & any excess. Leave it laying flat on the tile to dry. While the base is drying you can
take the 60 inch length of crochet cotton and repeat the process of making a longer cord this time.
Enlarge Picture tying off the end base and letting it dry.
TIP:
Wash your hands frequently to keep glue from building up while working.
Wash your hands frequently to keep glue from building up while working.
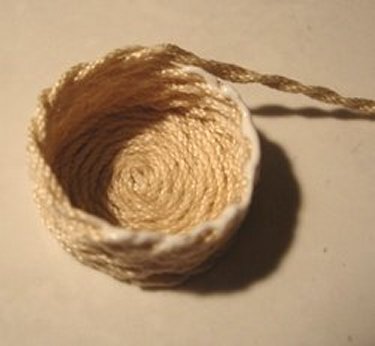
 14. Now we'll build up the basket shape.
-- Keep your base flat on the tile; if you can resist the temptation to peal it away just yet, the glue will hold it in position for the next process. Take you cocktail stick and glue the outer cord on the top edge of the base. Take your second cord (the one you made from the 60 inch length) and starting with the neat end start to feed it onto the glue line of the base, pressing gently as you go round.
-- Once you have went round and covered this line of glue repeat the process with more glue on the new upper top edge. You will find that the cord will naturally want to go with the curve and with the tacky glue you can re-adjust the sides keeping each new layer of the cord side straight as you go.
-- Don't be afraid to press firmly down on the top cord as you offer it to each new layer of glue. As long as you hold the edge firmly between two fingers it will stay put. When you have about 2inches of your cord left - STOP - and read the next step.
Enlarge Picture of building up the sides of the basket.
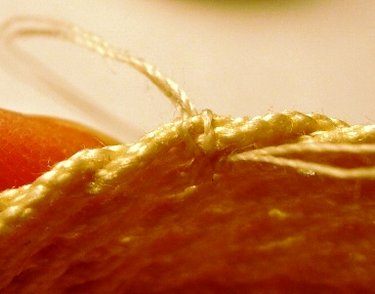
 15. Handle Option 1:
For a simple cord handle tie a knot in the cord as close to the basket edge as possible. Simply by making a
loop and pulling it through. Decide how high you want the handle to sit and knot the other end of the cord
cut off the excess leaving on a little end. Arch it over across to the opposite edge of the basket to make
the handle and glue the knot end to the edge. Leave the glue to dry before decorating or filling.
Enlarge Picture of knotted handle.
TIP:
How do you keep the handle stiff if its floppy? Just dab it with glue. If you use the crochet cotton and
twist it really tight this will stiffen it.
How do you keep the handle stiff if its floppy? Just dab it with glue. If you use the crochet cotton and
twist it really tight this will stiffen it.
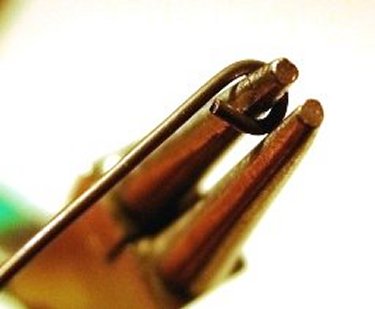
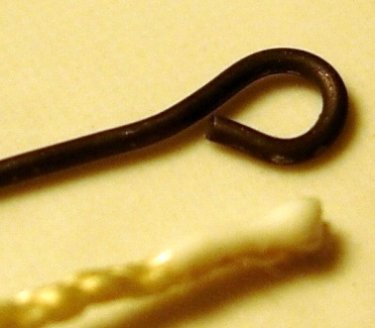
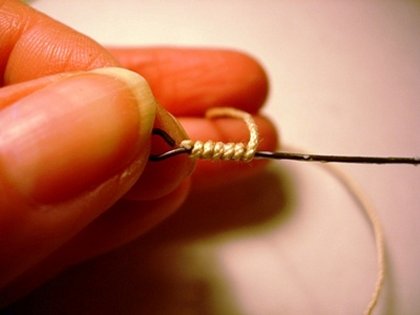
 16. Wire Handle Option 2:
For a wire handle, you can continue on gluing the edging of the cord in place until you come to the cord
end & leave to dry. Then take your florist wire and cut to a length of 2� inches. Take your round nose
pliers and make a loop at each end and bend back so as to keep the wire central to each loop �see picture.
Enlarge Picture of preparing a wire handle.
 17. Spread glue on the straight section of the wire only and leave it on the tile to go tacky.
Meanwhile take a length of crochet cotton about 8 inches should be enough.
Enlarge Picture of lining up the layers.
 18.
Dab some glue onto the end of the cotton; take your wire and start to tightly wrap it round the wire, if the
18.
Dab some glue onto the end of the cotton; take your wire and start to tightly wrap it round the wire, if the
glue gets too dry up just dab some more on. Wrap it all the way to the other end covering the wire.
Enlarge Picture of wrapping the cord for a wire handle.
 19.
When you reach the end cut the cotton about � inch from the wire and hold it in place and press hard until
19.
When you reach the end cut the cotton about � inch from the wire and hold it in place and press hard until
the glue grips. Trim excess � inch with sharp scissors as close to the wire as possible when dry.
Enlarge Picture of wet wrapped handle.
 20.
When the glue is dry, trim the end off with sharp scissors and bend the wire into a curve, check that the
20.
When the glue is dry, trim the end off with sharp scissors and bend the wire into a curve, check that the
ends are the same width apart as the edges of the basket. Bend the covered wire into a �U� shape, size
it against the basket sides to ensure the ends are the same width apart as the edges of the basket.
Enlarge Picture of the curved wrapped handle wire.
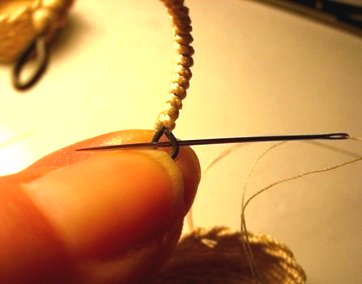
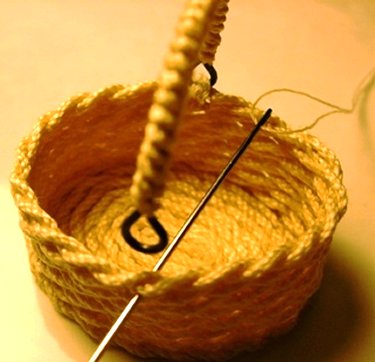
 21.
To attach your wire handle, cut a length of sewing cotton, thread it onto your needle and put a double
21.
To attach your wire handle, cut a length of sewing cotton, thread it onto your needle and put a double
knot about an inch from the end. Begin threading the length through from the inside of the basket to
the outside, over the edge and back through again to secure. Cut off excess thread ends.
Enlarge Picture of securing the thread threw basket.
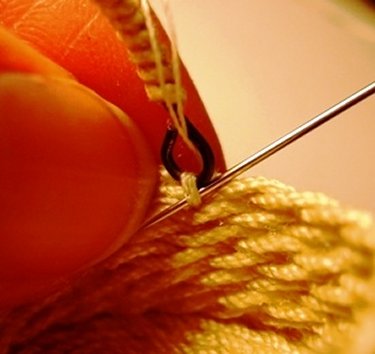
 22. Bring the needle through the handle loop and through the basket side again about 3 or 4 times.
Enlarge Picture sewing the thread threw the loop.
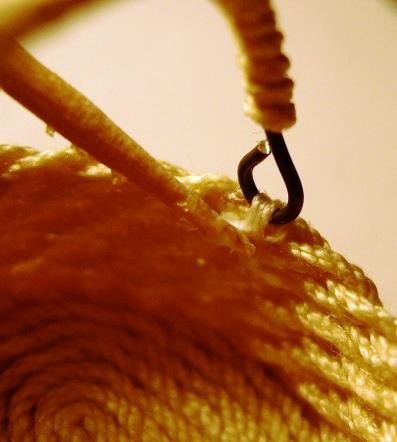
 23. Bring the needle through to the inside and behind the stitches on the last stitch & cut the excess thread away.
Enlarge Picture of sewing the handle to the basket.
 24. Repeat on the other side.
Enlarge Picture repeating the second side of the handle.
 25. Dab some glue onto the finished inside end on both sides.
Enlarge Picture showing the dabbing of glue to seal the ends.
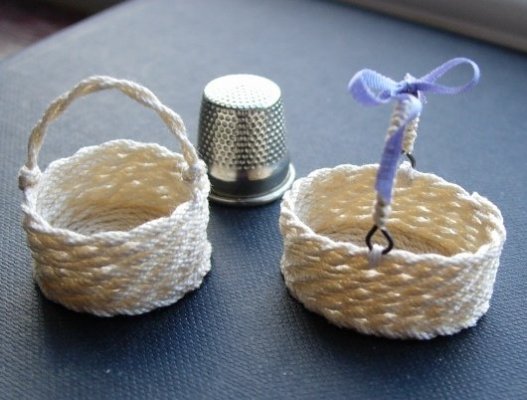
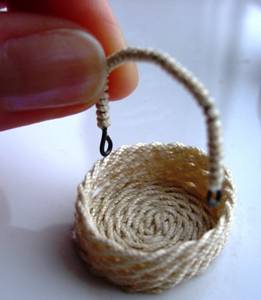
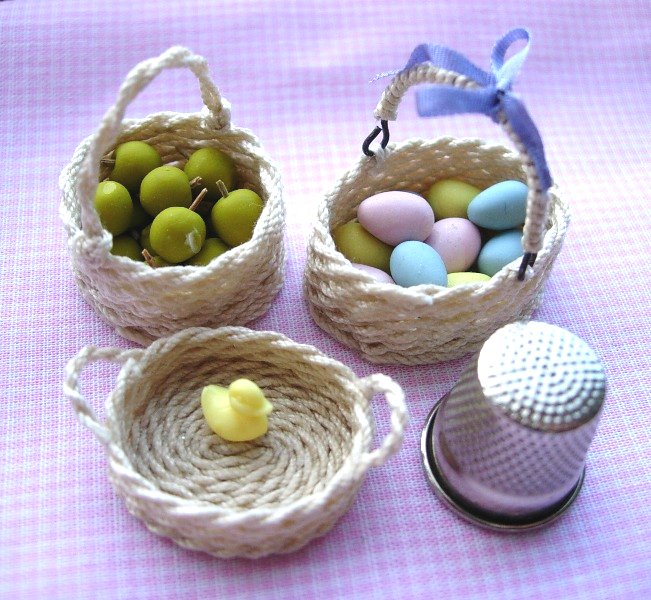
 26. Finished examples of baskets with varying handles.
Enlarge Picture of finished miniature baskets with varying handles.
MEET THE ARTIST
 Yvonne Moxon has always loved making things from bits and pieces. As a child she was fascinated by all things small and played with her sisters' dolls house. In 2002, her daughter was given a dollhouse kit for her birthday. At the time Yvonne was studying City & Guilds Embroidery and NC Jewelry at College. She soon began combining work in both classes & found a renewed interest in miniatures. Yvonne enjoys working on miniature embroidered pieces.
Yvonne is a valued member of the CDHM Forums. Visit the Galleries today.
Yvonne Moxon has always loved making things from bits and pieces. As a child she was fascinated by all things small and played with her sisters' dolls house. In 2002, her daughter was given a dollhouse kit for her birthday. At the time Yvonne was studying City & Guilds Embroidery and NC Jewelry at College. She soon began combining work in both classes & found a renewed interest in miniatures. Yvonne enjoys working on miniature embroidered pieces.
Yvonne is a valued member of the CDHM Forums. Visit the Galleries today.
© 2007-2013 Yvonne Moxon and CDHM.org
Reproduced with permission from Yvonne Moxon. All photographs and text appearing in this tutorial are the exclusive property of Yvonne Moxon.
Permission is explicitly denied for any republication of text or photographs in this article without the prior express written consent of the author.
Permission is explicitly denied for any republication of text or photographs in this article without the prior express written consent of the author.