


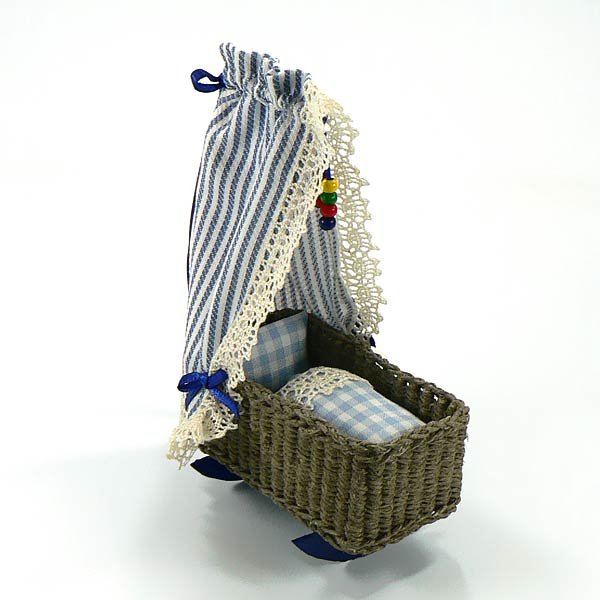
Learn To Weave A
1:12 Baby Cradle
with CDHM Artisan
Ulrike Leibling
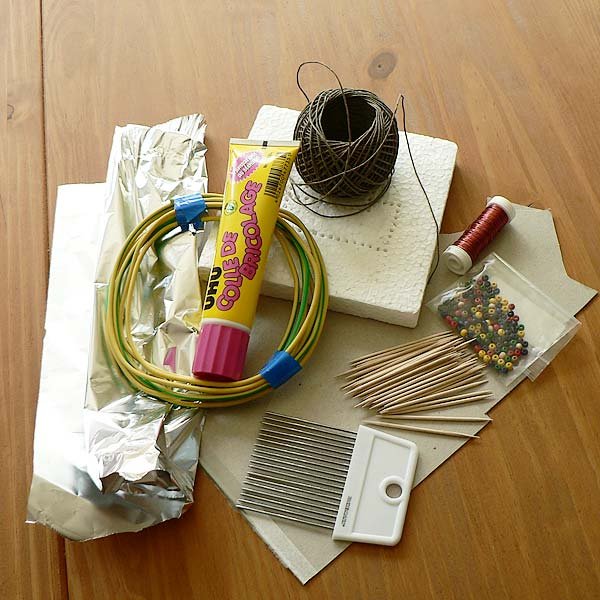
Tools and Materials Needed:
- Materials
- Aluminum Foil
- Cardboard: Thin Type
- Glue, That Dries Clear
- Needle (Sewing Type) and White Thread
- Onion Holder
- Pearls: Small Wooden: For Toy
- Poly Fiber Batting
- String: Fine, .08cm (1/32") in diameter
- Styrofoam, 1.5cm (½") Thickness
- Toothpicks
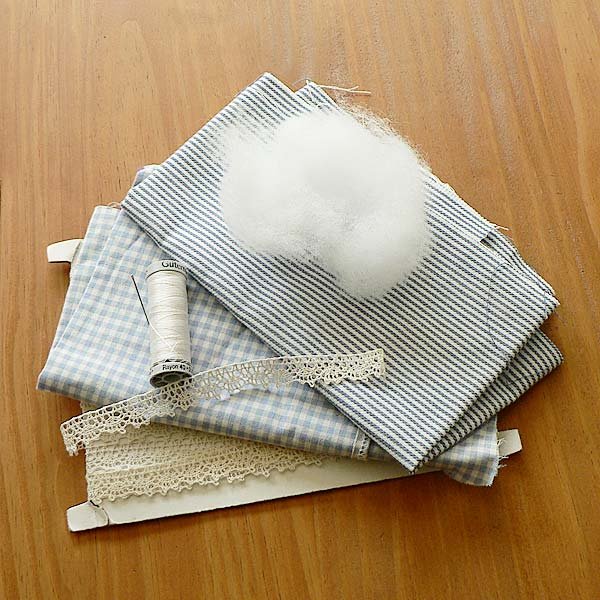
- Wire: Electrical, 2.5mm (14 Gauge) - Cloth and Threads
- Fabric : Thin type, of Choice
- Glue, That Dries Clear
- Lace For Cover
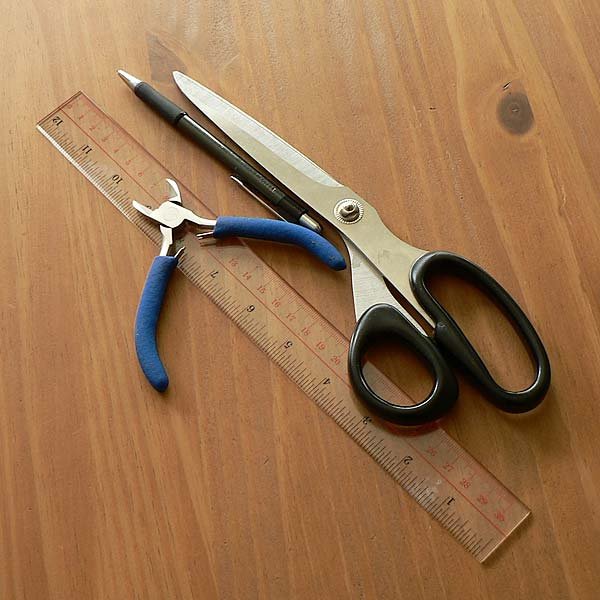
- Poly Fiber Batting - Tools
- Knife
- Paintbrush
- Pen or Pencil For Marking
- Pincer Tool
- Ruler
- Scissors - Baby Wipes
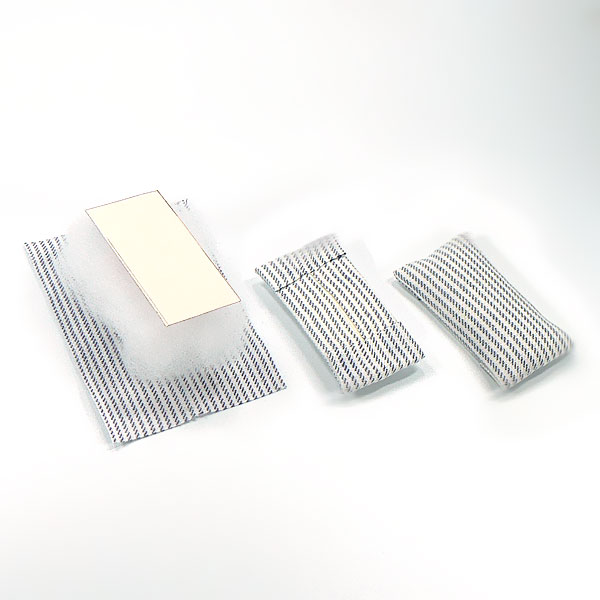
 Close-up images of materials needed
Enlarge picture of basic supply requirements
 Close-up images of cloth and threads needed
Enlarge picture of basic material requirements
 Close-up images of tools needed
Enlarge picture of basic tool requirements
INSTRUCTOR COMMENTS and PREPARATION
This is a cradle for a newborn baby in 1:12 scale. It is smaller than a child's bed. The technique I used is for people who don't have wood and drill. Make sure you have plenty of toothpicks on hand, since you will be using many.
This is a cradle for a newborn baby in 1:12 scale. It is smaller than a child's bed. The technique I used is for people who don't have wood and drill. Make sure you have plenty of toothpicks on hand, since you will be using many.
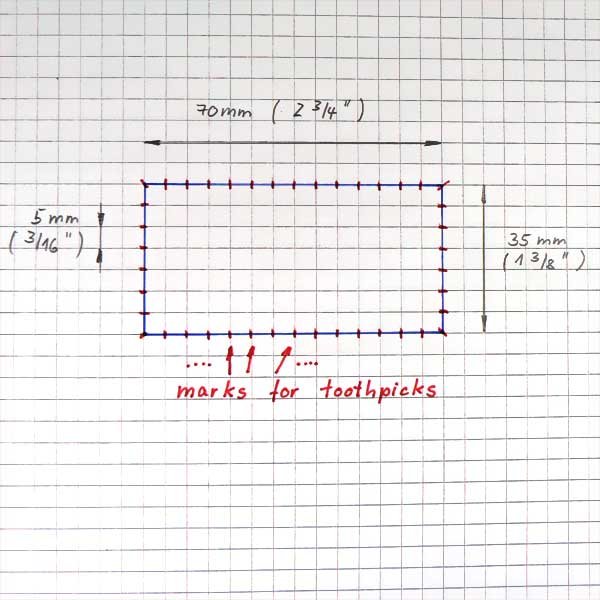
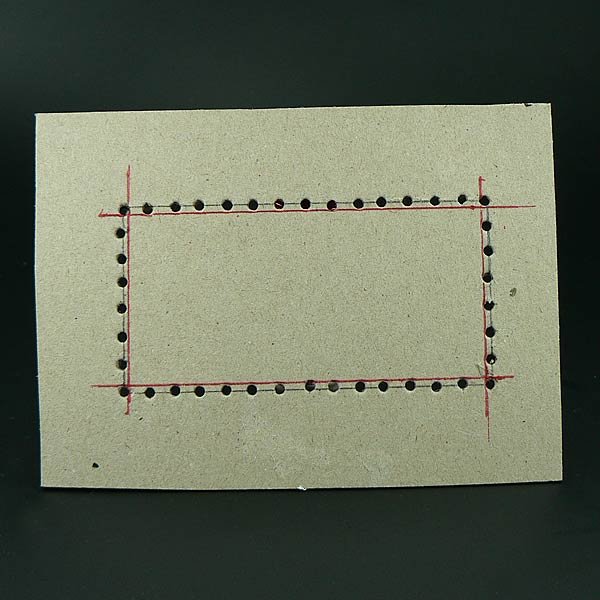
 1. Retrieve your cardboard. Draw a pattern as shown in the image. Including the marks for the toothpicks.
Enlarge picture showing cradle pattern
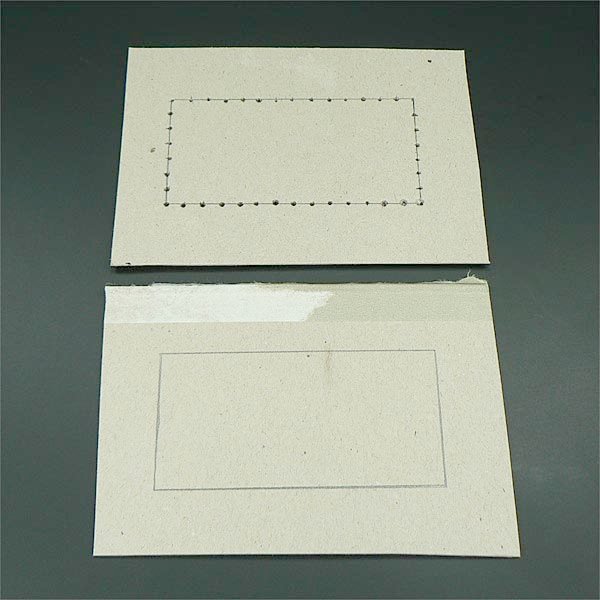
 2. Cut two rectangles like the pattern in the image leaving a margin of 1.5-2cm (½-¾") from the lines when cut. Punch holes using a toothpick on each mark on each of the rectangle sheets. Make sure that the holes in both cardboard pieces are align. If your cardboard is thick you can use a needle rather than a toothpick.
Enlarge picture showing cardboard pattern and holes
Q&A
Q: My styrofoam is 2cm (¾") thick. Is it ok to use this thickness?
A: It is not recommended to use thicker styrofoam. The toothpicks will not be visible on the opposite side, nor will the toothpicks stand vertical when weaving.
Q: My styrofoam is 2cm (¾") thick. Is it ok to use this thickness?
A: It is not recommended to use thicker styrofoam. The toothpicks will not be visible on the opposite side, nor will the toothpicks stand vertical when weaving.
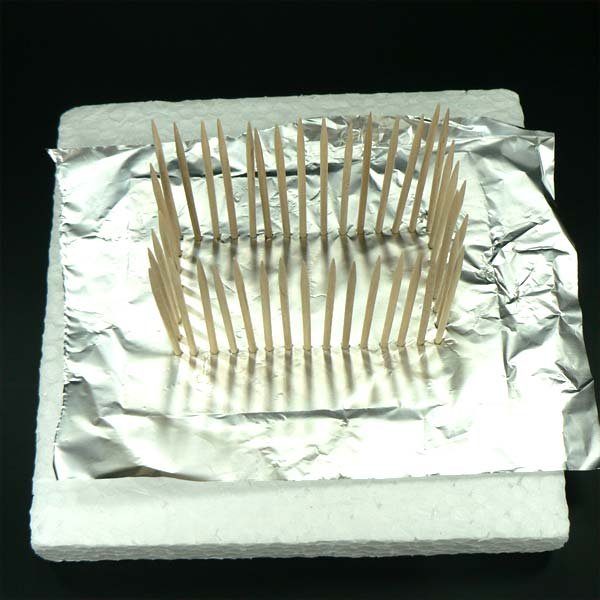
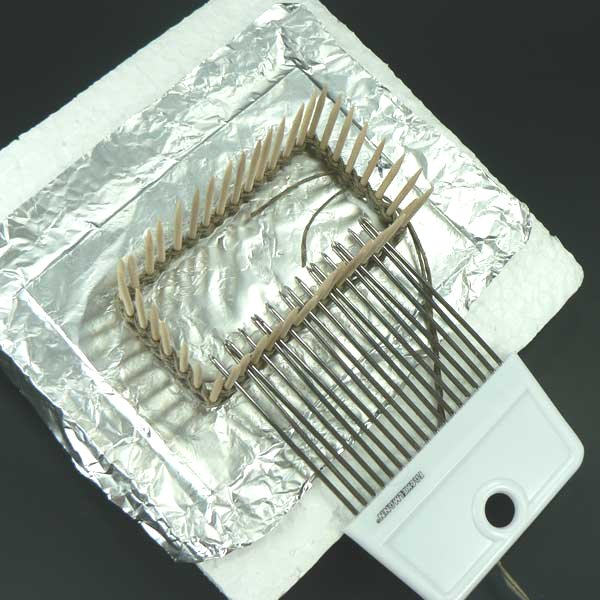
 3. Retrieve your styrofoam board. Mark your holes from the cardboard pattern onto the styrofoam. Now lay the first cardboard rectangle onto the styrofoam, aligning the holes. Cover the cardboard with a piece of aluminum foil on the surface to reinforce the placement; then lightly glue the four corners in place. Your holes will show an impression on the foil. Begin pushing the toothpicks through the styrofoam and through the cardboard.
Enlarge picture showing how to set up the pattern and toothpicks
TIP
Take care - the toothpicks are very pointed and tapered and can make holes in your fingers if you are not careful.
Take care - the toothpicks are very pointed and tapered and can make holes in your fingers if you are not careful.
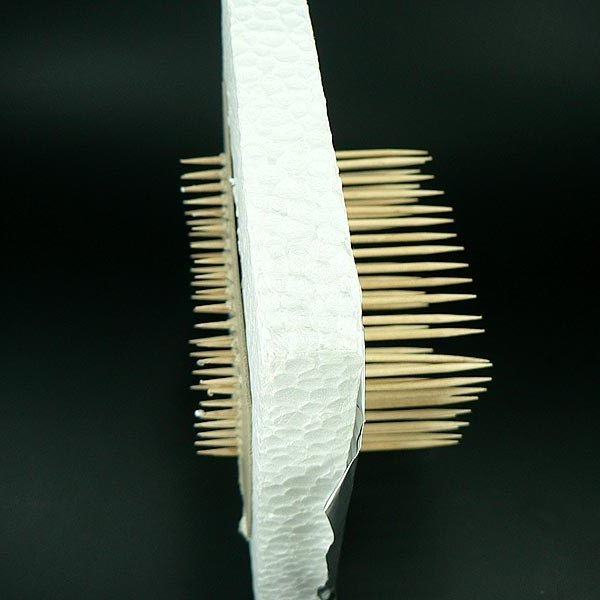
 4. This image shows how the toothpicks have been pushed all the way through the styrofoam and cardboard from the other side. Keeping in mind that the toothpicks must stay as vertical as possible on the cardboard.
Enlarge picture showing opposite side of styrofoam with toothpicks
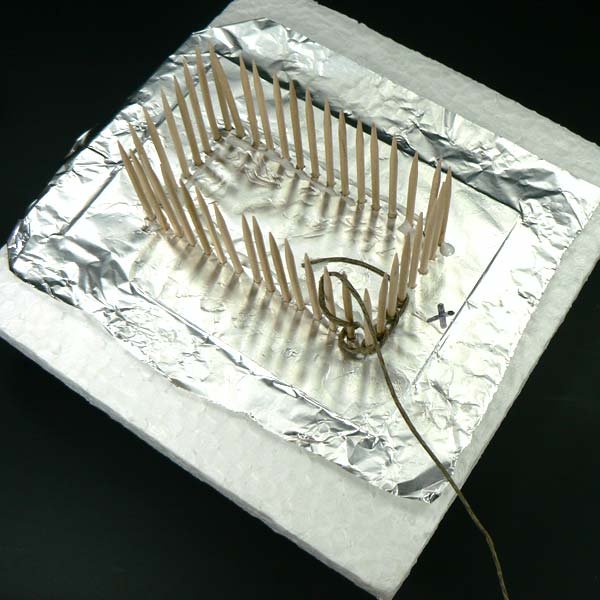
 5. On the opposite side of the styrofoam board, carefully slide the second rectangle onto the toothpicks. On the right side is the side with the toothpicks must be seen around 3,5cm (1 3/8").
Enlarge picture showing how to slide the second cardboard pattern onto the toothpicks
 6. So the toothpicks stay vertical while weaving, dab some glue on the base of each toothpick. Next, cut a piece of string approximately 1,10m in length (44 inches). Begin weaving by looping around toothpick, as shown.
This will be the first row and the edge of the cradle. Mark an 'X' by the first toothpick where you begin the weave.
Enlarge picture showing where to begin weaving
 7. This is how the first row of weave should look.
Enlarge picture showing first row
TIP
When you finish the first row, fold the end of the string into the middle of the form. This is end of this piece of string.
When you finish the first row, fold the end of the string into the middle of the form. This is end of this piece of string.
 8. Now cut another piece of string, 9m (30 feet) in length. Fold it in half and put the loop on the toothpick where you marked the 'X'.
Enlarge picture showing where to loop the next string
 9. Begin weaving each half of the string around the toothpicks. You must twist the two strings around each toothpick in the same direction, but on opposite sides of the toothpick. As an example here, I'm using two string of different colors, blue and green.
Enlarge picture showing how to begin weaving
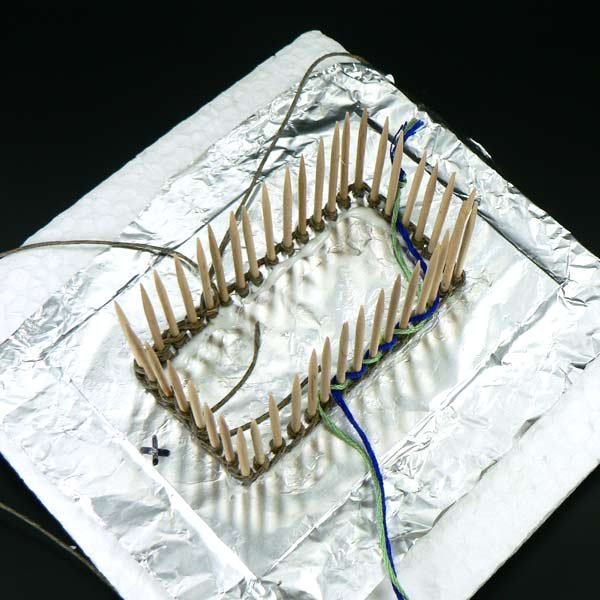
 10. From time to time you will need to press the rows down to tighten the weave. Use the onion holder or you can use a knitting needle. Using the onion holder will allow you to press all the weave down at once.
Enlarge picture showing how to use an onion holder
 11. Cut a small piece of cardboard. Punch a hole in opposite ends of the piece. Then pull one end of each string through the hole. This is very helpful while weaving. The two string ends tend to twist together. This little trick keeps the string from twisting up while you are weaving.
Enlarge picture showing a little trick while weaving
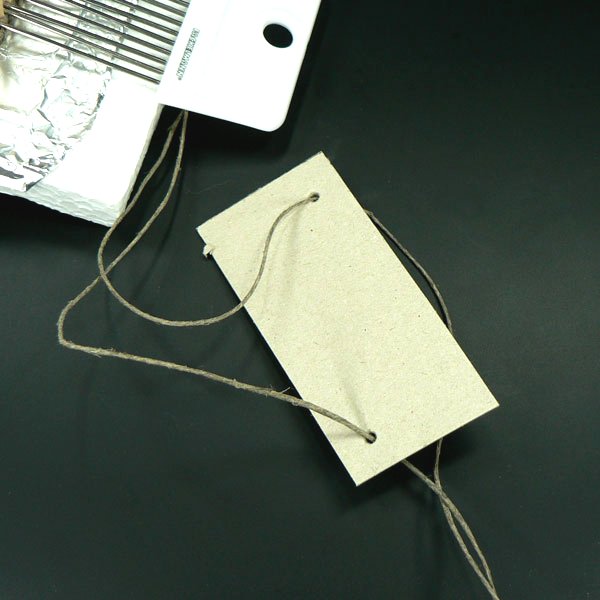
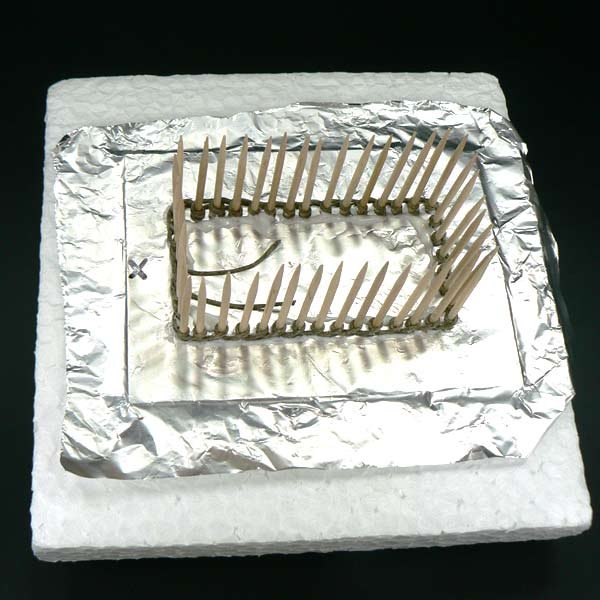
 12. Continue weaving the string around the toothpicks until the height is approximately 24mm (1"). Stop weaving on the same toothpick that you starting weaving from, 'X' marks the spot. Cut the string, leaving about 48mm (2") from the last weave. Glue the string inside of the cradle at the toothpick. Leave the excess inside the cradle bed.
Enlarge picture showing how to end the weaving of the cradle base
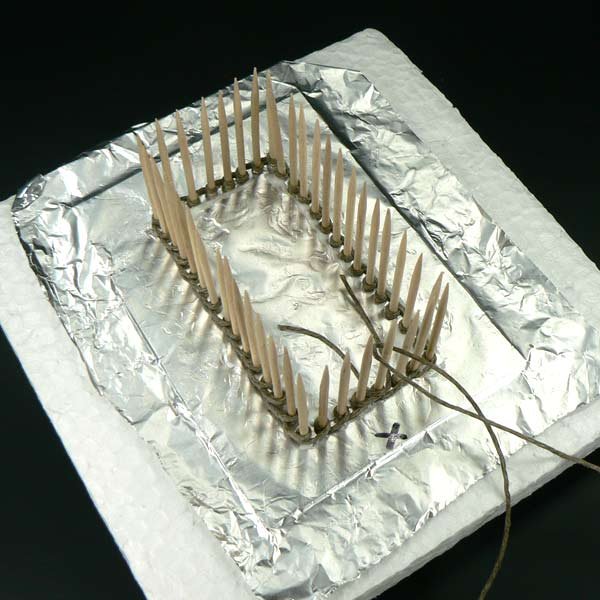
 13. Cut a new piece of string, approximately 1,10m (45") in length. Repeat Step 6. Press all the rows down to the same height on all four sides. Dab a little drop of glue on the inside edge. Let it dry and cut the toothpicks as close as possible, without cutting the string.
Be careful and touch the toothpicks with your fingers while snipping the toothpicks - otherwise, the string will unravel all over the room and may be in your eyes.
Enlarge picture showing how to finish base
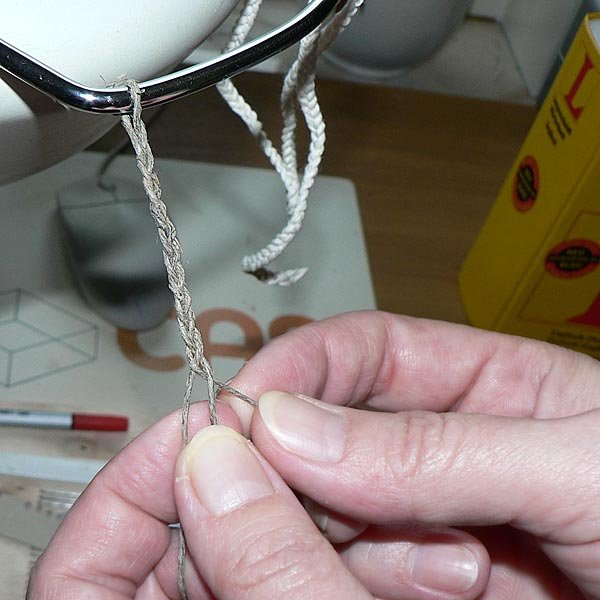
 14. Cut three new pieces of string, length approximately 60cm (24") each. Knot the pieces together on one end and plait them like a braid (pigtail).
Enlarge picture showing how to braid new lengths
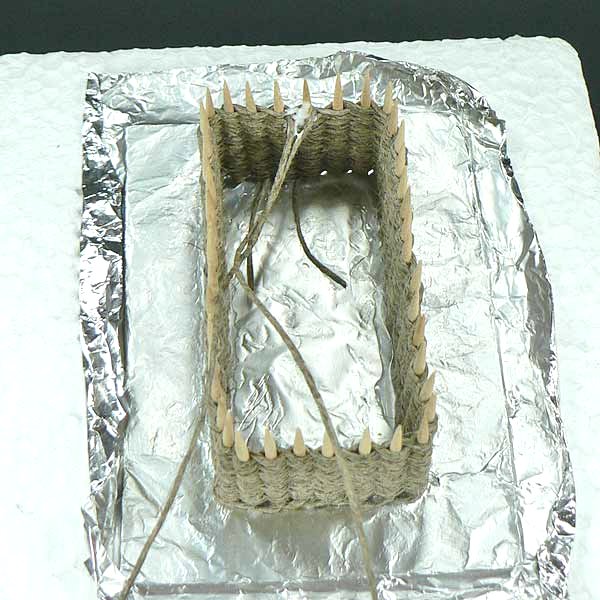
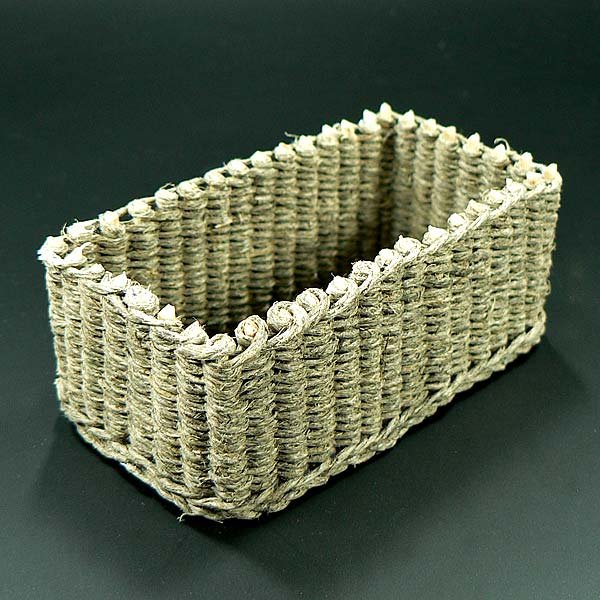
 15. Dab glue on the toothpick ends of the cradle and glue the braid around the edge. We will have now a basic cradle body that looks like this.
Enlarge picture showing where to glue the braid
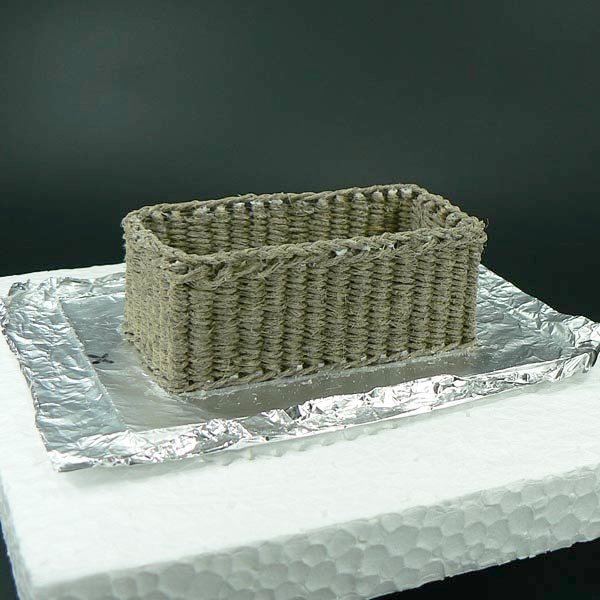
 16. Using the onion holder, press under the aluminum foil and lift up the cradle from the cardboard. Do this carefully around all sides of the cradle step-by-step. The cradle should not lose it's shape on this step.
Enlarge picture showing how to lift the cradle from the form
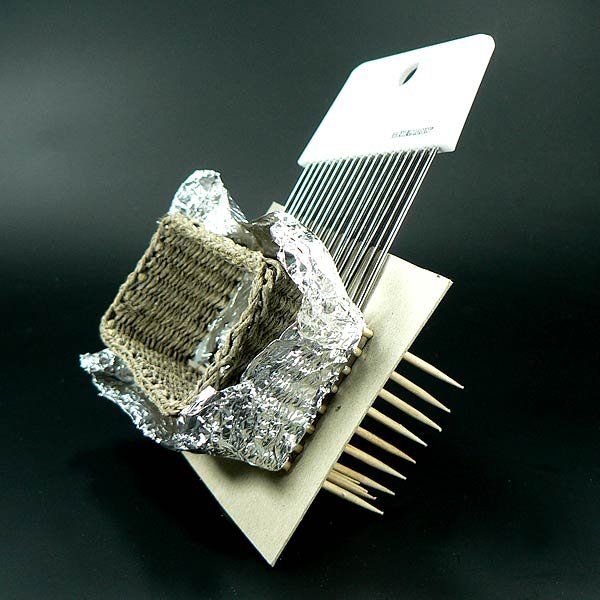
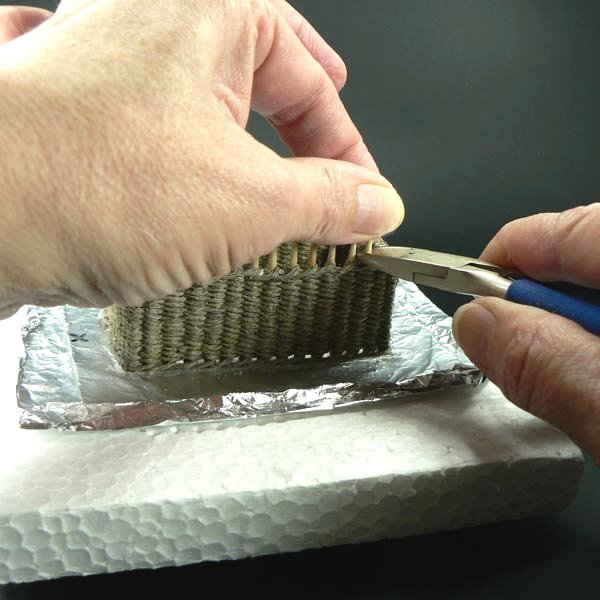
 17. Cut the toothpicks from the underside of the cradle.
Enlarge picture showing where to cute the toothpicks
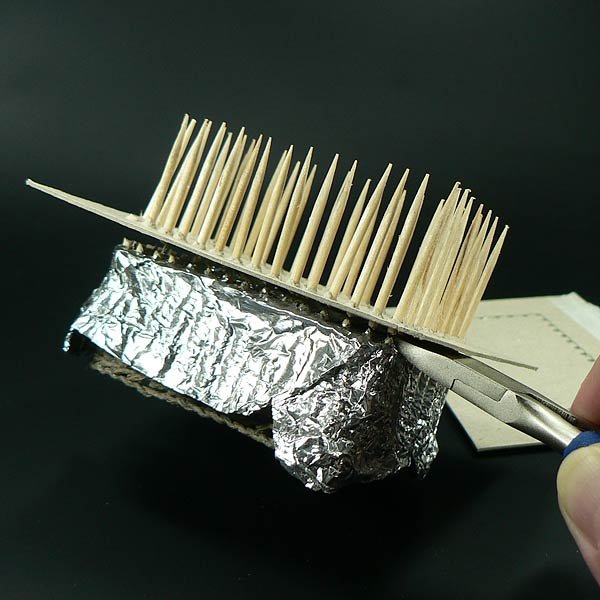
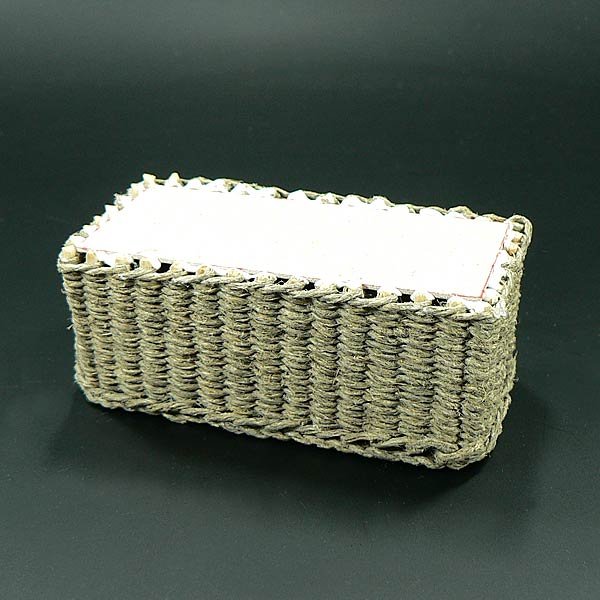
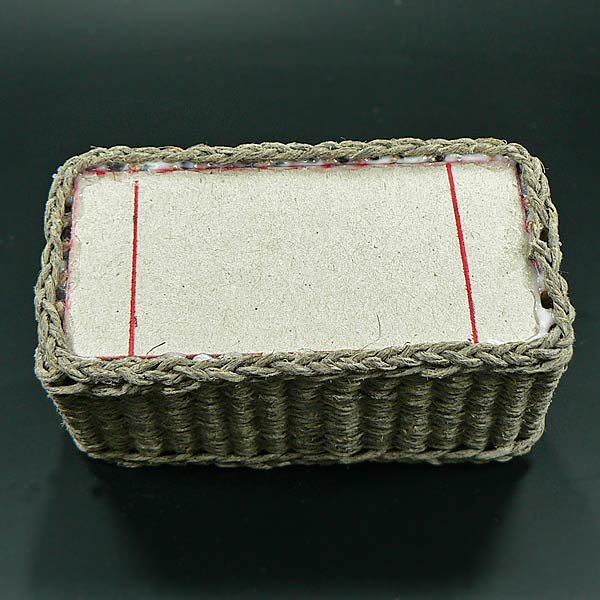
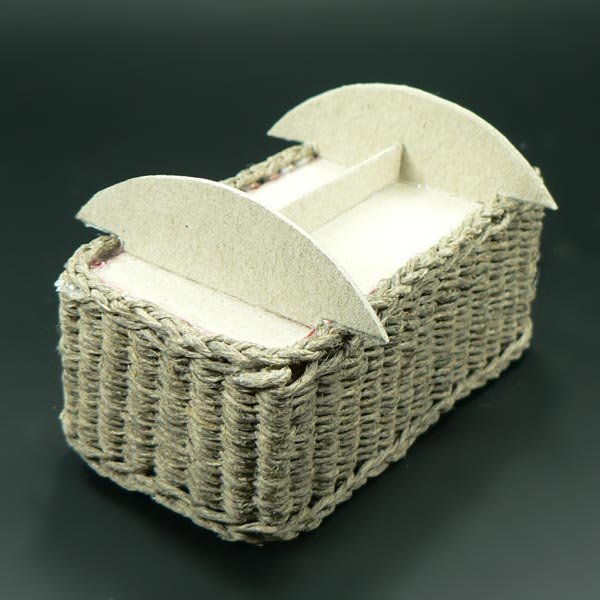
 18. Remove the cardboard. Do not discard, you will use this for a pattern of your cradle bottom. Cut the bottom along the red lines seen on the photo. You will need to cut a new cardboard piece for the bottom, since this one is destroyed.
Enlarge picture showing how to remove the cardboard
 19. Bottom of the cradle base.
Enlarge picture showing cradle base
 20. Using the new cardboard piece, glue the bottom between along the edges, as shown in the photo.
Enlarge picture showing glued cardboard bottom
 21. Next, you will weave a new braid for the bottom of the cradle.
Enlarge picture showing new braid for the bottom of the cradle
 22. Glue the braid on the toothpick ends around the edges. The red lines on the bottom are the marks where we must glue the runners in the next step.
Enlarge picture showing where to glue the braid
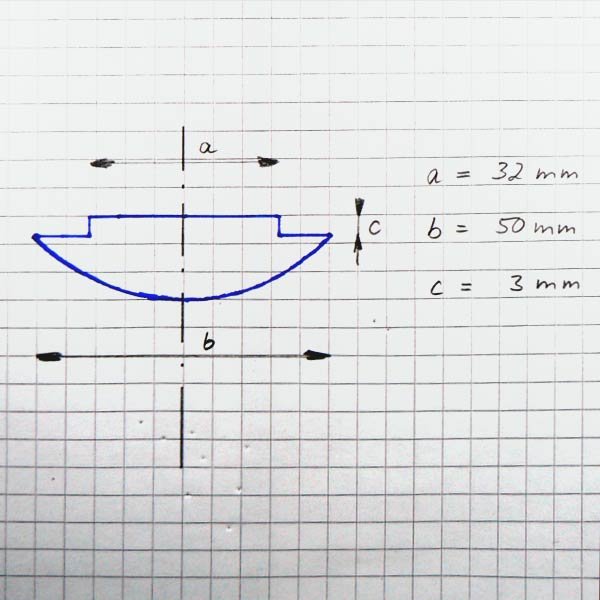
 23. Next, you will need to cut two pieces of cardboard in the size shown in the photo for the runners. The measurements are for my cradle - but you will need to adjust to the size to fit in yours. It changes with the thickness of the threads used for weaving the cradle.
My example is:
A = 32mm (= 1.25 inches)
B = 50mm (= 2 inches)
C = 3mm (= 0.118 inch)
Enlarge picture showing how to measure the cradle runners
 24. Glue the runners on the bottom of the cradle and glue a piece of cardboard between the runners as shown. When the glue is dry, balance the cradle. You may need to trim the cardboard runners to make it balance. Cut carefully - the cradle must stay and swing.
Enlarge picture showing where to glue the runners
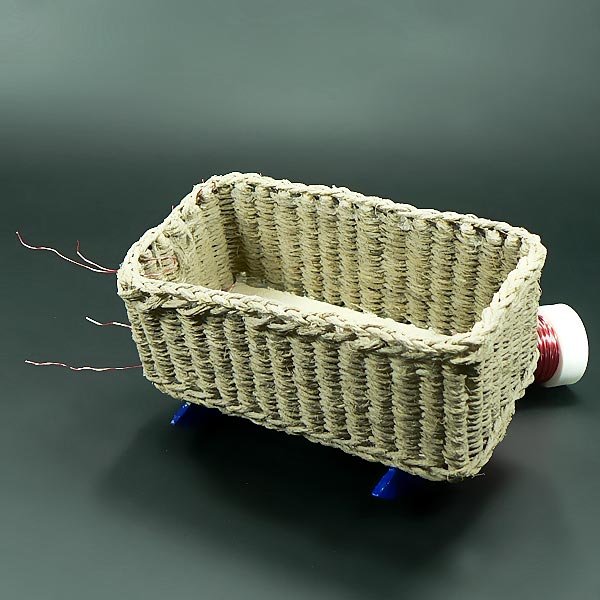
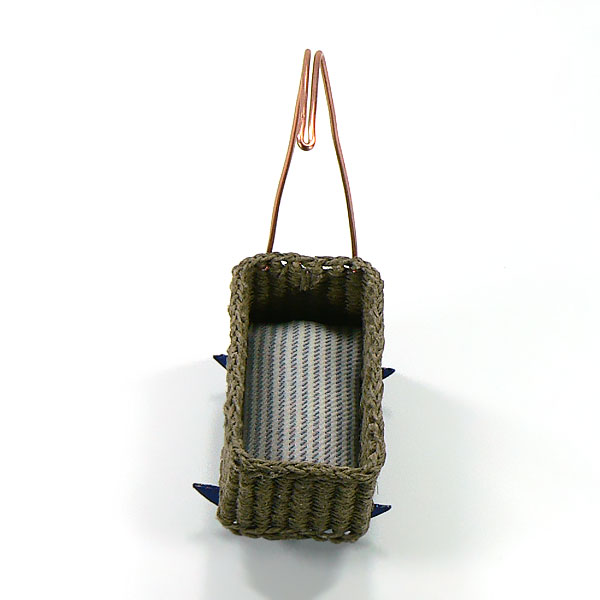
 25. Progress so far. Your cradle should look like this, after these steps.
Enlarge picture showing progress so far
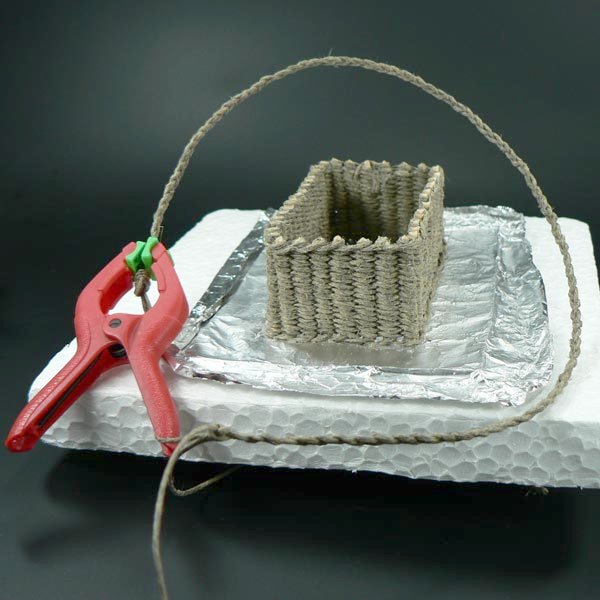
 26. To make the canopy support, cut a piece of electric wire around 13" (32cm) long and remove the insulation.
Enlarge picture showing wire length for canopy
 27. Then bend the wire as shown in photo.
Enlarge picture showing where to bend the wire
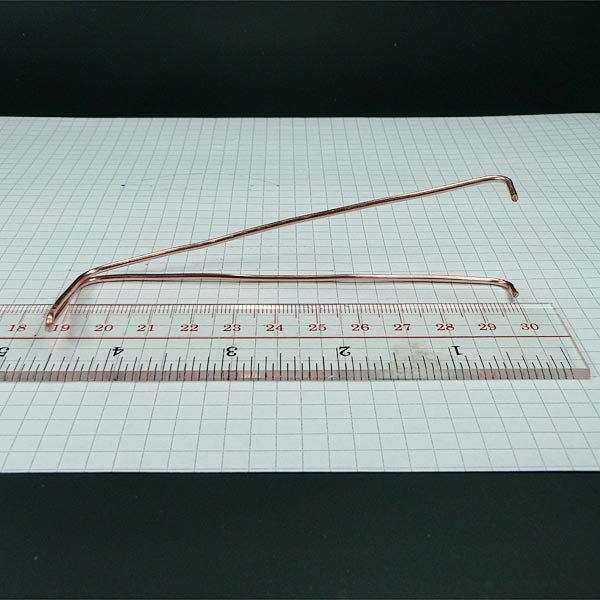
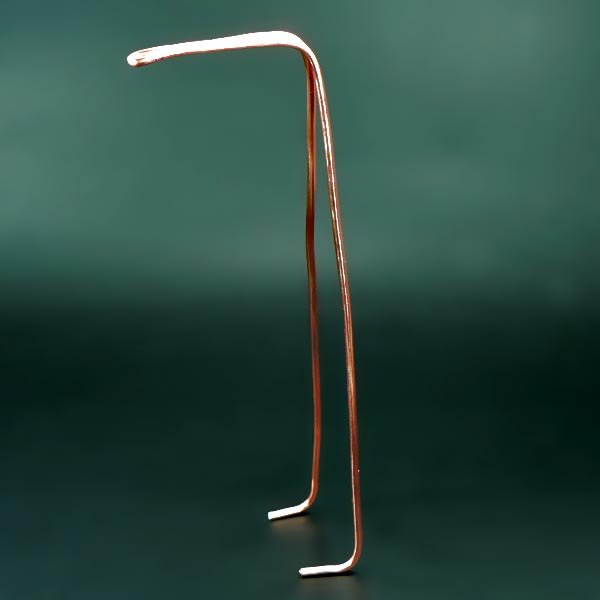
 28. You will wind up with the wire shaped like the image.
Enlarge picture showing shape of canopy wire
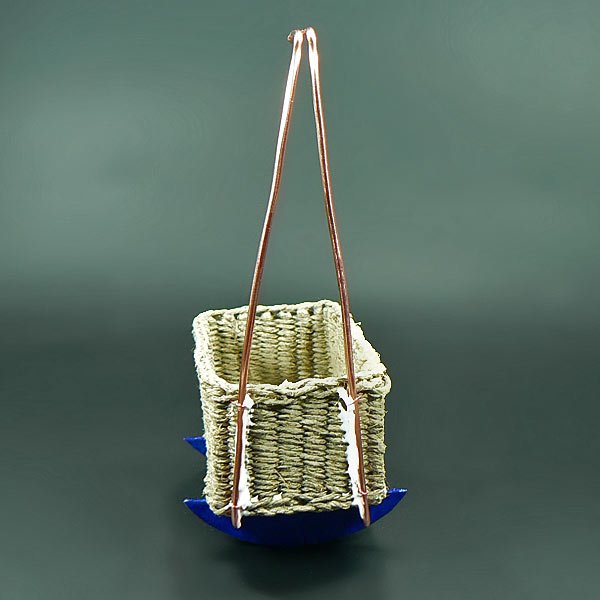
 31. Thread two pieces of wire through the weave between the rows of the back wall of your cradle on each side. This will be the anchor support of the canopy wire.
Enlarge picture showing how to anchor the canopy wire form
 32. Secure the canopy support with a little glue at the fine wire support.
Enlarge picture showing where to glue the canopy wire
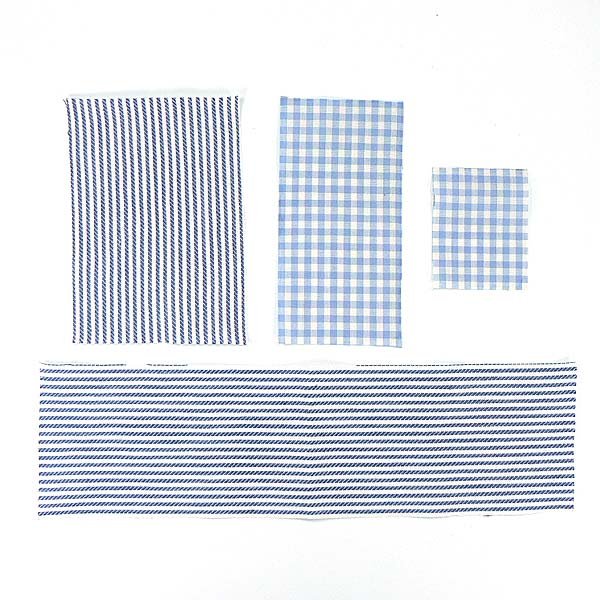
 33. Set the cradle aside and cut four pieces of fabric as follows:
- 1 piece ::: 8 3/4" long and 2 1/2" wide (22 x 6cm) for the canopy
- 1 piece ::: 4" x 2 3/4" (10 x 7cm) for the mattress
- 1 piece ::: 4" x 2" (10 x 5cm) for the bed cover
- 1 piece ::: 2" x 1 5/8" (5 x 4cm) for pillow
Enlarge picture showing patterns for pillow and mattress
 34. To make the mattress cut a rectangle of cardboard what will fit into your cradle. Mine is 6,5 x 3cm (2 9/16" x 1 3/16"). Glue the fabric you have cut on this cardboard with a little fiberfil inside.
Enlarge picture showing how to make the mattress
 35. Then glue the mattress on the bottom of your cradle.
Enlarge picture showing where to glue the mattress
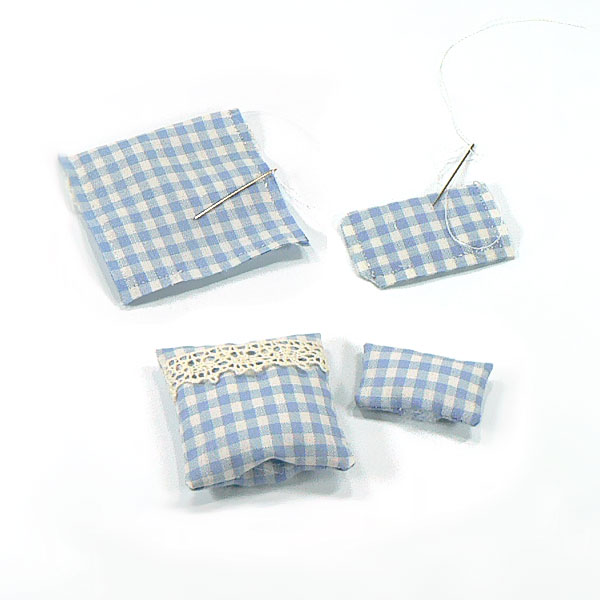
 36. To make the bedding, first fold the fabric for the cover and pillow in half. Sew the edges together. Leave a small opening to turn the material back on itself and add the filling. Turn the material inside out, then fill with fiberfil.
Enlarge picture showing how to make the cradle bedding
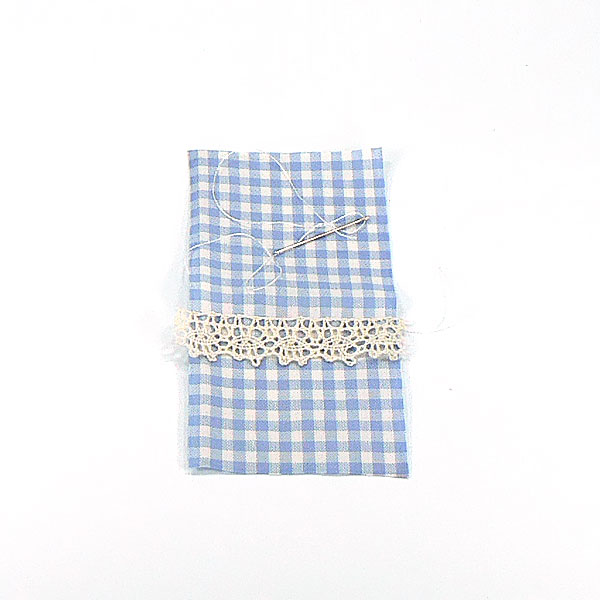
 37. Then sew the opening. You an add lace or edging as I have done on the bed cover.
Enlarge picture showing how to finish the pillow
 38. To make the canopy cover, stitch a piece of lace around three edges of your fabric. This will be the front and bottom of the canopy.
Enlarge picture showing how to stitch the canopy cover
 39. Then fold the piece in half and sew two rows. The first seam at 3/16" (ca. 5mm) from the folded edge and the second seam at a spacing of 3/16" from the first seam. This will be the tunnel for the support to add the wire.
Enlarge picture showing where to sew the canopy cover
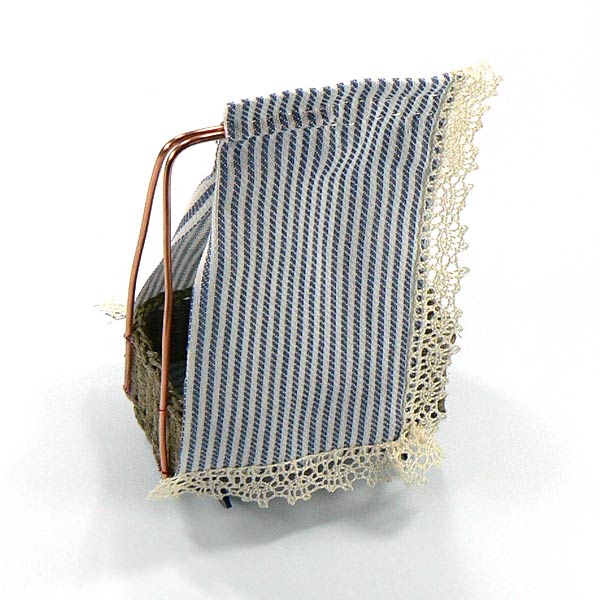
 40. Fitting the canopy cover over the wire support.
Enlarge picture showing Fitting the canopy cover over the wire support
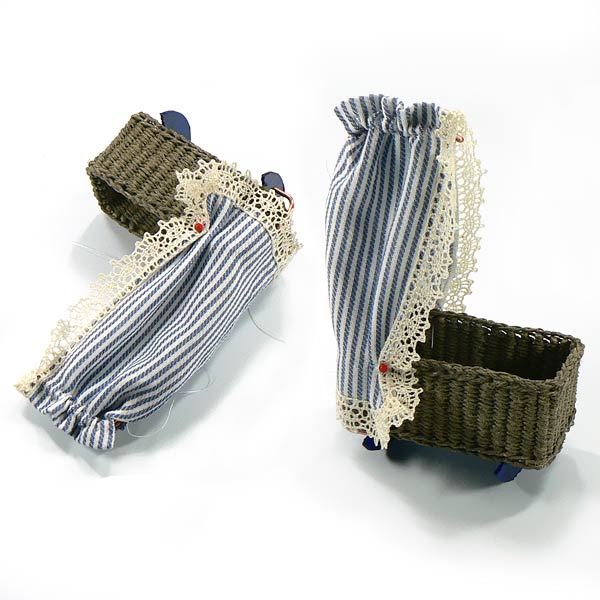
 39. Then sew the two sides of the canopy in the back together.
Enlarge picture showing where to sew the sides
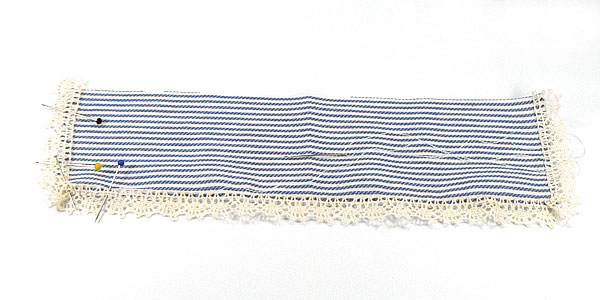
 40. Drape the fabric nicely on the sides of the cradle and pin to hold, as noted in the image. Stitch through the fabric and weaving where the pins are at.
Enlarge picture showing close the back cover
 41. Add a few drops of glue onto the end area where you stitched. Then knot the thread at the hook on the front of the canopy support. Save with a few dabs of glue again on the knot.
You can add bows on the side and the back of your cradle. I have also glued some beads on a thread and knot this thread at the hook off support. Also, you can paint the runners in a color of choice. I have painted them in dark blue.
Now your cradle is ready for the new baby!!!
Enlarge picture showing completed dolls house canopy bed
MEET THE ARTIST
 Ulrike Leibling lives with her husband in Benshausen - the green heart of Germany. Her two children are now relatively independent and out of the house.
Her sculpting career started with the big babies, mostly from Modelene polymer clay. Sometime later, she discovered a love for the doll's house in 1:12 scale. A particular challenge is precisely this scale - all size fits perfectly together as in real life - just 12 times smaller! In addition to modeled babies there are also accessories for life in the dollhouse. All her creations are unique. Each piece is lovingly hand worked according to her own inspiration.
Ulrike Leibling und wohne mit meinem lieben Mann in Benshausen in Thüringen dem grünen Herzen Deutschlands. Unsere beiden Kinder sind inzwischen relativ selbständig und aus dem Haus, und so habe ich mir ein wunderschönes Hobby erschlossen.
Vor einiger Zeit habe ich meine Liebe zum Puppenhaus im Maßstab 1:12 entdeckt. Eine besondere Herausforderung ist gerade dieser Maßstab alles passt größenmäßig perfekt zusammen wie im richtigen Leben nur eben 12mal kleiner! Außer den modellierten Babys gibt es dort auch Accessoires für das Leben im Puppenhaus.
Alle meine Kreationen sind Unikate. Jedes Stück ist in liebevoller Handarbeit ganz nach meiner eigenen Inspiration gefertigt.
Ulrike is a valued member of the CDHM Forum . Visit the Galleries today.
Ulrike Leibling lives with her husband in Benshausen - the green heart of Germany. Her two children are now relatively independent and out of the house.
Her sculpting career started with the big babies, mostly from Modelene polymer clay. Sometime later, she discovered a love for the doll's house in 1:12 scale. A particular challenge is precisely this scale - all size fits perfectly together as in real life - just 12 times smaller! In addition to modeled babies there are also accessories for life in the dollhouse. All her creations are unique. Each piece is lovingly hand worked according to her own inspiration.
Ulrike Leibling und wohne mit meinem lieben Mann in Benshausen in Thüringen dem grünen Herzen Deutschlands. Unsere beiden Kinder sind inzwischen relativ selbständig und aus dem Haus, und so habe ich mir ein wunderschönes Hobby erschlossen.
Vor einiger Zeit habe ich meine Liebe zum Puppenhaus im Maßstab 1:12 entdeckt. Eine besondere Herausforderung ist gerade dieser Maßstab alles passt größenmäßig perfekt zusammen wie im richtigen Leben nur eben 12mal kleiner! Außer den modellierten Babys gibt es dort auch Accessoires für das Leben im Puppenhaus.
Alle meine Kreationen sind Unikate. Jedes Stück ist in liebevoller Handarbeit ganz nach meiner eigenen Inspiration gefertigt.
Ulrike is a valued member of the CDHM Forum . Visit the Galleries today.
©
2008-2010 Ulrike Leibling and CDHM.org
Reproduced with permission from Ulrike Leibling. All photographs and text appearing in this tutorial are the exclusive property of Ulrike Leibling. Permission is explicitly denied for any republication of text or photographs in this article without the prior express written consent of the author.
BACK
Copyright © 2004-2012
Custom Dolls, Houses & Miniatures / CDHM
Custom Dolls, Houses & Miniatures / CDHM