


Learn To Sculpt
a Head & Face
From Polymer Clay
with Tony Rice
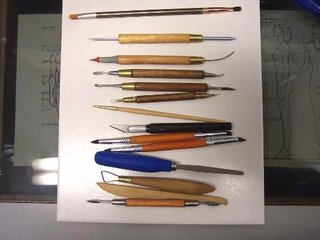
Materials Needed:
- One or two ounces of your favorite Polymer Clay
- Needle Tool
- Craft Knife: X-Acto
- Wire Loop Tool
- Small Spatula Tools
- Small Filbert Brush for Blending
- Thick Bamboo Skewer or Lollipop Stick
- Aluminum Foil
- Paper Tape, Masking Tape or Floral Tape
 Close-up images of materials needed
Enlarge picture of basic supply requirements.
Overview
Faces are probably the most difficult structure on the body to sculpt: it is the first object we learn to recognize and are intimately aware when one doesn't look right.
Study pictures of heads and look at the ways other sculptors create them. Look at the profile as well as frontal views. A good practice technique is to buy some gray clay in your favorite brand and make faces. Bake the first face/head that you sculpt and put it away, then make a dozen more and knead them up when you are done.
After every dozen you sculpt, bake one and then compare it the first head you made and baked. I promise you that you will be amazed at your progress. Also, it is a good idea to get yourself one of these and study it.
 1. I bought a plastic model of a skull to study the bones of the head. It is very helpful (to me anyway!) to have one of these to look at when sculpting a head.
Enlarge picture of skull for study
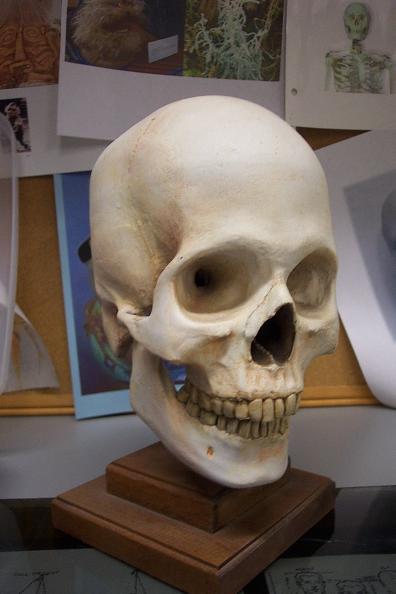
TIP
Mushy clay will hinder and frustrate you while you work. It is best to use a firm clay to sculpt with so that you can have better control over what it does. Firm clay also picks up less dirt!
Mushy clay will hinder and frustrate you while you work. It is best to use a firm clay to sculpt with so that you can have better control over what it does. Firm clay also picks up less dirt!
 2. Take a bamboo skewer or a lollipop stick and make a ball of aluminum foil on the end of it. Crush it down as tightly as you can. You are making a skull shaped: rounded back, flat sided, tapered front.
The foil skull should be about 2/3 the size of the finished head you intend to sculpt.
Enlarge picture showing how to create the foil skull
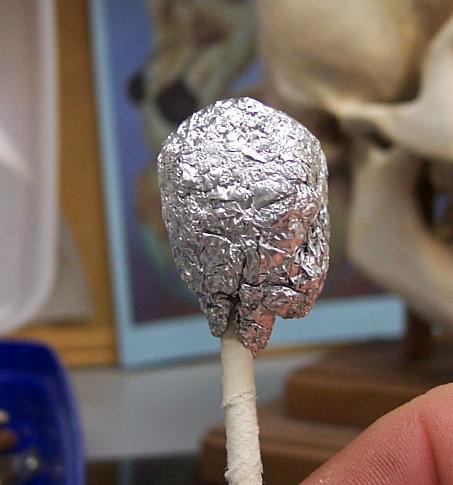
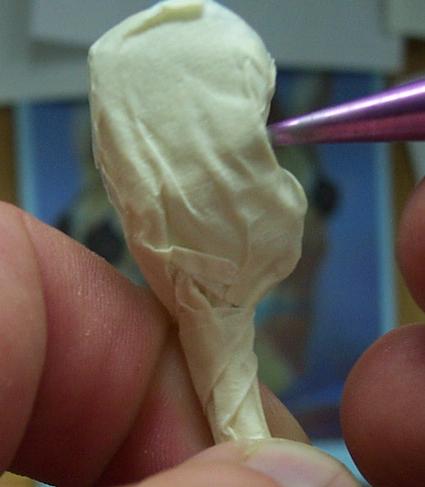
 3. Wrap the foil skull with paper tape or masking tape. This is done to give the clay something to stick to and to conceal the dark foil!
Be sure to go down the "neck" to secure the head onto the stick.
Enlarge picture showing how to wrap foil with paper tape
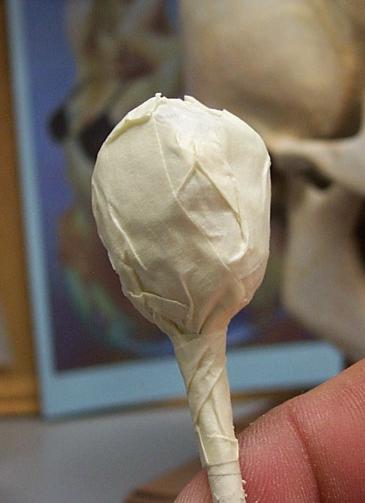
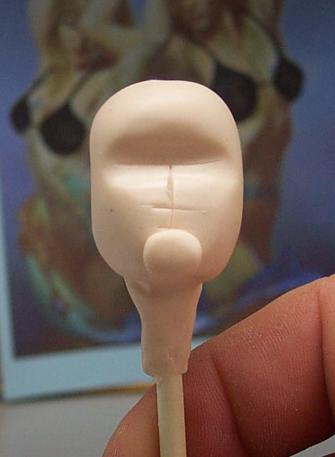
 4. Press a dent into the face half way between the top and the bottom. You can use any of your tool handles to do this, just lay it across the face and press in. You can lay the head on your work surface and push down with your weight, if you need to.
This process may flatten the back of the head, like I did to mine. If this happens you can plump it back up later by adding more clay to the back of the head.
Enlarge picture to show where to make the indents
Q&A
Q: How big should the dent be? It looks pretty big from the side!
A: The dent should be pretty deep, maybe 1/8th of the depth of the head traversing the entire face.
Q: How big should the dent be? It looks pretty big from the side!
A: The dent should be pretty deep, maybe 1/8th of the depth of the head traversing the entire face.
 5. Make a pancake of clay and cover the skull starting at the front. Be sure to get out all of the air bubbles! Trapped air bubbles will wiggle around and hinder you as you sculpt, and if you leave them in they will typically expand and burst the clay when you bake it.
Enlarge picture showing where to start applying clay
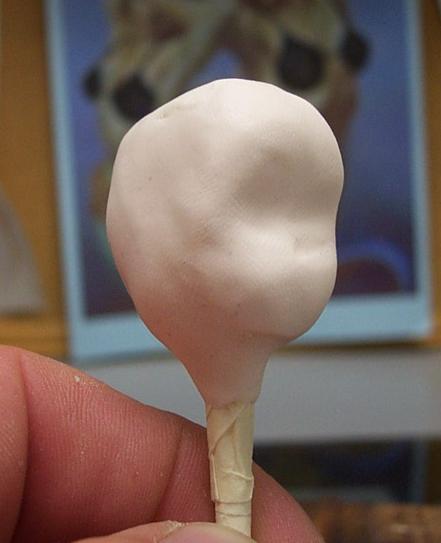
 6. Make another pancake for the back of the head. Make it thicker in case you deformed your skull pressing the groove into it. Smooth it all uniformly.
Enlarge picture of applied clay to the back of the skull
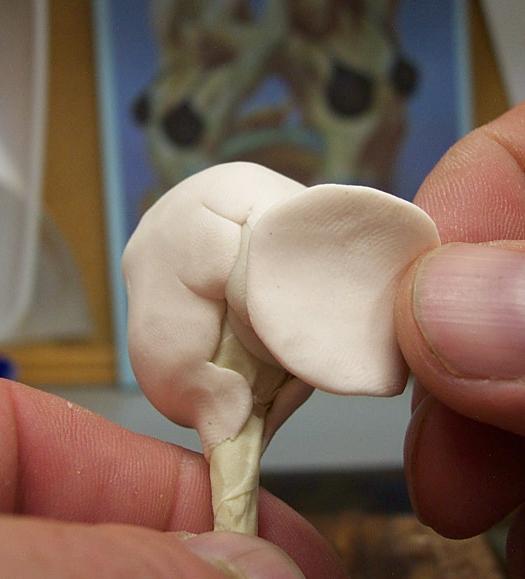
 7. Next you will be using the blunt side of the blade on your craft knife; you will need to divide the face up. Start by drawing a line across horizontal dent from left to right to indicate the line the eyes will sit on. This line should be about halfway between the top of the head and the chin. Make one line dividing the face in half vertically. Make tick marks half way out on the horizontal line to note the center of the pupil. A mark half way down the vertical line will indicate the bottom of the nose. A mark half way between the nose mark and the chin will tell you where the mouth will be. This is a map of where the features will go.
Making the map will make it easier to get the proportions right than not, but it will still take practice! Don't worry about proportions to much if this is your very first head sculpt, just have fun.
Enlarge picture showing how to map the face
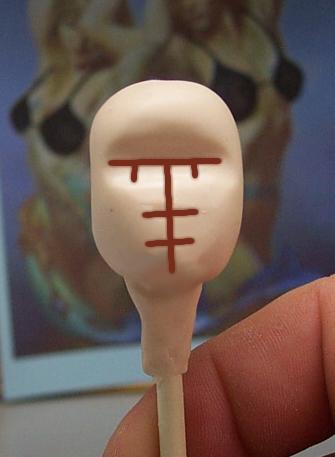
 8. Make a thick pancake of clay that fits between the chin and mouth line and place it on the head. Blend it into the face left, right and down, but not in an upward motion toward the nose.
Enlarge picture showing how to build up the chin
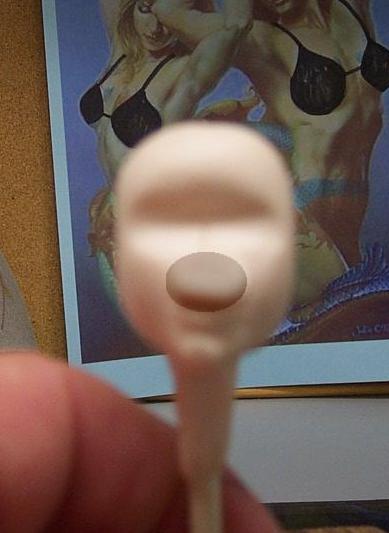
 9. This picture came out blurry, but I edited it so you can see what you need to do. Make an oval pancake of clay and place it on the face just above the last one you made. Blend it in left, right and up, but not down.
Enlarge picture to show nose area build-up
 10. There should be a gash where you didn't blend the last two pancakes together. This is the mouth. Make a rounded dent under the bottom lip to give it shape and fullness. Press up at an angle on the inside of the top lip to give it the approximate shape of a Cupid's bow. I use a spatula tool for the top lip and any small round tool handle for the bottom lip. Draw in the philtrum with a ball stylus. Apply a small round ball of clay to the center of the face. Your nose line is probably obliterated by now, but guesstimate where it was. Smooth the nose out in all directions away from the center, but most steeply at the sides and top.
Enlarge picture showing how to create the mouth
 11. Using a round tool, like a large ball stylus or the end of your little finger, make an indent where the eye sockets will be.
Enlarge picture showing where to create the eye sockets
ARTIST COMMENT
At some point I decided to add a small ball of clay to the chin because I thought it wasn't shaped right, but forgot to take a picture of it. In this next picture, you can see where I haven't blended it in all the way.
At some point I decided to add a small ball of clay to the chin because I thought it wasn't shaped right, but forgot to take a picture of it. In this next picture, you can see where I haven't blended it in all the way.
 12. Be sure to allow a mound in the middle between the eyes, where the bridge of the nose will be. Smooth the edges around the eye sockets so that you have a gentle indentation, not a pit.
Enlarge picture showing smoothing steps
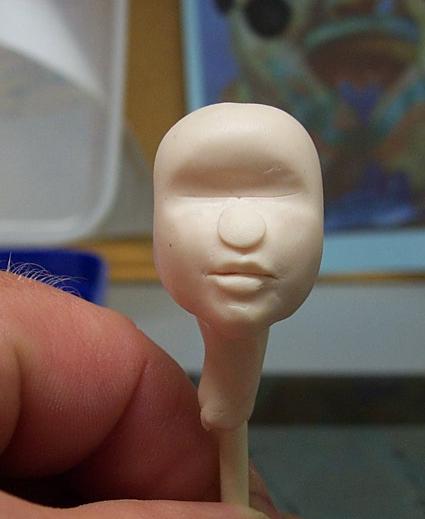
 13. I added a tiny ball of clay to the end of the nose and smoothed it into the face because my nose was too small. Using a stylus, draw in the wings of the nose, then press the nostrils in. Using the stylus, make a slight dent at each corner of the mouth. Don't be too aggressive with the nose and the mouth corners.
Enlarge picture showing how to refine the nose
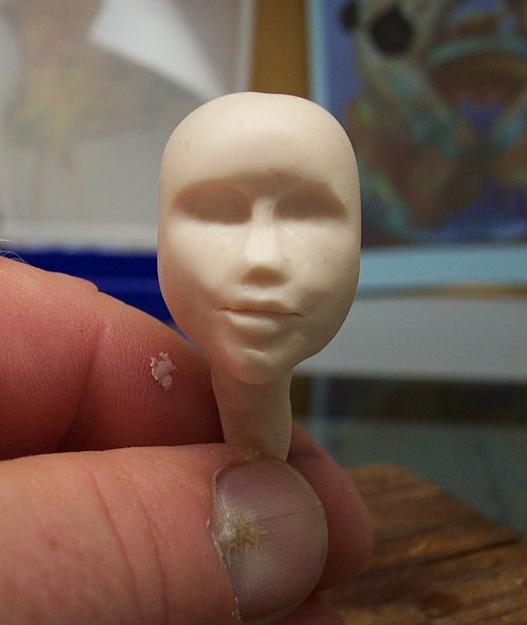
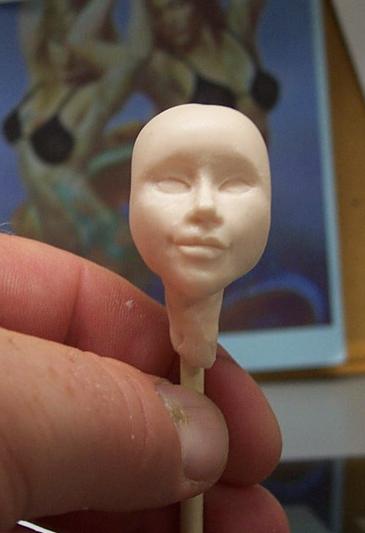
 14. Before you move on check your profile. How does the nose look? Do you need more clay at the bridge of the nose, between the eyes? If so add more. If the nose is too long, trim some off with a razor knife. How's the chin look? Too long? Trim it, too short? Add a ball of clay and blend it in.
Enlarge picture showing what to review before continuing
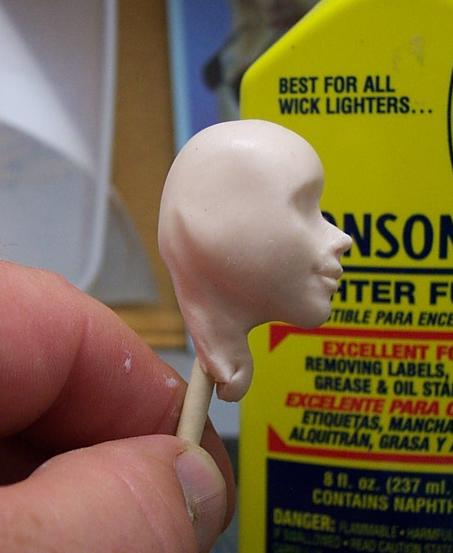
ARTIST COMMENT
You may notice the bottle of lighter fluid that has magically appeared in the pictures. I will put a few drops in a glass dish and slightly dampen my blending brushes with it sometimes. If you do this, be very careful because too much will melt your work and ruin your clay.
You may notice the bottle of lighter fluid that has magically appeared in the pictures. I will put a few drops in a glass dish and slightly dampen my blending brushes with it sometimes. If you do this, be very careful because too much will melt your work and ruin your clay.
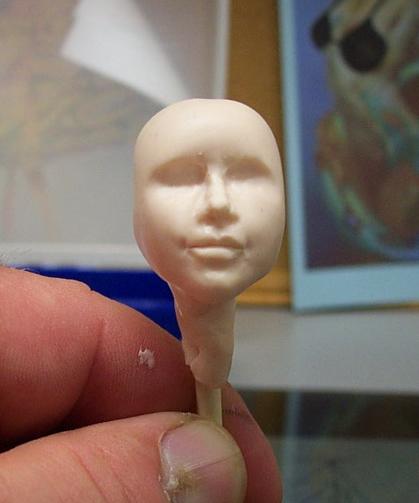
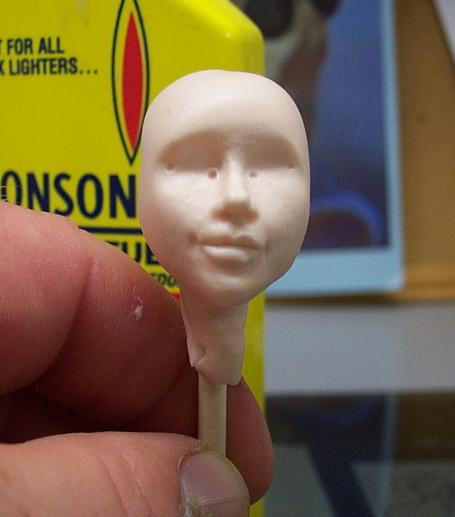
 15. Now, using a needle tool or a small ball stylus make 4 points marking the outside and inside corners of the eyes.
Enlarge picture showing how to create the eye corners
Q&A
Q: Does the smell of lighter fluid go away after you bake it?
A: Yes, it does away. Be sure to let it dry for at least an hour before baking!
Q: Does the smell of lighter fluid go away after you bake it?
A: Yes, it does away. Be sure to let it dry for at least an hour before baking!
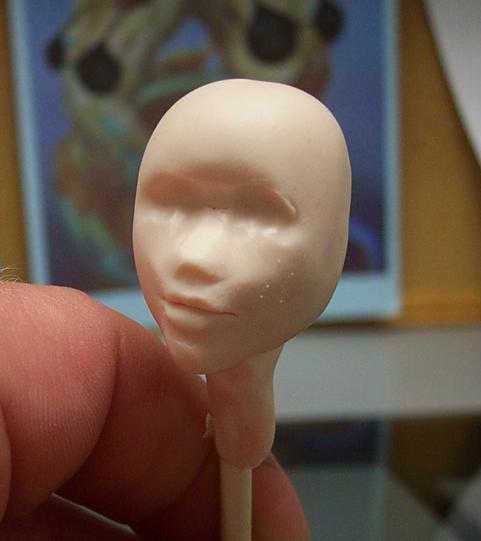
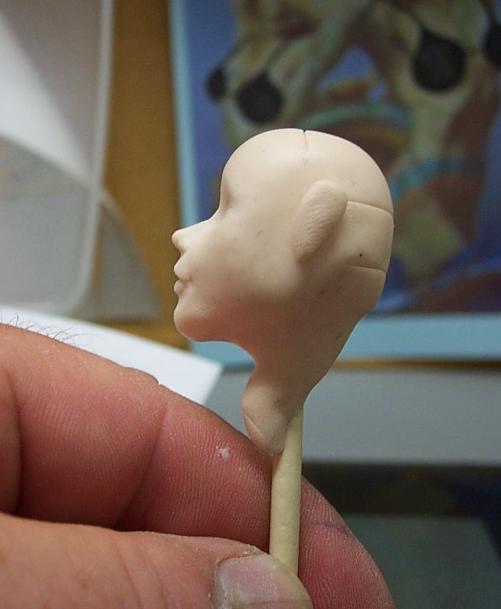
 16. Using a needle tool or a ball stylus connect the points with lines. Getting the left to match the right is a struggle! Take your time and don't worry too much if they look a little "cockeyed" on your first sculpt. Practice will make perfect! Right now, just worry about the technique, not getting it perfect.
Enlarge picture showing how to connect the lines
 17. Moving on! We're almost done!!
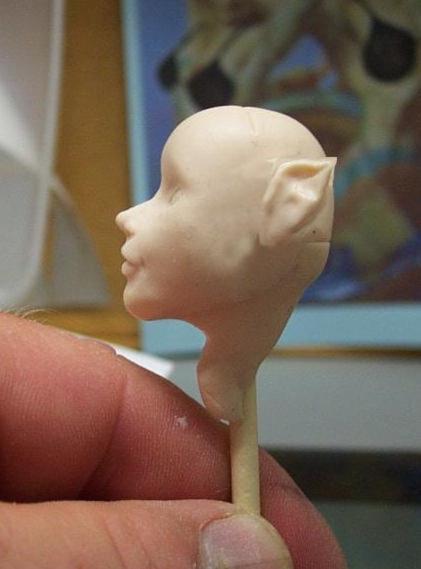
Draw a line over the top of the head from ear to ear. This will help line the ears up. You can also draw two lines across the back of the head even with the mouth and the corner of the eye to help line the ears up. Roll a little sausage of clay and put it on the side of the head.
Enlarge picture showing how to place ears
 18. Blend the little sausage into the head toward the face. Use a ball stylus to create the swirls and cavities inside the ear. Repeat for the other side. Give the head one final smoothing over to remove any fingerprints of tool marks.
Bake and enjoy!
Enlarge picture showing blending effects of the ears
MEET THE ARTIST
I started sculpting in 1992 when my wife wanted to get a twelve inch tall Victorian Santa to use as a Christmas decoration. We couldn't afford it because I was going to college. My wife asked me, Couldn't you make one for me and off I went. Everyone who saw the Santa wanted me to sculpt something for them and I spent lots of late nights and early mornings at my desk sculpting Santas, Elves, Fairies, Trolls, and anything people wanted me to make. I thank God every day for the skills and opportunities He has given me.
Tony is a valued member of the CDHM Forum. Visit the CDHM Galleries today.
© 2007-2012 Tony Rice
Reproduced with permission from Tony Rice. All photographs and text appearing in this tutorial are the exclusive property of Tony Rice. Permission is explicitly denied for any republication of text or photographs in this article without the prior express written consent of the author.