


Learn To Sculpt Hands
From Polymer Clay
For your Doll or Fairy
by Tony Rice
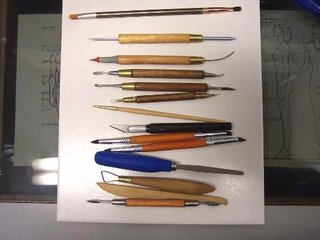
Materials Needed:
- One or two ounces of your favorite Polymer Clay
- Needle Tool
- Craft Knife: X-Acto, etc.
- Wire Loop Tool
- Small Spatula Tools
- Small Filbert Brush for Blending
 Close-up images of materials needed.
Enlarge Picture of basic supplies.
Overview
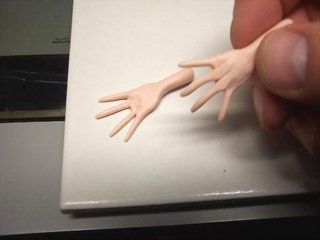
There are dozens of methods to sculpt hands. This is one of the easiest and can be modified in scale up and down fairly easily, this pair of hands is sculpted in 1/12th scale.
Hands are difficult to sculpt accurately because people are so intimately aware of how hands look; their shape, size, proportions, etc. Another reason why hands are difficult to sculpt is mushy clay. It is best to use a firm clay to sculpt hands in order to keep the fingers from wilting and to prevent you from accidentally mushing the details.
Study pictures of hands, your own hands and look at the hands other sculptors produce. Then practice, practice, practice. A good way to practice is to buy some gray clay of your favorite brand and make hands. Bake the first pair and put them away, then make a dozen or so pairs, kneading them up when you are done. Every dozen or so pairs you sculpt, compare them to the first pair you made and baked. This will help motivate you because you will be able to see yourself improve.
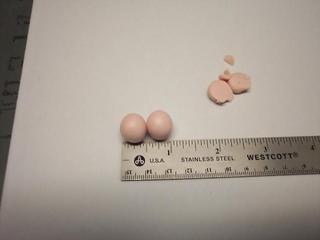
 1. Make two balls of clay, the same size. Use a ruler or calipers to match them up.
Enlarge Picture showing the size of the balls of clay.
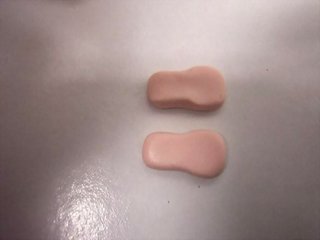
 2. Flatten the balls into ovals. The ovals should be about half the size of the figures face and be slightly wider on one end.
Enlarge Picture of flattened balls into ovals.
 3. The narrow end will be the wrist, the wider end will be the hands.
Enlarge Picture showing the wrist & hand ends.
 4. Pinch and twist the corners on the wide end into gently tapered cones, these are the pinky and index fingers. Compare them to each other.
Enlarge Picture showing the pinky & index fingers.
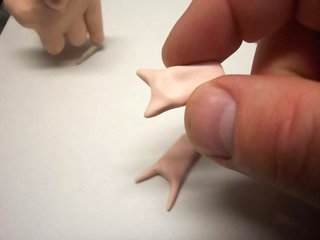
 5. Pinch some clay off of the wrist end and roll it into tapered cones that will become the middle and ring fingers.
Enlarge Picture showing how to make remaining fingers.
TIP
The clay gets warm from the friction of working it, the heat from your hands, etc. As your hands get stronger from working with clay, I recommend that everyone switch to a firmer clay that is less likely to get mushy and wilted, like Fimo Classic.
The clay gets warm from the friction of working it, the heat from your hands, etc. As your hands get stronger from working with clay, I recommend that everyone switch to a firmer clay that is less likely to get mushy and wilted, like Fimo Classic.
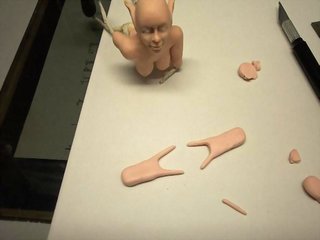
 6. Place the fingers on the back of the hand.
Enlarge Picture showing how to attach fingers.
 7. Blend the fingers into the back of the hand using gentle stroking motions. The convex side of any spoon shaped tool will work for smoothing.
Enlarge Picture showing how to blend the fingers.
 8. Turn the hands over and blend the fingers into the palm of the hand.
Enlarge Picture showing how to blend into the palms.
 9. The clay is probably getting warm and is easily dentable now, so be careful! Using a spatula tool blend the clay in between the fingers to hide the seams.
Enlarge Picture on repeating Steps 2-8.
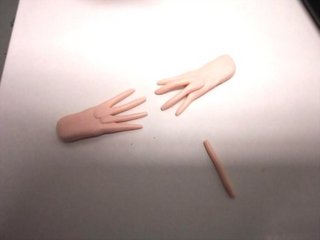
 10. Smoothing out the seams can deform the hands, so reshape the palms now if you need to.
Enlarge Picture on how to smooth fingers.
 11. Check the fingers to ensure that they are in proportion to each other. If fingers are too long or too thick, take your hobby knife and trim a bit off the ends. Roll and twist the tip back into shape.
Enlarge Picture showing proportions.
Q&A
Q. How do you handle the clay with out it sticking to the board?
A. The board I use there in the image is a large ceramic cutting board. A very light dusting of talcum powder will deter any sticking, but be careful, because it will also impede the clay sticking to itself and blending when you need it to do so.
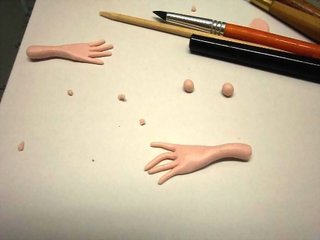
 12. Compare them against one another to ensure that the palm and fingers are the same length, width and thickness.
Enlarge Picture showing finger and hand comparisons.
TIP
Be sure to make a left and a right hand, not two lefts or two rights for the next step!
Be sure to make a left and a right hand, not two lefts or two rights for the next step!
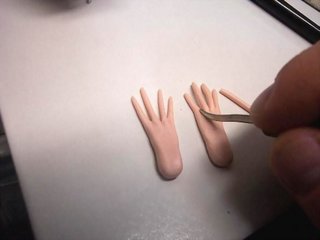
 13. Pinch some clay off of the wrist end and roll it into a blunt cone. Attach it near the base of the palm. Blend the thumb into the palm and the side of the hand in the same manner you blended the other fingers. Reshape the hands if you deform them during the blending process.
Enlarge Picture showing how to create the thumbs.
TIP
For those having trouble with the clay becoming too warm, try using a can of compressed air (the sort used for cleaning off electronics). If you turn the can upside down and spray, the refrigerant comes out. If you spray your clay with this - only a bit, and quickly, you can cool the clay and harden it somewhat -- making your sculpting easier. The clay will return to it's natural state as it warms up. The longer you spray, the colder it gets, so be quick. Just hit it again if needed.
For those having trouble with the clay becoming too warm, try using a can of compressed air (the sort used for cleaning off electronics). If you turn the can upside down and spray, the refrigerant comes out. If you spray your clay with this - only a bit, and quickly, you can cool the clay and harden it somewhat -- making your sculpting easier. The clay will return to it's natural state as it warms up. The longer you spray, the colder it gets, so be quick. Just hit it again if needed.
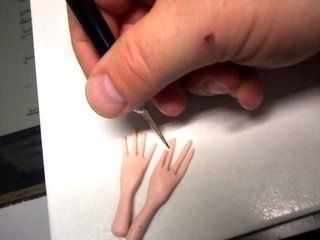
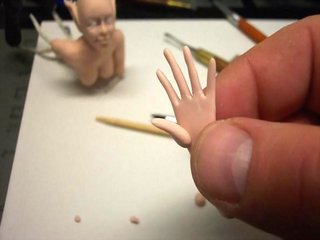
 14. Take your needle tool gently draw the fingernails into the tips of the fingers.
There is no shortcut for doing this, so forget it (I have looked for cheats and shortcuts for years, and have never found one that actually worked without creating more problems, like squished clay fingers).
Enlarge Picture showing how to create fingernails.
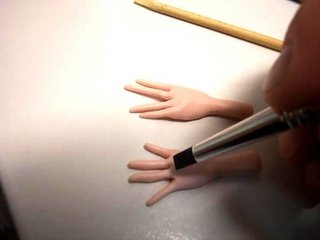
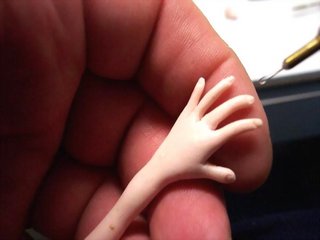
 15. Primp the fingertips to make them tip up towards the fingernail. Correct the fingernails if you distorted the details. I usually use a needle tool to scribe the lines in the palm of the hand and along the underside of the fingers. It is easy to go overboard and make pruny hands instead of pretty smooth hands, so moderation is the key! Use you own hand as a reference.
Pose and bake.
Enlarge Picture on final steps.
MEET THE ARTIST
I started sculpting in 1992 when my wife wanted to get a twelve inch tall Victorian Santa to use as a Christmas decoration. We couldn't afford it because I was going to college. My wife asked me, Couldn't you make one for me and off I went. Everyone who saw the Santa wanted me to sculpt something for them and I spent lots of late nights and early mornings at my desk sculpting Santas, Elves, Fairies, Trolls, and anything people wanted me to make. I thank God every day for the skills and opportunities He has given me.
Tony is a valued member of the CDHM Forum. Visit the CDHM Galleries today.
© 2007-2012 Tony Rice
Reproduced with permission from Tony Rice. All photographs and text appearing in this tutorial are the exclusive property of Tony Rice. Permission is explicitly denied for any republication of text or photographs in this article without the prior express written consent of the author.