


Learn To Sculpt
a Rainbow Trout
From Polymer Clay
with Kiva Atkinson
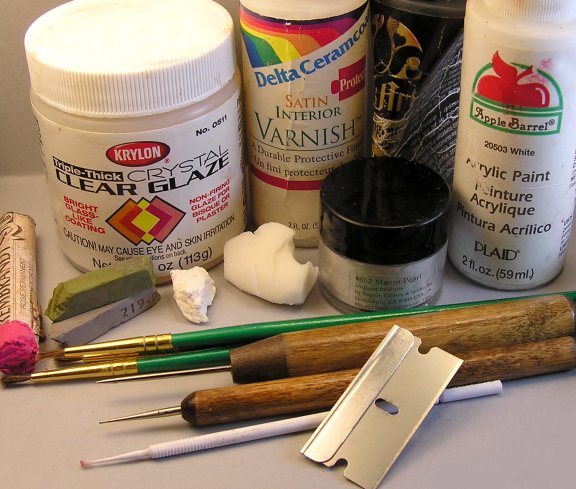
Materials Needed:
- Gloss Varnish
- Satin Varnish
- Dark Gray Acrylic Paint or Black
- White Acrylic, if needed, to Mix with Black to make Gray
- Pearl Ex Pigment Powder In Macro Pearl (or any sheer pearly powder)
- Three Soft Paint Brushes
- One Micro Brush or Extremely Fine Paint Brush
- Kemper Tools: Needle Tool
- Kemper Tools: Ball Stylus
- Straight Edge Razor
- Fimo Classic White Clay
- Fimo Classic Translucent Clay
- Artist's Chalks in Gray, Bright Pink, and Mossy Green
 Close-up images of materials needed
Enlarge picture of basic supply requirements
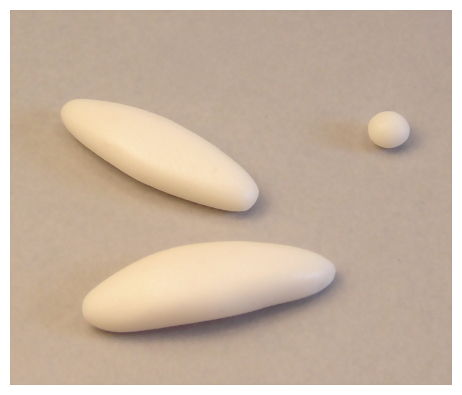
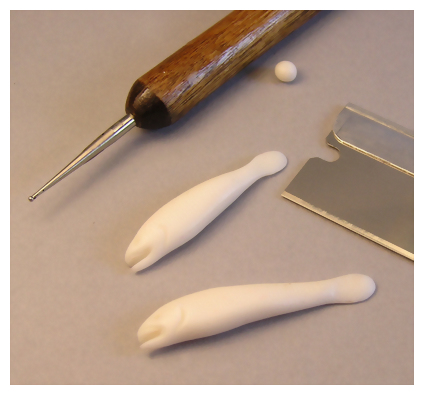
 1. Condition your white and translucent clays separately, then depending on how many fish you want to make, add a small amount of white to your translucent and blend. Set aside a small amount for the fin that is just behind the gills. Make torpedo shapes about 2 and 1/2 centimeters in length. We are not counting the tail. Flatten the torpedo shapes slightly, especially at both ends. You want a rounded belly.
Enlarge picture showing basic shapes of fish
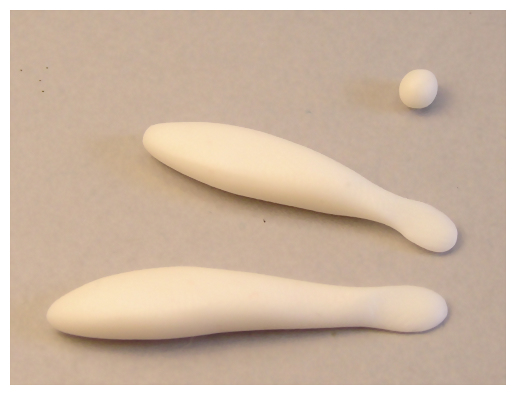
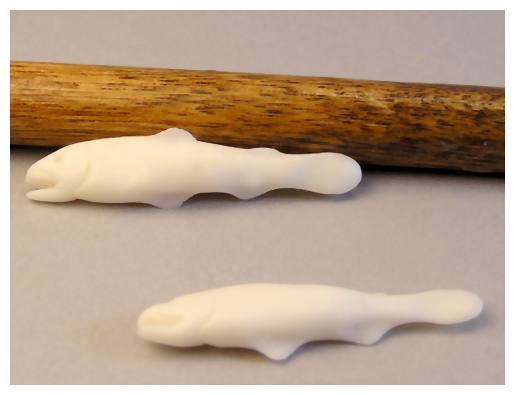
 2. Pinch one end of your torpedo piece and flatten to make the tail.
Enlarge picture showing how to start the tail
 3. Using your needle tool, mark the mouth and make a curved line for the gills. To make the mouth more gaping, use your razor and cut through. With the needle tool, I also carved a light upper lip. Then using the small ball stylus, make an eye socket.
Enlarge picture showing how where to mark the mouth and gills
TIP
If you don't want laughing/smiling fishies, make that mouth at a downward slant.
If you don't want laughing/smiling fishies, make that mouth at a downward slant.
 4. This is a sneaky way to make the fins on the body. Lightly on the dorsal or top, pinch out two fins. Refer to the photo for proper placement of the fins.
Enlarge picture to show where where to make the fins
TIP
Remember, this is the quick and dirty way of making fins, but if you prefer to make separate ones to attach to the body, you can absolutely do that too. I just take a tiny ball, make somewhat of a teardrop shape, mark the lines,then attach them. More often than not though, I make them the fast way!
Remember, this is the quick and dirty way of making fins, but if you prefer to make separate ones to attach to the body, you can absolutely do that too. I just take a tiny ball, make somewhat of a teardrop shape, mark the lines,then attach them. More often than not though, I make them the fast way!
 5. Now to make the ventral or bottom fins, pinch out two sections, in alignment with the dorsal fins.
Enlarge picture showing where to make the bottom fin
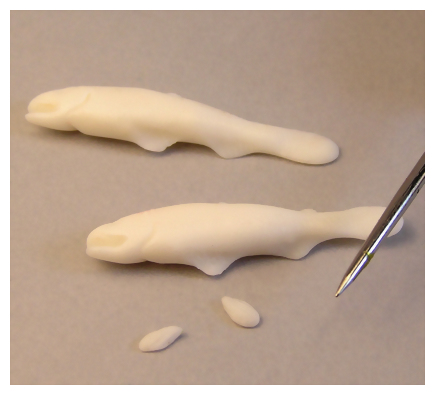
 6. To make the fins next to the gills, take the tiny ball that was set aside, and make a tiny flattened teardrop shape, and mark lines with your needle tool. Press the fin onto the section just behind the gill opening, a bit low on the body.
Enlarge picture of how to make the gill fins
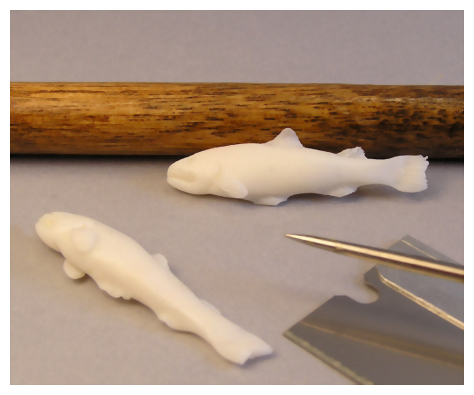
 7. Now mark lines on all the fins, including the tail. Then take your razor and cut a very slight vee in the tail.
Enlarge picture showing how to define the gills and tail
TIP
You can "re-gape" your fish's mouth if it closed again. Take your razor and slice into it. Sometimes I make hanging fish. I gape the mouth really wide, make an opening all the way through the "throat" and poke a tiny hole in the upper lip. Then when the fish is baked and varnished, I slide a metal hook through the hole.
You can "re-gape" your fish's mouth if it closed again. Take your razor and slice into it. Sometimes I make hanging fish. I gape the mouth really wide, make an opening all the way through the "throat" and poke a tiny hole in the upper lip. Then when the fish is baked and varnished, I slide a metal hook through the hole.
 8. Grate some grey chalk!!!! It's time for the shading. This can get messy, so be very careful! Brush the dorsal or top part of the body, also all the fins, including the tail and the gill fin. Go a little softer on the gill and ventral or bottom fins, shading it midway, making sure you leave a white belly.
Enlarge picture showing how to shade with the grey chalk
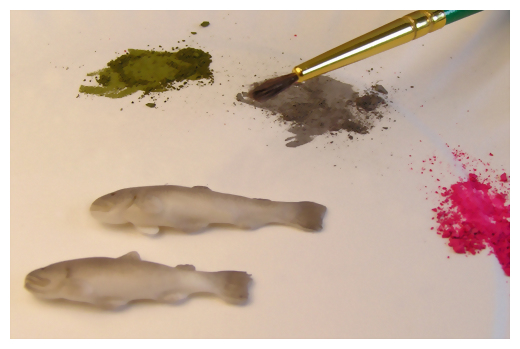
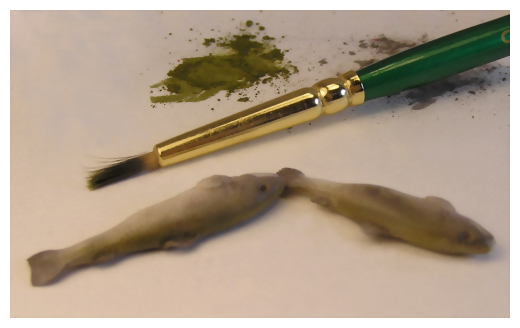
 9. Grate your moss green chalk and brush the very top of the entire length of the body.
Enlarge picture showing how to shade with the green chalk
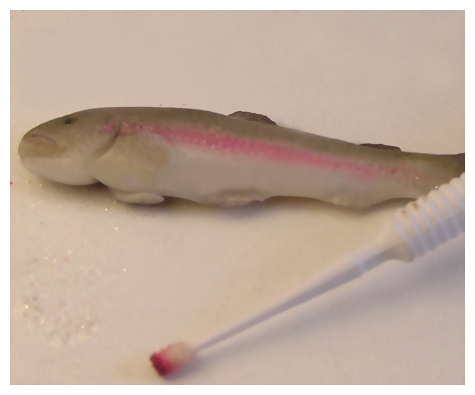
 10. Grate your bright pink chalk, and using your micro brush, make a blurred line of pink, starting just before the gills, and fading before you get to the tail. This part is optional, but I like to use a bit of pearlescent powder and lightly brush it over the pink stripe.
If you don't have a micro brush, no worries. Just use a super fine brush and pick up a little of the pink powder, blow off the excess, and very lightly make that line. Go a little right into the gill as well. Don't make a really defined, hard line, blur it out.
Enlarge picture showing how to shade with the pink chalk
TIP
This is the another step that can get a wee bit messy. After the fish are shaded and baked and cooled, I take a bit of super fine sandpaper (more like a rough sponge than sandpaper) and gently go over the belly, where I want to clean up any stray bits of chalk. This leaves a more pristine looking belly.
This is the another step that can get a wee bit messy. After the fish are shaded and baked and cooled, I take a bit of super fine sandpaper (more like a rough sponge than sandpaper) and gently go over the belly, where I want to clean up any stray bits of chalk. This leaves a more pristine looking belly.
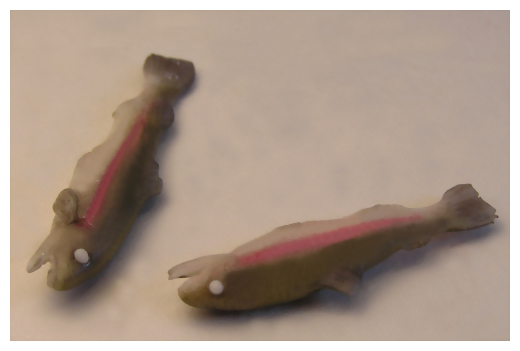
 11. Roll tiny white balls for the eye balls. To make the eye balls really stick in the socket (especially since you will get chalk in the socket), take a toothpick, dip it in some liquid polymer, place it in the socket, then place the eyeball in the socket.
Bake your fish according to the directions on the clay package. If you want to pile your fish, or stack them, or drape them in any way, arrange them as you want before you bake.
Enlarge picture to show how to make the fish eyes
TIP
The fish in step 11 will appear to have really defined pink stripes, but rest assured, in real life, I make them a lot more blurred. Sometimes I go over that area with another brush to further blur everything.
The fish in step 11 will appear to have really defined pink stripes, but rest assured, in real life, I make them a lot more blurred. Sometimes I go over that area with another brush to further blur everything.
 12. Don't forget the black spots when the fish has cooled! Also, along with the spots on the body, make the one for the eyeball and gloss the eye. Depending on the finish you want your fish to have, you can use satin varnish or for super wet fish, gloss varnish. It's up to you! Sometimes I just put matte varnish. Experiment until you see which you prefer!
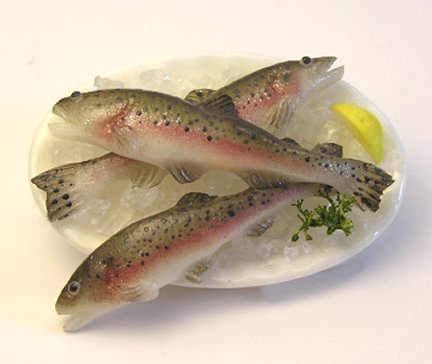
Here's the finished fishies.
Enlarge picture to show finished dish
MEET THE ARTIST
 Kiva Atkinson is a IGMA Artisan, creator of miniature food and oddball stuff. All her work is done in the classic 12th scale, but she occasionally dabbles in 1/24th scale as well. Her mother, Linda makes all of the crates, tables, and banana hangers for her creations. Kiva has been published in American Miniaturist, Dollhouse Miniatures, and Dolls House and Miniature Scene magazines.
Kiva is a valued member of the CDHM Forum. Visit the Galleries today.
Kiva Atkinson is a IGMA Artisan, creator of miniature food and oddball stuff. All her work is done in the classic 12th scale, but she occasionally dabbles in 1/24th scale as well. Her mother, Linda makes all of the crates, tables, and banana hangers for her creations. Kiva has been published in American Miniaturist, Dollhouse Miniatures, and Dolls House and Miniature Scene magazines.
Kiva is a valued member of the CDHM Forum. Visit the Galleries today.
© 2007-2012 Kiva Atkinson
Reproduced with permission from Kiva Atkinson. All photographs and text appearing in this tutorial are the exclusive property of Kiva Atkinson. Permission is explicitly denied for any republication of text or photographs in this article without the prior express written consent of the author.