
Learn To Sculpt
A Miniature Breakfast
in 1:12 Scale
with IGMA Fellow
Betsy Niederer
Materials Needed
- Premo® Polymer Clay, Half A Bbar Each
- Translucent
- White
- Cadmium Yellow (Or Any Medium Yellow)
- Orange (Just A Teeny Tiny Bit)
- Burnt Umber (Or A Chocolate Brown)
- Alizarin Crimson (A Dark Purplish Red, almost Like Burgundy Wine Colored) - Chalk Pastel
- Golden Ochre (A Rich Deep Gold)
- Medium Brown (Just A Tiny Bit Needed) - Delta Creative® Transparent Glass Paint (Or Any Stained Glass Paint)
- Amber
- Clear - Acrylic Varnish
- Gloss (But Only If You Cant Find Clear Stained Glass Paint)
- Satin - Sandpaper Around 80 Grit
- Single Edge Blade
- Ceramic Tile
- Pin, Needle, Or A Pointy Toothpick
- Dried Oregano
- Small Paint Brush
- Small Cup Of Water
- Tacky Glue Or Any Glue That Dries Clear
- Hand Wipes Or Paper Towels
- Optional: A Plate To Put Your Food On
PREPARATION & COMMENTS
Before you start working with clay, please wash your hands even if your hands look clean youd be surprised how much dirt can be on them, and it will show up in your white clay. I also dust my hands with cornstarch or talc powder after washing and drying to get rid of any excess moisture, as well as bits of dust.
Preheat your oven according to your clay directions.
NOTE
If you are using the new Fimo® formulation, please make sure that you check the baking temperature as this is lower than previously. If you are mixing new Fimo® with old Fimo® you need to use the lower baking temperature, so the mix doesnt burn!
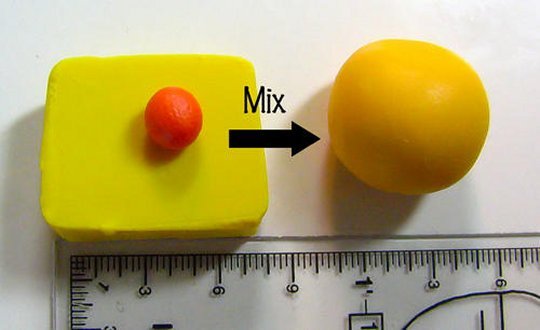
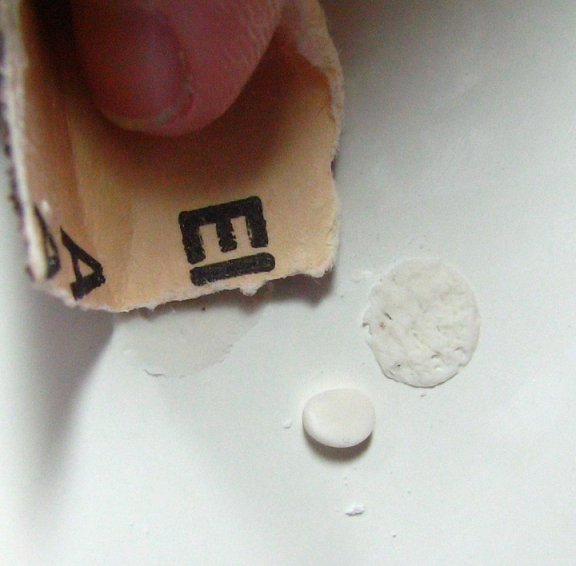
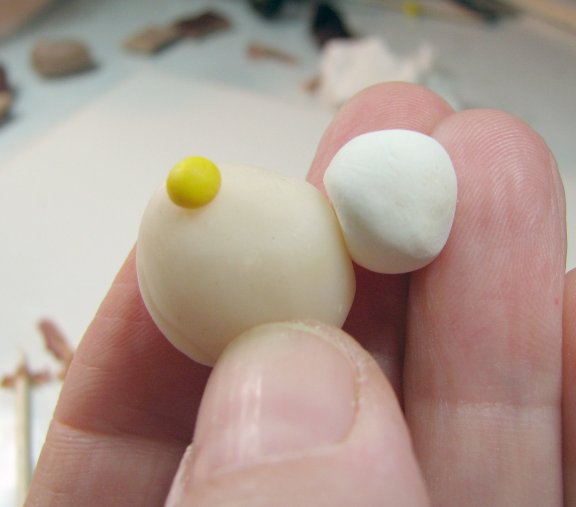
 1. We'll start with making the eggs - you will need to mix up the yolk color first. Mix a small bead of orange clay with about a ½ inch (12.7mm) square chunk of yellow to make a rich egg yolk color. You can adjust the color as you wish, just dont make it too orange.
Enlarge picture showing mixture for the egg yokes
TIP
You'll only need a little bit of the orangish yellow, so you can mix up the amount that you want using the proportions below. If you have extra just stick it in a zip lock baggie for another time.
You'll only need a little bit of the orangish yellow, so you can mix up the amount that you want using the proportions below. If you have extra just stick it in a zip lock baggie for another time.
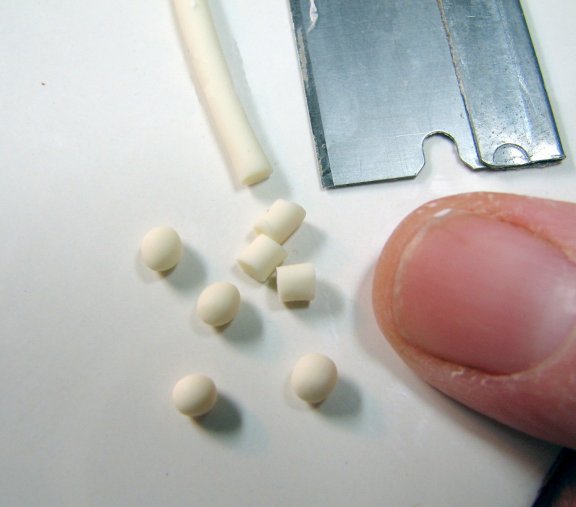
 2. Roll a snake of clay around 1/8th of an inch thick. Using your blade cut small chunks about 1/16 (1.6mm) of an inch each from the snake. Roll them into a ball. These will be your egg yolks. Don't be overly concerned about getting the measurements exact, just an approximation is fine!
Enlarge picture showing clay snake
 3. Use your finger to flatten the yolks slightly on the tile. If the yolks come off the tile and stick to your finger, just dust your finger with some powder.
Enlarge picture showing how to flatten the clay
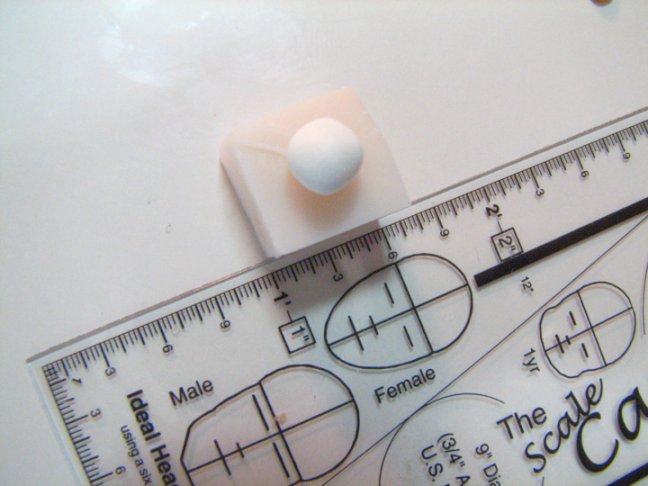
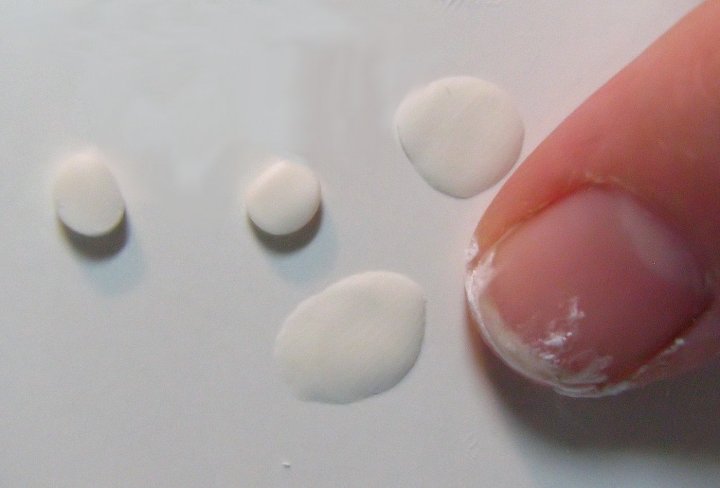
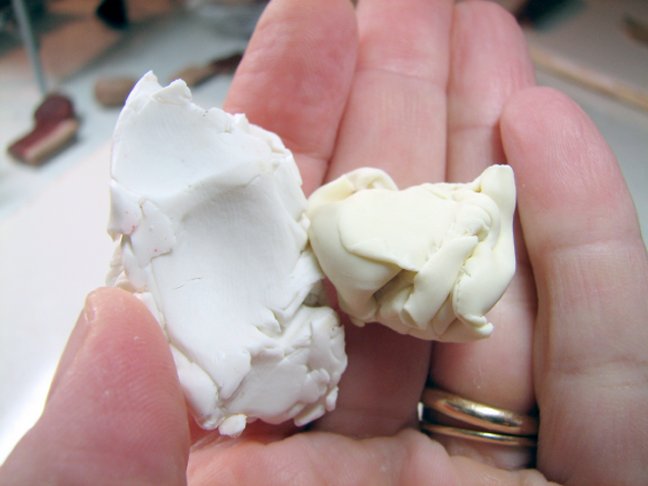
 4. Put the yellow yolks to the side and wash your hands again. It's time to mix up the white clay for the 'whites' of the eggs, and we don't want yellow streaks in it. Mix about a ½ inch (12.7mm) square of translucent with a bead of white as shown.
Enlarge picture showing mixture size of the egg whites
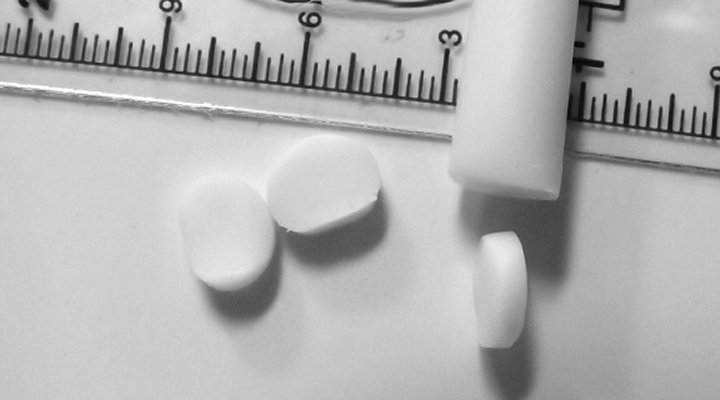
 5. Roll the translucent/white mix into a snake as shown and using your blade cut off 1/16 inch (1.6mm) chunks.
Enlarge picture showing size to cut to make the egg whites
TIP
The objective about the egg whites, you want them to be more on the translucent side. If you add too much white they end up being chalky looking. Most foods are extremely translucent, and that's an important part of getting them to look real!
The objective about the egg whites, you want them to be more on the translucent side. If you add too much white they end up being chalky looking. Most foods are extremely translucent, and that's an important part of getting them to look real!
 6. Press the whites flat with your finger on the tile. They should stick to the tile, but if they stick to your finger instead just dust it with powder.
Enlarge picture showing how to create the shape of the egg white
 7. Press the sandpaper into the egg white to flatten it further, and put some texture into it. You might have to go over it several times before it is ready. If the white rips a bit on the edges, thats ok. You dont want the whites to be perfect circles. Think about how they look in a pan when you fry them. The whites run all over the place. If your clay sticks to the sandpaper, just dust it with some powder.
Enlarge picture showing how to texturize
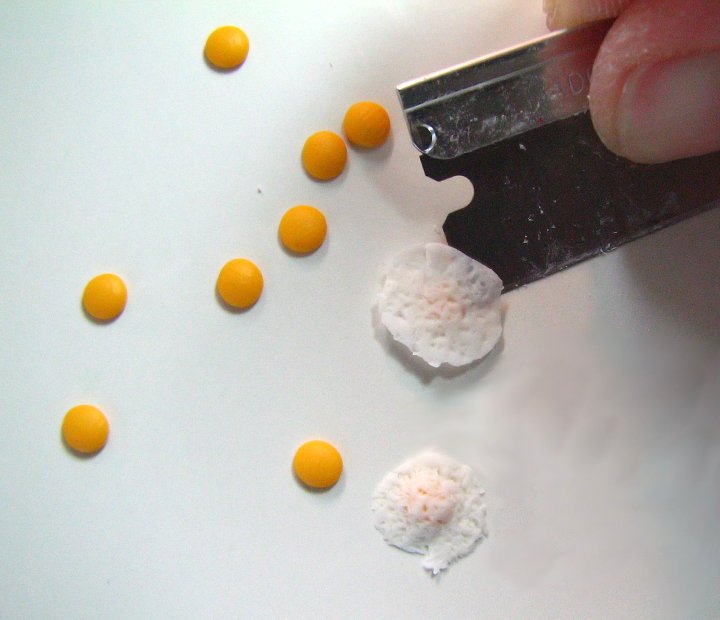
 8. Carefully scrape the white off of your tile with your blade, and gently put it over the top of a yolk. It might help to dust your blade with a little bit of powder to help it slide under the clay.
Remember that yolks are not always centered in fried eggs, so position some yolks off to the side, and some in the center of the white. Gently press the white over the yolk so they adhere. Put a little bit of powder on your finger and very gently press the white down over the yellow yolk. See how the sand paper gives the white a nice textured appearance?
Enlarge picture showing how to bring the egg yokes to the egg whites
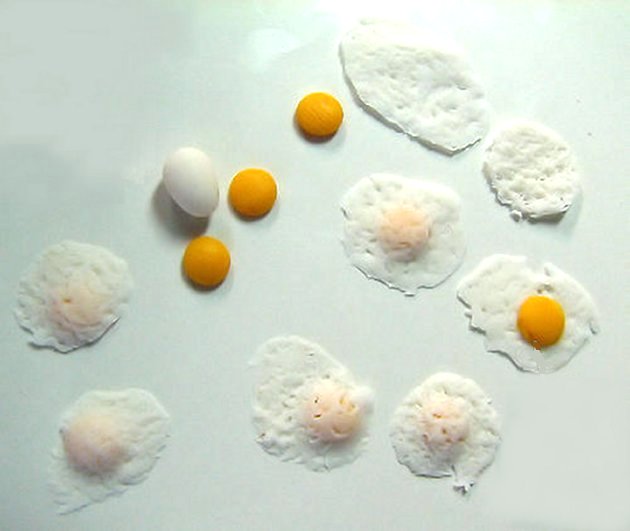
 9. Notice that theres enough translucent in the egg white so that the yellow yolk is visible. The white has been gently pressed so that it adheres to the tile, but the yolk is nicely rounded. Dont flatten your egg out too much, and try to keep your white as thin as possible.
Enlarge picture showing fried egg variances so far
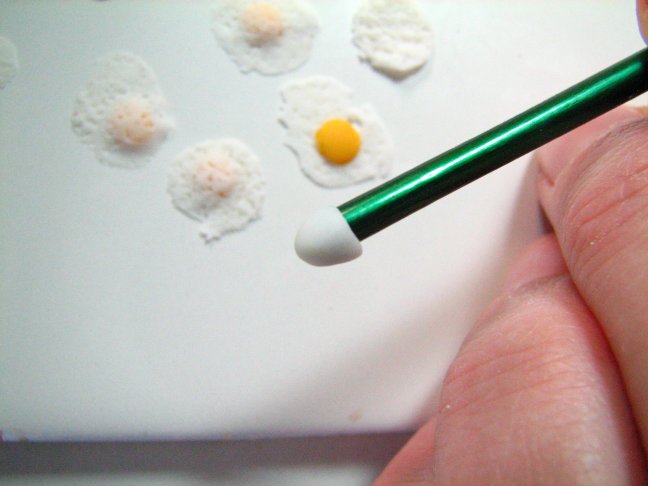
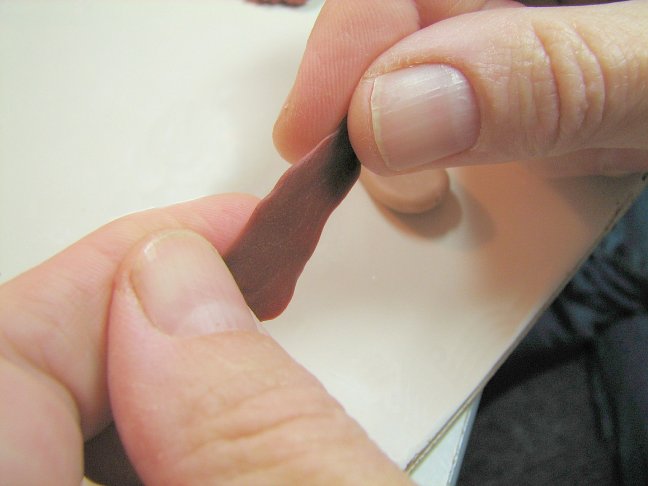
 10. You can also use some of your white/translucent mix to make a few unbroken eggs for your breakfast scene. When you roll your egg shells make sure to make them with a slightly more pointed part on one end. If you'd like to make some broken shells, you can press some of the white/translucent mix on to the end of a small paint brush like this -
Enlarge picture showing how to make unbroken and broken shells
TIP
Baking the eggs: Bake your eggs according to your clay's baking temperature and instructions. Baking your eggs for about 20 to 25 minutes should be enough since they are so thin. When they are done, take them out to cool, but leave your oven on!
Baking the eggs: Bake your eggs according to your clay's baking temperature and instructions. Baking your eggs for about 20 to 25 minutes should be enough since they are so thin. When they are done, take them out to cool, but leave your oven on!
 11. Onto the bacon while the eggs are baking.
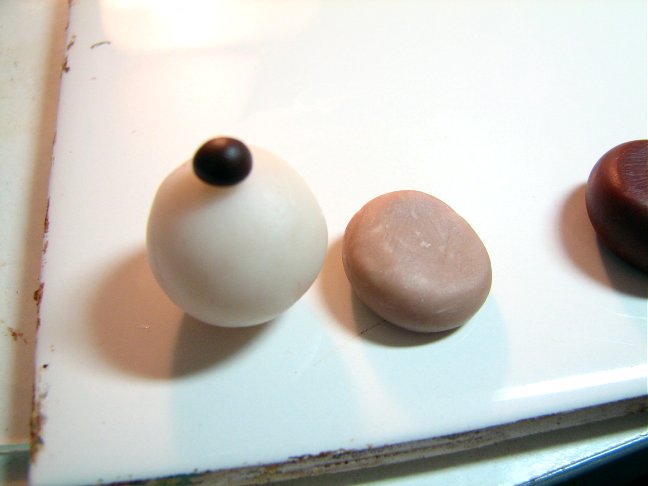
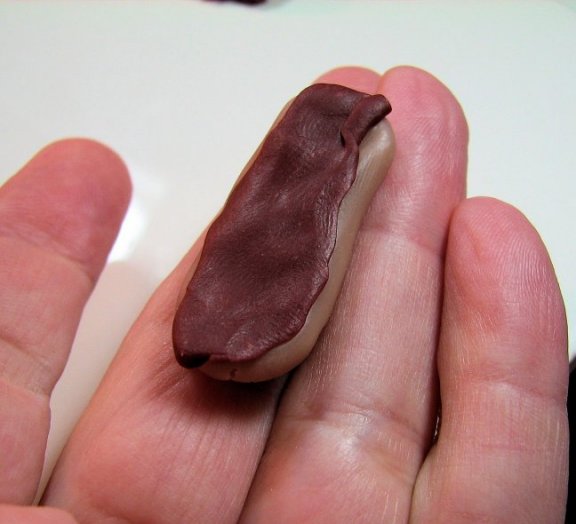
Youll start with the fat. You will want this to look a bit cooked already; so mix a ball of translucent with a tiny bit of burnt umber clay. The ball of translucent in this picture is about the size of a ping pong ball, and the little bit of brown is about the size of a pea. Please feel free to down size the quantities, since this makes a lot of bacon fat! If you have extra just put it in a zip lock baggie and save it for later. I always have the best luck starting with the translucent and gradually adding the color until I have the right shade. The color that you end up with should look like icky, very translucent, light brown, like on the right.
Enlarge picture showing blends of clay for the bacon fat
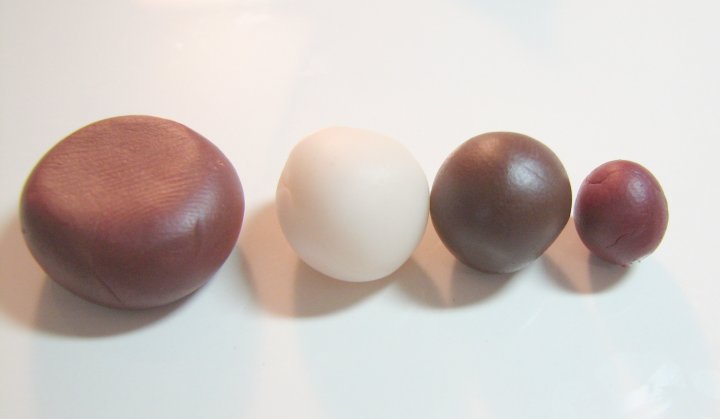
 12. To mix up the bacon meat color, youll need about equal parts of burnt umber and translucent + about half as much alizarin crimson as shown. So the ratio is about 1:1 burnt umber (dark brown)/translucent, then 2:1 burnt umber+translucent to crimson. If you don't have alizarin it's not a big deal, you can use any dark red or even a more reddish red, just add the red color slowly to get the color you're looking for. You can refer to 'real' bacon for a reference.
Enlarge picture showing blends of clay for the bacon fat
 13. Next, you will make a layered cane. To start flatten out a piece of the fat color, about as long as the first joint on your finger, (Im terrible at measuring, but about 1.25 would be fine for now, thats around .3cm).
Enlarge picture showing how to begin making the cane
 14. This is about 3/8ths of an inch or around .75cm. You dont have to be exact since were going to be reducing this.
Enlarge picture showing first clay piece of the bacon cane
 15. Now flatten out a strip of the red meat color, big enough to fit on top of the slab of fat.
Enlarge picture showing flattened meat color of the cane
 16. Like this! Notice how Im not being exceptionally neat, its not a big deal for this cane since bacon is not straight.
Enlarge picture showing the flattened bacon cane
 17. Flatten out a slightly thinner layer of fat and layer this on top of the meat color.
Again, dont worry about being too neat about it.
Enlarge picture showing insertion of fat clay into meat cane
 18. Heres where you can get a little bit creative with your layering to make your bacon look real with chunks of meat running through the fat instead of just making stripes. For this layer, I formed the meat colored clay into a sort of long tear drop shape, only about half as wide as the clay slab. The layering doesn't have to be perfect because you will be adding texture and color later.
Enlarge picture showing insertion of fat clay into meat cane
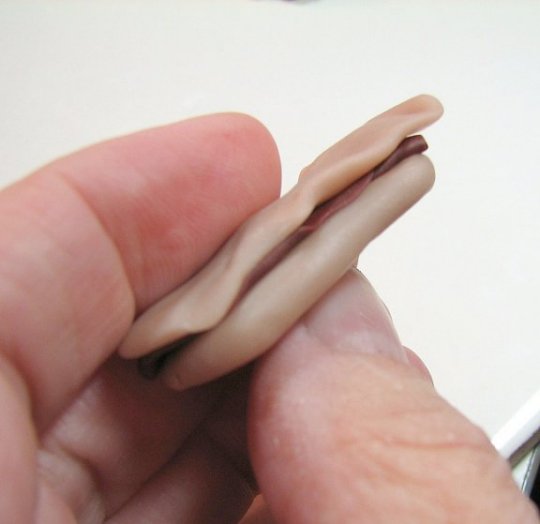
 19. Here you can see that I have added the same sized strip of fat colored clay beside meat clay. This will make up the 4th layer, half of it will be 'meat' color, and half will be 'fat' color. The 'fat' color clay should be a little bit tapered on one side so it fits over the 'meat'.
Enlarge picture showing how to layer the bacon cane
 20. Cover up the meat part with another piece of the fat colored clay. Then you can put one more thin layer of meat color clay on, as the top layer, (reference the arrow). That should be about enough. You dont want the bacon to look too stripey.
Enlarge picture showing last layer of the bacon cane
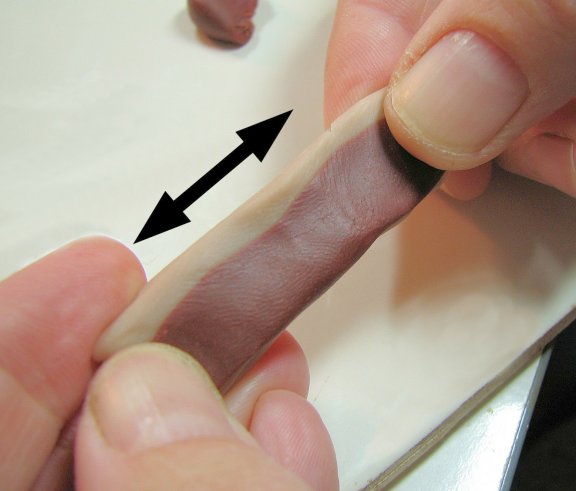
 21. This is the cane with the last piece of meat colored clay on top. I didn't cover the entire top of the cane with the brown/red clay, just about 3/4ths of it. To reduce the bacon cane - You can start reducing this right away, you dont have to let it sit and cool off (unless your clay is really mushy, then just pop it in the fridge for a few minutes). We want this cane to be long and thin so gently press the cane with your thumbs all over the length, being sure to use equal pressure all over, and gradually lengthen it by gently pulling it apart as shown. By pressing and gently pulling your clay, this will move the way you want it to. Go slowly! If you reduce it too fast it might get smaller than you want it. Also, if the cane starts looking too wide (we want to keep it around the width of your index finger) you can gently press the sides back into shape and continue to lengthen it).
Enlarge picture showing how to thin the cane
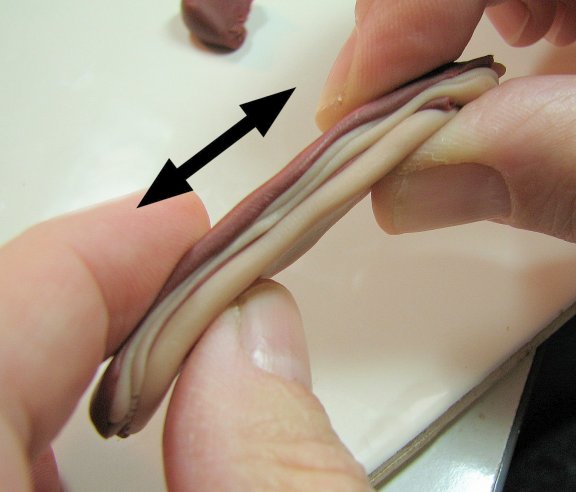
 22. Here's what it looks like from the side as you reduce the cane.
Enlarge picture showing side view of the bacon cane
 23. When its about .5 wide (around 1.7cm) and 3/16 inch (.7cm thick) youre done. Cut into the center of the cane, and it should look something like this. Dont panic if it doesnt look exactly the same. Even a remote approximation is going to work out just fine!!
Enlarge picture showing size of bacon cane
 24. Time to slice it up! If your clay is warm, you might want to wait on this for a few minutes. You can also put your cane in the freezer to firm it up before you cut it. You want nice thin slices. Slice up as many as you want. I always make more than I think I need because I usually wind up ripping some, and generally goofing up. Even if you get a partial slice, thats fine, we can use it!!! Try to get them as thin as you can!
Enlarge picture showing sliced cane
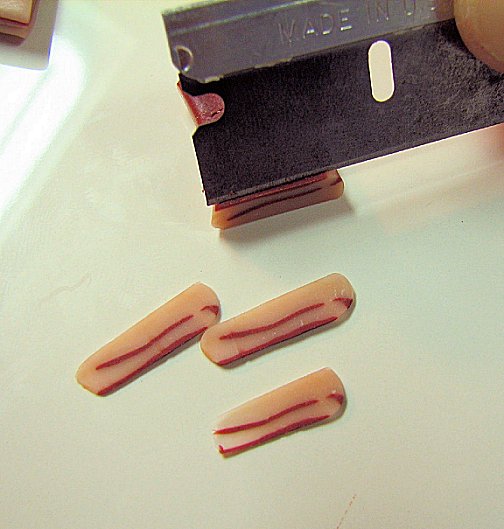
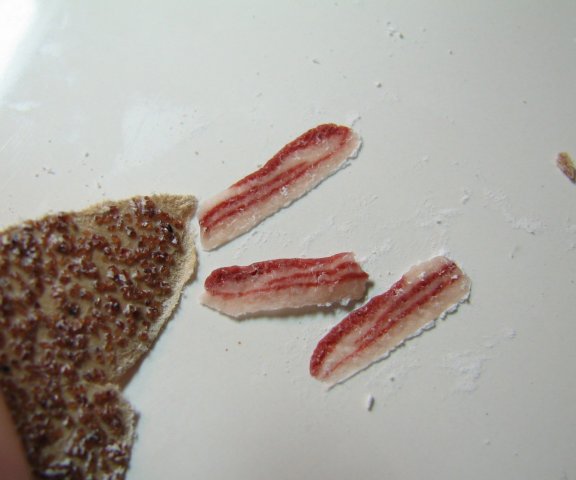
 25. This is what Im after! Youll notice that not all of my slices look the same, I sliced the bacon in this image from another part of the cane. Again, bacon slices are not always the same sizes.
Enlarge picture showing sliced bacon
 26. Press your bacon slices on to your tile to secure them, then dust them with some talc, cornstarch, or chalk so the tops are less likely to stick. We need to texture them.
Enlarge picture showing how to powder the bacon
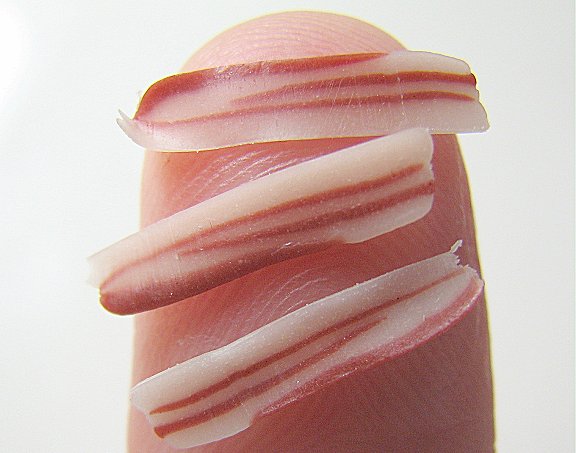
 27. Texture your bacon with sand paper, tap the pieces gently so they stick to the tile. If they come off on the sand paper you can coax them off with a pin. If they rip, dont worry about it, thats why you made extras!
Enlarge picture showing how to texture the bacon
 28. This is where they start looking more like cooked bacon! Use a small soft brush, gently color the edges with the Burnt Green Earth (or medium brown) chalk pastel. Use a light hand, dont coat the whole strip, just the edges and maybe a little bit in the center. Were going to add more color later too. The whole time youre doing this think about how a real bacon strip looks like.
Enlarge picture showing how to highlight the bacon
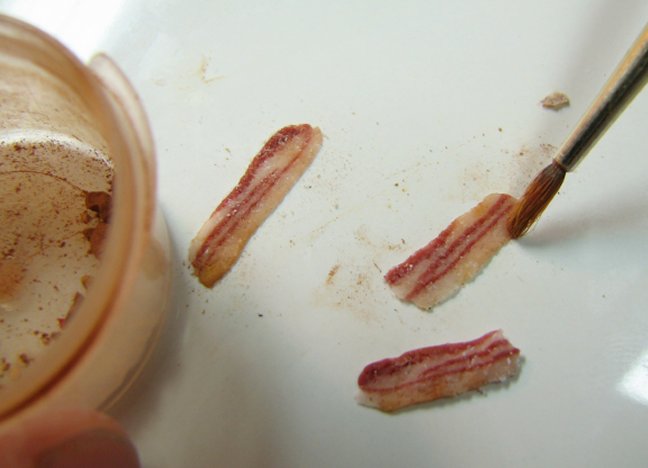
 29. After your bacon has a bit of color, grab your toothpick or pin and gently gnarl up the edges just a bit.
Enlarge picture showing how to rough the edges of the bacon
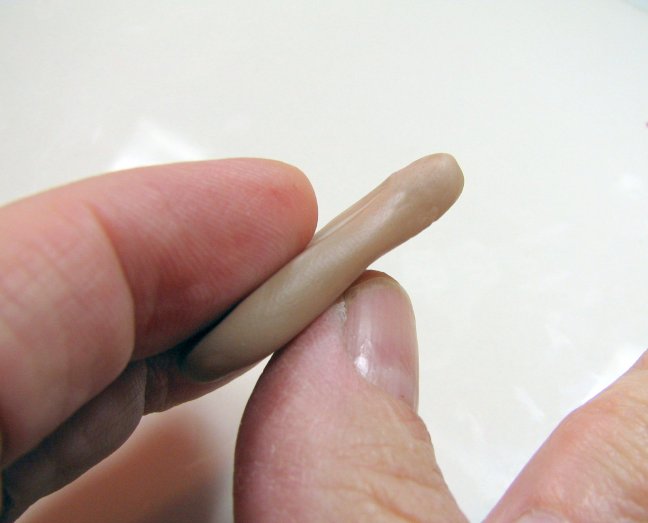
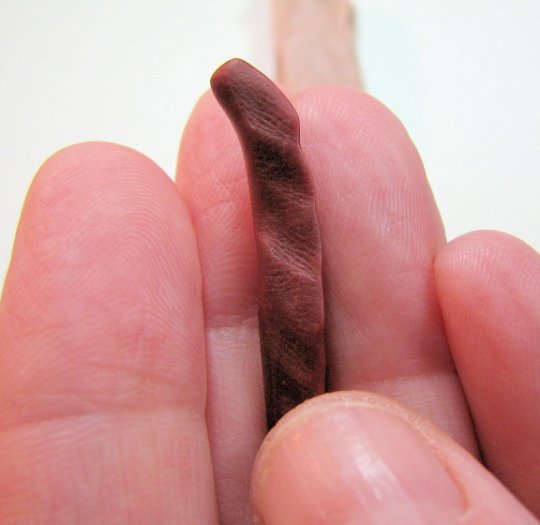
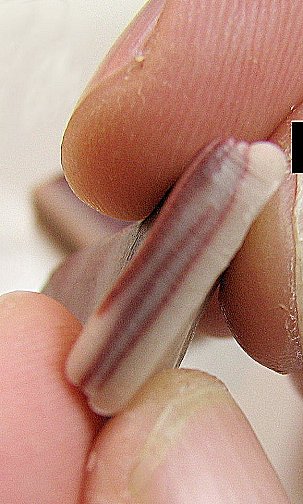
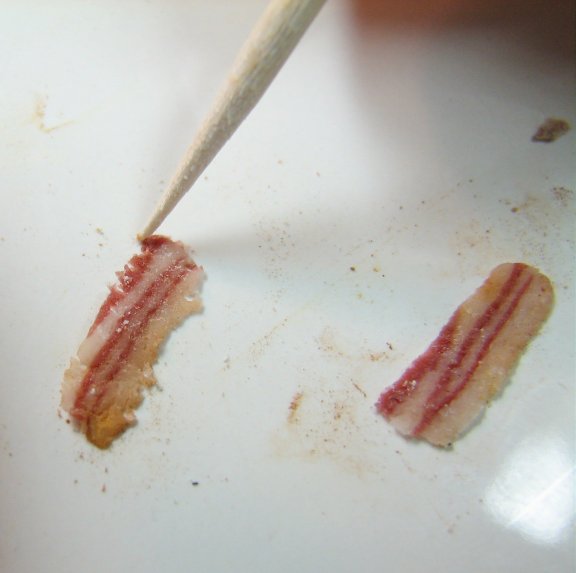
 30. When bacon cooks it shrinks, and gets bubbly on the edges, and sometimes curls up in the center. Very gently slide your blade under the bacon and very, very, carefully lift it off of the tile so we can shape it.
Enlarge picture showing how to shape the bacon
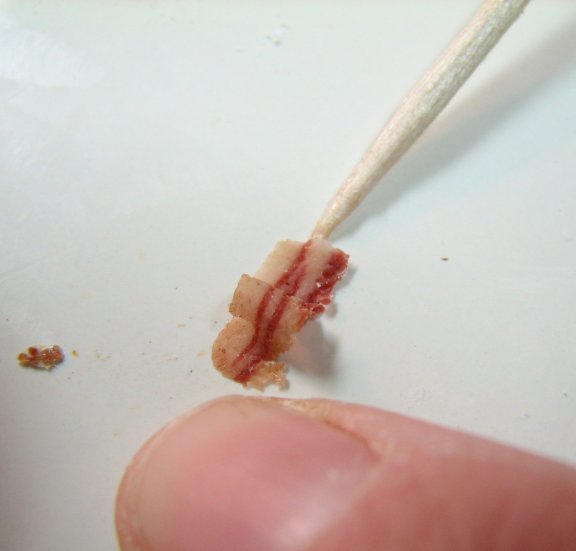
 31. Gently drape the center of the bacon slice over the thin end of a toothpick. You can bake the slice just like this the toothpick wont burn. The slice will retain its shape when cured.
Enlarge picture showing how to drape the bacon over a toothpick
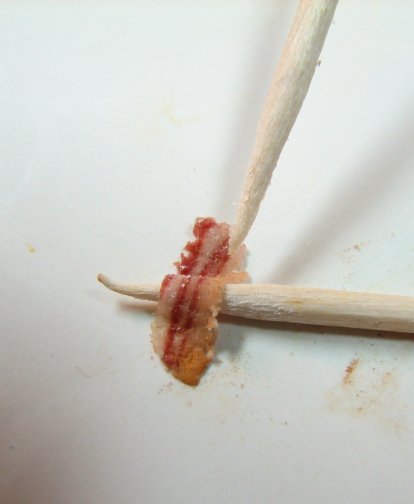
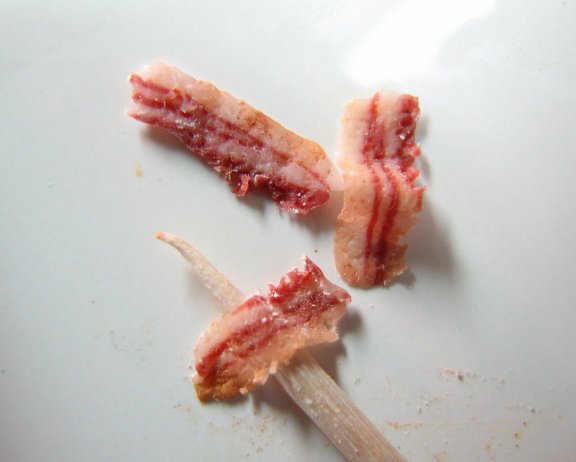
 32. I use another toothpick to help arrange the slice, or you can just do it with your fingers, as shown. This is sort of hard to do and you can leave your bacon flat on your tile, if you rather, it will still look really good that way!
Enlarge picture showing how to arrange the bacon with a toothpick
 33. You can use a variety of poses for your bacon slices. They look best this way when you put them on a plate. Theyre ready to bake now, so get your eggs out of the oven and put the bacon in. You should only have to bake the bacon for about 20 minutes because they are super thin. When you're ready, go ahead and put the bacon in the oven. Watch it closely as its baking because with all of that translucent clay, there is a chance it might discolor, if the oven temp is off.
Enlarge picture showing how to arrange the bacon for cooking
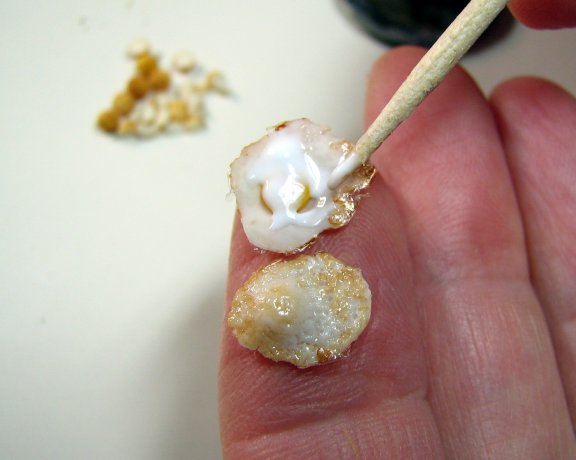
 34. Time to finish the eggs.
After your egg has been baked and has cooled, dilute the amber stained glass paint with a few drops of water. Using a thin brush, gently apply the diluted paint to the edges of your egg. Think about how a fried egg looks thin areas of the white will brown more than the others. Go lightly, and then step back to take a look. If your egg doesnt look brown enough you can always add more paint. When youve finished browning your egg, let the amber paint dry and then gently cover the surface with either clear stained glass paint or gloss varnish. I like the sheen that glass paint gives, but if you prefer varnish thats fine. Once your eggs are painted, set aside and let them dry.
Enlarge picture showing how to finish browning the eggs
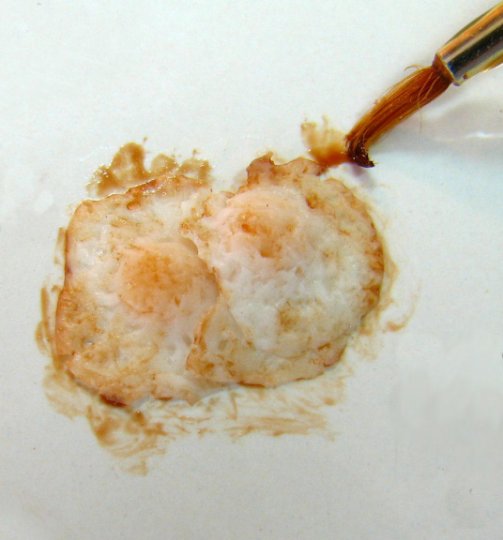
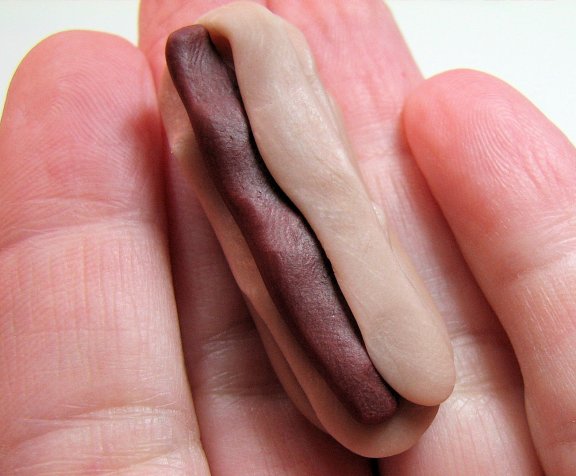
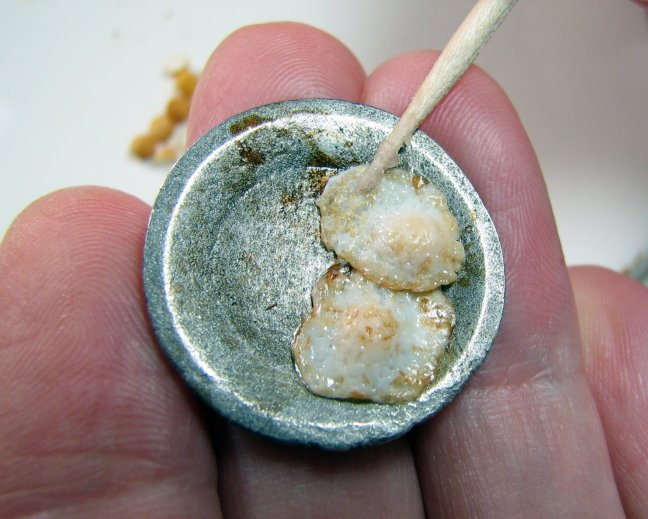
ALTERNATIVE TO BROWNED FRIED EGGS
If you absolutely hate browned eggs, just leave them white and cover them over with some clear stained glass paint or gloss varnish. Let them dry and set them aside for later. I layered two eggs on top of each other in this picture because I wanted to arrange them that way on the plate, but it's probably easiest to color each egg separately then glue them on your plate.
If you absolutely hate browned eggs, just leave them white and cover them over with some clear stained glass paint or gloss varnish. Let them dry and set them aside for later. I layered two eggs on top of each other in this picture because I wanted to arrange them that way on the plate, but it's probably easiest to color each egg separately then glue them on your plate.
 35. Next, move onto the potatoes. Wash your hands again because you will be working with white clay. Mix clay in these proportions. You want the potatoes to be slightly translucent and creamy in color. The best way to do this is to mix the translucent and white first, then bit by bit add the yellow until it looks like cream.
Enlarge picture showing how clay portions to make the potatoes
 36. This is the color difference that youre looking for. Stark white is on the left, and potato cream is on the right.
Enlarge picture showing clay colors for the potatoes
 37. Take a bit of the clay and roll it into a snake shape, until it is about 1/8th of an inch (3cm). Using your blade cut about 1/8 inch chunks from the snake. Roll each chunk into balls. You can make your potatoes a little larger or smaller to emulate real potatoes.
Enlarge picture showing snake shape and size to cut
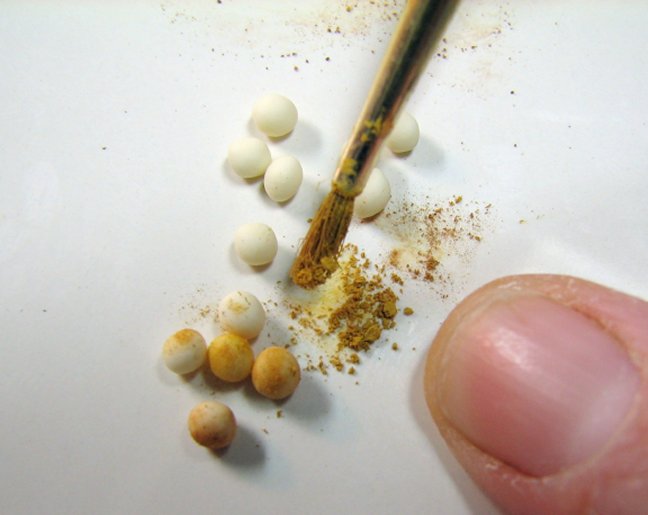
 38. Mix your yellow ochre (or golden yellow) chalk with a little bit of medium brown and using your soft brush, generously coat your potatoes.
Enlarge picture showing how to use the chalks
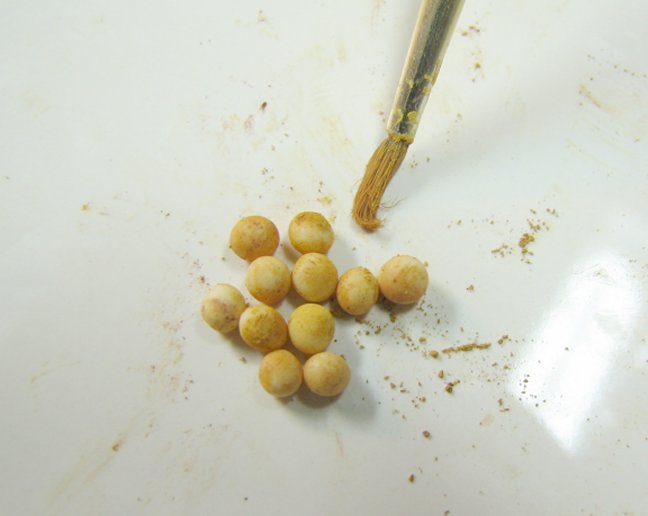
 39. This is about how you want the potatoes to look. Now its time to bake the potatoes according to your clays directions. Again, about 20-25 minutes should be enough.
Enlarge picture showing prepared potatoes
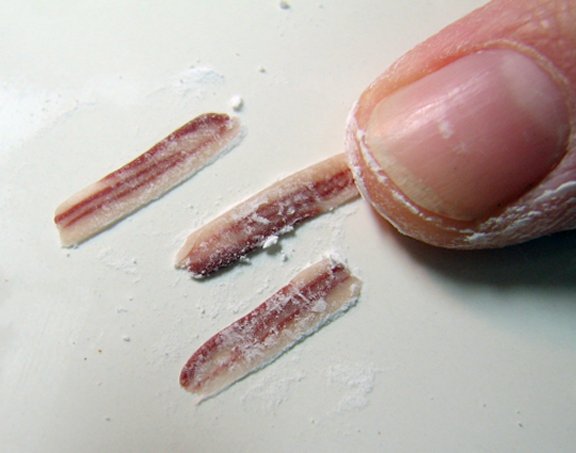
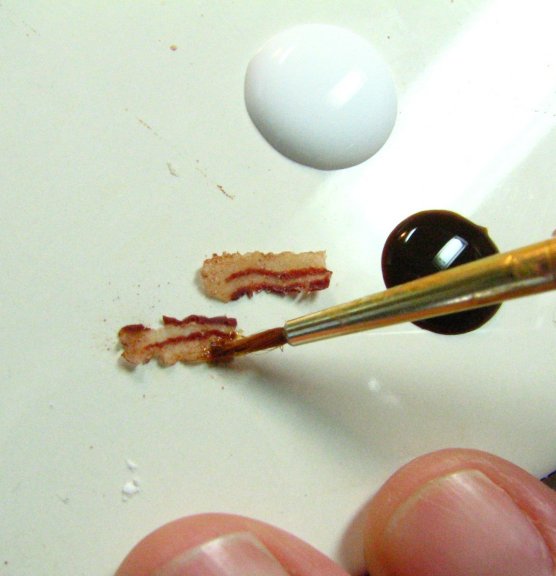
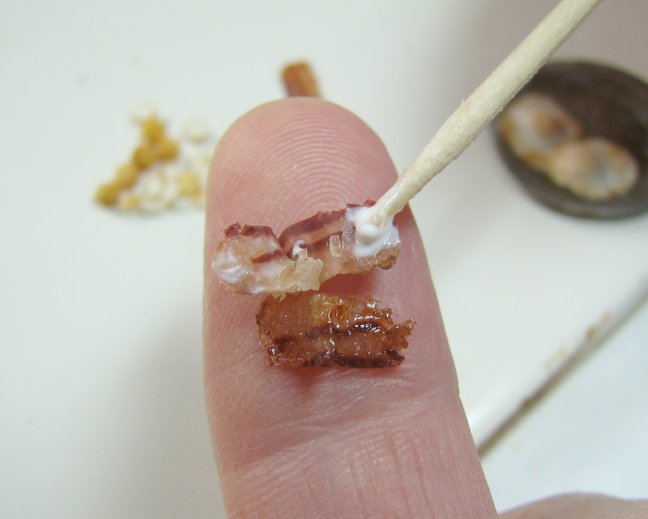
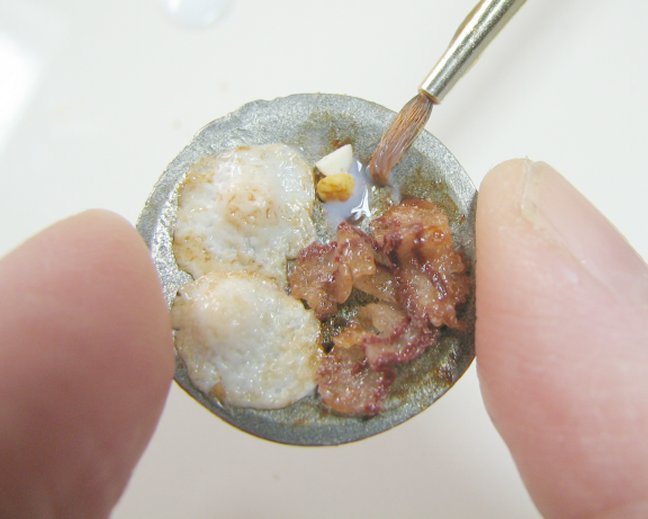
 40. After baking the bacon strips its time to color them so that they look crispy! Dilute some amber stained glass paint in a small bit of water and cover just the ends and sides of the bacon, where it would get browner in the skillet or broiler.
Enlarge picture showing how to apply hightlights to the bacon
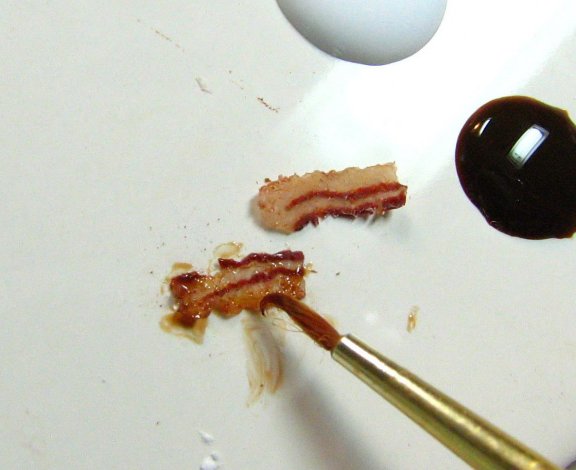
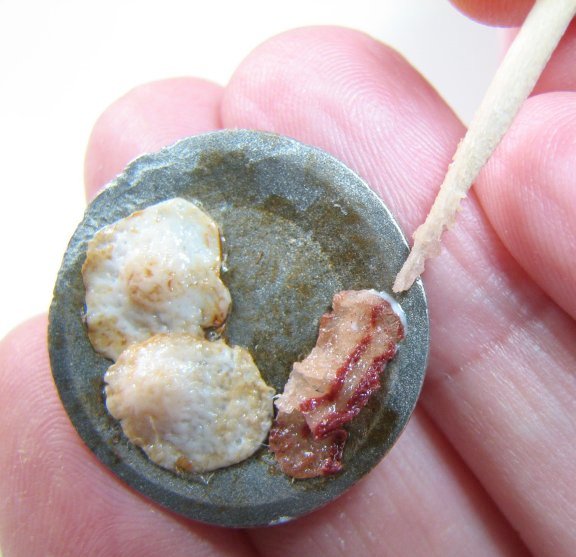
 41. Here is how I have applied the amber stained glass paint to the ends and sides of the bacon. Let the amber paint dry.
Enlarge picture showing a different view of how to use the stained glass paints
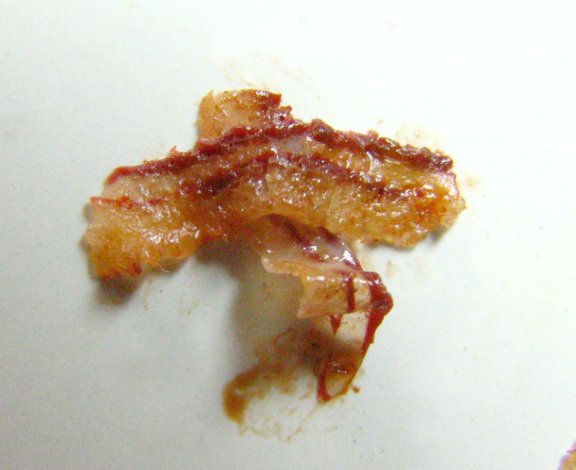
 42. When the paint is dry, cover the entire bacon slices with clear stained glass paint for that greasy look. Set aside and let dry.
Enlarge picture showing bacon after the clear paint has been applied
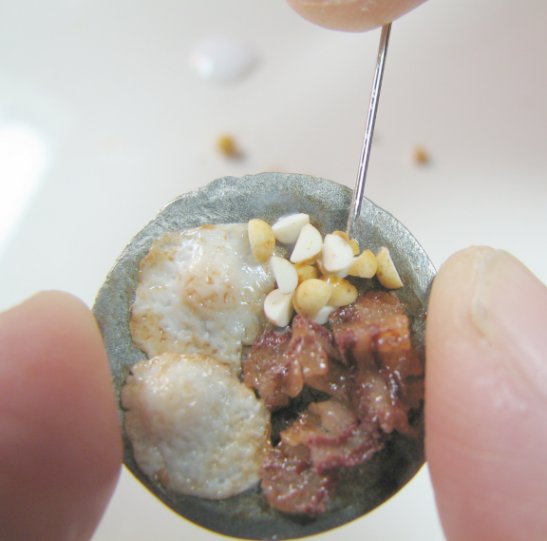
 43. Ok back to the potatoes! When your potatoes are done, take them out of the oven and let them cool just a bit. Cut the potatoes into wedges with your blade. They are easier to cut if they are a bit warm from the oven. When youre done, just set them aside.
Enlarge picture showing how to slice the potatoes
 44. Now its time to arrange the plate! I decided to use a cast iron plate for this tutorial, but any plate will do. If you want your plate to look a little greasy, Ive found that amber stained glass paint is perfect! Just brush some on!! This is good for greasy grills, and skillets too.
Enlarge picture showing options to prepare the plate
 45. Take your eggs and put some white glue on the back of your eggs.
Enlarge picture showing where to put the glue
 46. Arrange your eggs, using your toothpick to overlap just a bit. If the glue squeezes out from underneath, just scrape it off with your toothpick. Its best if no glue shows.
Enlarge picture showing how to arrange the eggs
 47. Take your bacon and put some white glue on the back of your eggs using the toothpick.
Enlarge picture showing where to put the glue
 48. Again, if glue squeezes out from underneath, just remove it with a toothpick or a pin. Put several bacon slices on the plate, and try to jumble them up I like plates to look messy, like Mom just slapped the bacon on the plate!
Enlarge picture showing arrangement of bacons
 49. Take some of your gloss varnish and put a drop on your plate. Start adding the potatoes bit by bit, and mix them up with a pin or toothpick to coat them with the varnish.
Enlarge picture showing how to add the potatoes
 50. Before the varnish dries, arrange the potatoes so you see some cut surfaces, and some skin. When they varnish dries, the potatoes will be stuck to the plate.
Enlarge picture showing how to arrange potatoes
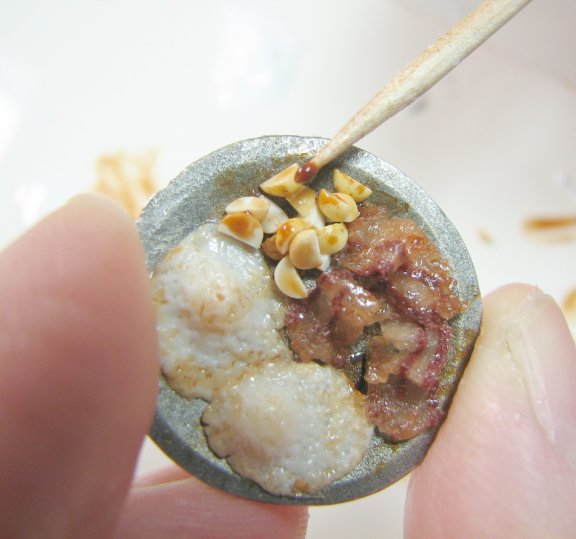
 51. Put a drop of amber stained glass paint on your work tile and using your toothpick, put some paint on the edges of the potatoes. Just a little bit you want them to look like parts were over browned in the skillet.
Enlarge picture showing where to use the paint on the potatoes
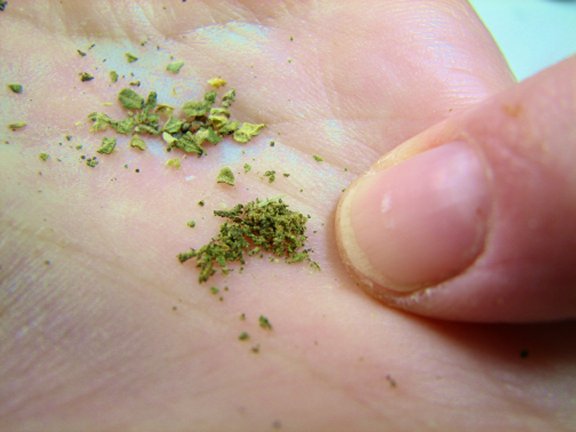
 52. If you prefer not to use greenery in your miniatures you can skip this step. I like to add just a touch of color on the potatoes since everything is rather brown in this dish. Take a small bit of oregano (or whatever dried greenery or herb that you like) and grind them in the palm of your hand. While the varnish or stained glass paint is still wet, sprinkle a small amount of oregano on top of your potatoes. When the varnish is dry you can cover the herbs with another coat of gloss varnish to seal them. If you prefer, you can use chopped leaf green clay for the garnish if you dont want to use real herbs.
Enlarge picture showing herb additive
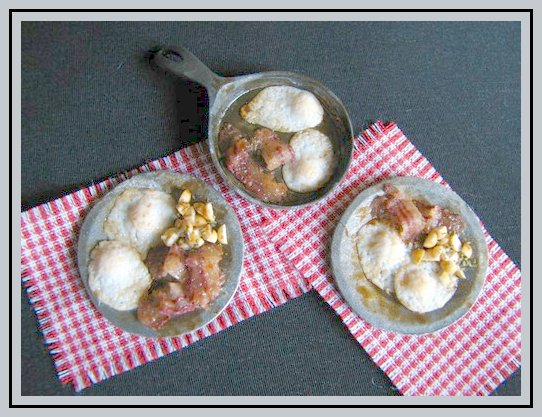
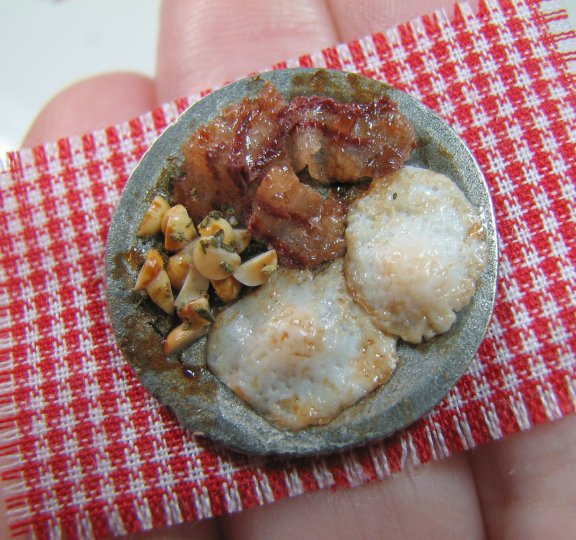
 53. That's it!! You have now made a complete breakfast plate for your dollhouse.
Enlarge picture showing completed breakfast plate
ABOUT THE ARTIST
 Betsy Niederer has been making miniatures for five years, after discovering that she could make miniature food for her children's Barbie® kitchen. She is an IGMA member since 2003, an IGMA Fellow (Food category), and since 2006 a Guild school instructor.
Betsy is a valued member of CDHM and Moderator in the CDHM Forum, Food Board.
Betsy's CDHM Gallery can be visited, just by clicking here.
© 2007-2012 Betsy Niederer and CDHM.org
Reproduced with permission from Betsy Niederer. All photographs and text appearing in this tutorial are the exclusive property of Betsy Niederer. Permission is explicitly denied for any republication of text or photographs in this article without the prior express written consent of the author.